
Your Pack and Profile: Difference between revisions
From Grouse House Wiki
(Quick Page Creation) |
No edit summary |
||
| (40 intermediate revisions by the same user not shown) | |||
| Line 1: | Line 1: | ||
{{ComingSoon}} | {{ComingSoon}} | ||
Work in Progress! | |||
{| class="mw-collapsible mobiletoc" | |||
! Table of Contents | |||
|- | |||
| class="disclaimer | ''Links not working? Sections must be expanded to jump to a subheader within them!'' | |||
|- | |||
| class="mtocl1" | [[Your Pack and Profile#Pack Setup|Pack Setup]] | |||
|- | |||
| class="mtocl2" | [[Your Pack and Profile#Pack Name|Pack Name]] | |||
|- | |||
| class="mtocl2" | [[Your Pack and Profile#Pack Biome Location|Pack Biome Location]] | |||
|- | |||
| class="mtocl2" | [[Your Pack and Profile#Moving Your Pack|Moving Your Pack]] | |||
|- | |||
| class="mtocl1" | [[Your Pack and Profile#Den Page|Den Page]] | |||
|- | |||
| class="mtocl2" | [[Your Pack and Profile#Lead and Featured Wolves|Lead and Featured Wolves]] | |||
|- | |||
| class="mtocl2" | [[Your Pack and Profile#Caves|Caves]] | |||
|- | |||
| class="mtocl2" | [[Your Pack and Profile#Territory Slots|Territory Slots]] | |||
|- | |||
| class="mtocl2" | [[Your Pack and Profile#Immortal Slots|Immortal Slots]] | |||
|- | |||
| class="mtocl2" | [[Your Pack and Profile#Pack Overview|Pack Overview]] | |||
|- | |||
| class="mtocl2" | [[Your Pack and Profile#Pack Dynasty|Pack Dynasty]] | |||
|- | |||
| class="mtocl1" | [[Your Pack and Profile#Den Customization|Den Customization]] | |||
|- | |||
| class="mtocl2" | [[Your Pack and Profile#Cave Display|Cave Display]] | |||
|- | |||
| class="mtocl2" | [[Your Pack and Profile#Den Notices|Den Notices]] | |||
|- | |||
| class="mtocl2" | [[Your Pack and Profile#HTML and CSS|HTML and CSS]] | |||
|- | |||
| class="mtocl1" | [[Your Pack and Profile#Profile Page|Profile Page]] | |||
|- | |||
| class="mtocl2" | [[Your Pack and Profile#Your Information|Your Information]] | |||
|- | |||
| class="mtocl2" | [[Your Pack and Profile#Friends and Groups|Friends and Groups]] | |||
|- | |||
| class="mtocl2" | [[Your Pack and Profile#Achievements|Achievements]] | |||
|- | |||
| class="mtocl2" | [[Your Pack and Profile#Wishlist|Wishlist]] | |||
|- | |||
| class="mtocl2" | [[Your Pack and Profile#Profile Settings|Profile Settings]] | |||
|- | |||
| class="mtocl2" | [[Your Pack and Profile#Other Players' Profiles|Other Players' Profiles]] | |||
|} | |||
{{SectionToggles}} | |||
<h2 class="c-header active">Pack Setup</h2> | |||
<div class="c-content" style="display: block;"> | |||
=== Pack Setup === | |||
Your pack is where all of your wolves call home. It's totally up to you how you want to represent it! | |||
<h3 class="c-header active">Pack Name</h3> | |||
<div class="c-content" style="display: block;"> | |||
=== Pack Name === | |||
Your pack name is chosen during the opening sequence of the game. | |||
<center>[[File:ChoosePackName.png|800px]]</center> | |||
It can be whatever you'd like, and doesn't even have to have the word "pack" in it! However, pack names must be completely unique. '''Two players cannot have the same pack names as each other.''' Additionally, pack names cannot be longer than 25 characters. | |||
If you decide that you need something need, don't worry! '''You can change your pack name at any time in the Grove, for a small cost of 1 [[File:icon-gc.png]] GC!''' | |||
While you can use plain text for your pack name, many players also choose to use [https://www.w3schools.com/charsets/ref_html_utf8.asp UTF-8 symbols]. While these symbols do work on most player's devices, we generally recommend that you do not use them for the following reasons: | |||
* They often take up more than one character, limiting how many you can use in a name. | |||
* They do not work for all players. Many players may end up seeing your name as just blank squares, rather than the letters you intended. | |||
* They are very inaccessible to players using screen-readers, as the screen-reader will read the character's full name (e.g. Mathematical Sans-Serif Script T) rather than combining it with the other characters to form a word. | |||
Where possible, we strongly encourage you use plain text in your pack name, rather than Unicode symbols. | |||
</div> | |||
<h3 class="c-header active">Pack Biome Location</h3> | |||
<div class="c-content" style="display: block;"> | |||
=== Pack Biome Location === | |||
Also chosen during the opening sequence of the game is your pack's biome! | |||
<center>[[File:ChooseBiome.jpg|800px]]</center> | |||
Your pack's biome affects many aspects of the game. However, between the first three starting biomes, the biggest differences will be aesthetic! When choosing your first biome between Grasslands, Deciduous Forest, and Mountains, we recommend going with what sounds the best to you, and not worrying about which is best for gameplay. | |||
Later on, as you're discovered more biomes, you'll see further the differences they present when moved to. Below is a list of everything that is affected by your pack's home biome. | |||
* [[Raccoon Wares|Raccoon Wares]] stock: each biome has exclusive decorations and backgrounds. | |||
* [[Hunting|Hunting difficulty]]: More difficult biomes are much harder to hunt in and require higher-stat wolves to succeed. You can hunt in any biome you have fully discovered, however it will take longer to hunt in biomes further from your home! | |||
* [[Herbalism|Foraging times]]: Each biome has a collection of herbs that can be gathered by foraging there. You can forage in any biome you have fully discovered, however it will take longer to forage in biomes further from your home! | |||
* [[Fishing|Fishing possibilities]]: Each biome has a collection of fish which can only be found in that biome. | |||
* [[Seasons, Time, and Weather|Weather patterns]]: Some biomes have weather patterns not available in other biomes. For example, in can snow during the Summer in the Mountains, but not in the Desert. | |||
* Site-wide visuals: Moving biomes changes visuals across the whole site - including the raccoon in the shop and fishing backgrounds! | |||
</div> | |||
<h3 class="c-header active">Moving Your Pack</h3> | |||
<div class="c-content" style="display: block;"> | |||
=== Moving Your Pack === | |||
Regret your choice of biome, or just want a change of pace? | |||
After you've fully discovered the three starting biomes (Deciduous Forest, Grasslands, and Mountains), you will unlock the ability to move your pack to a different biome. There are many things that moving your pack will change, which you can learn about on the [[Biomes]] page. | |||
Moving your territory is accessible through the [[Questing|Questing page]]. You can only move your pack to a biome that you've completely discovered (it will be explorable by your lead wolf). Upon requesting to move territory, the questing snake will give a quest to slay a certain number of wolves in that specific biome before he will help you move your territory. | |||
<center>[[File:moveyourpack.png|500px]]</center> | |||
The amount of wolves that must be slain can be calculated by dividing your total adult wolf count by four, rounding up, and adding two to that amount. Your adult wolf count is the number outlined in the image below. | |||
<center>[[File:AdultWolfCount.png|500px]]</center> | |||
In formula, this could be written as: | |||
<center>[AdultWolves/4] + 2 = WolvesToBeSlain</center> | |||
For example, if I have 37 adult wolves, I can divide and round up this number to get 10, then add 2 to get 12. I would need to defeat 12 wolves in order to move a pack with 37 adult wolves. | |||
Territory moving quests can be completed automatically with Golden Cones at a rate of 1 [[File:icon-gc.png]] GC per wolf that needs to be slain. '''You can take the biome-moving quest as many times as you would like, even multiple times in one day.''' If you do not complete the quest within 5 days, it will expire and you must restart it if you still want to move. | |||
</div> | |||
</div> | |||
<h2 class="c-header active">Den Page</h2> | |||
<div class="c-content" style="display: block;"> | |||
=== Den Page === | |||
Your [https://www.wolvden.com/den/ Den page] is your home base! This is where all of your wolves are stored, and where you can interact with and find out more information about them. | |||
<h3 class="c-header active">Lead and Featured Wolves</h3> | |||
<div class="c-content" style="display: block;"> | |||
=== Lead and Featured Wolves === | |||
At the top of the page, you'll notice your lead wolf panel. | |||
<center>[[File:LeadWolfPanel.png|800px]]</center> | |||
Here, you'll be able to see your lead wolf and featured wolf at a quick glance, as well as information about your pack. To change the titles in front of these two wolves' names, scroll down to the bottom of your Den page! | |||
You can also choose to Remove your featured wolf here if you'd like. Your featured wolf can be any wolf in your pack. You can set a featured wolf on the settings tab of a pack member's page. | |||
Your '''Territory Biome''' is the biome your pack is currently located in. | |||
'''Cave Slots''' refers to how many caves you have created. The maximum is always ten, and there's not currently a way to get any more caves than ten. | |||
'''Pack Adults''' and '''Pack Pups''' keep track of how many wolves are currently in your pack. '''Note that your lead wolf is not included in the Pack Adults count.''' The amount of pups that you can have is always 5x the amount of adults you can have. | |||
The maximum amount of Pack Adult slots you can have is 200, with 5000 Pack Pup slots. | |||
Finally, '''Immortal Slots''' refers to how many immortal wolves you have. Immortal slots can be purchased with [[File:icon-gc.png]] GC and you can use Jellyfish to fill those slots with immortal wolves. The maximum amount of immortal wolf slots you can have is 20. | |||
</div> | |||
<h3 class="c-header active">Caves</h3> | |||
<div class="c-content" style="display: block;"> | |||
=== Caves === | |||
On your Den page, all of your wolves can be organized into Caves. | |||
You unlock the ability to build caves after completing the '''Not Just for Bears''' quest on the [https://www.wolvden.com/questing Questing page]. | |||
After you've completed the quest, scroll down to the bottom of your Den page to find the cave-building panel. | |||
<center>[[File:BuildANewCave.png|800px]]</center> | |||
Building a cave requires three materials: Large Branches, Large Leafs, and Large Rocks. These materials can be found while [https://www.wolvden.com/explore Exploring]. Feel free to use our [[Explore Encounters | Explore Encounter reference]] to keep an eye out for encounters which have a chance of dropping them! | |||
The amount of materials required increases with how many caves you have. The first cave you build requires no materials as it is a part of the tutorial. Each subsequent cave adds 5 of each material. | |||
Below is a list of the required materials for each cave. In order to build all ten caves, you will need 225 of each material. | |||
<h4 class="c-header active">Required materials for each cave</h4> | |||
<div class="c-content" style="display: blank;"> | |||
'''Cave 1:''' 0 Large Branches, 0 Large Leaves, and 0 Large Rocks (built during the tutorial) | |||
'''Cave 2:''' 5 Large Branches, 5 Large Leaves, and 5 Large Rocks | |||
'''Cave 3:''' 10 Large Branches, 10 Large Leaves, and 10 Large Rocks | |||
'''Cave 4:''' 15 Large Branches, 15 Large Leaves, and 15 Large Rocks | |||
'''Cave 5:''' 20 Large Branches, 20 Large Leaves, and 20 Large Rocks | |||
'''Cave 6:''' 25 Large Branches, 25 Large Leaves, and 25 Large Rocks | |||
'''Cave 7:''' 30 Large Branches, 30 Large Leaves, and 30 Large Rocks | |||
'''Cave 8:''' 35 Large Branches, 35 Large Leaves, and 35 Large Rocks | |||
'''Cave 9:''' 40 Large Branches, 40 Large Leaves, and 40 Large Rocks | |||
'''Cave 10:''' 45 Large Branches, 45 Large Leaves, and 45 Large Rocks | |||
</div> | |||
If you want to destroy a cave you no longer use, you can do so on the cave's page. Click on the name of the cave button in the cave's panel. | |||
<center>[[File:CaveName.png|800px]]</center> | |||
Then, click Destroy Cave at the bottom of the page | |||
<center>[[File:DestroyCaveButton.png|400px]]</center> | |||
'''Destroying a cave does not give you your materials back.''' You do not get any benefit from destroying a cave. | |||
If the cave has wolves in it when you destroy it, they will be moved to your Unsorted section. | |||
<h4 class="c-header active">Unsorted</h4> | |||
<div class="c-content" style="display: block;"> | |||
When wolves first enter your pack, they are placed into your Unsorted section by default. | |||
"Unsorted" is not a cave, just a holding place. Wolves can only be moved out of the Unsorted section, not back into it. | |||
If you do not have any unsorted wolves, the Unsorted section will not be visible on your Den page. | |||
Unsorted section. | |||
</div> | |||
<h4 class="c-header active">Quarantine Caves</h4> | |||
<div class="c-content" style="display: block;"> | |||
Through playing, you may notice some players referring to certain caves as "Quarantine Caves". This term relates to the passing of illnesses between wolves in caves. | |||
'''A wolf in one cave cannot pass their contagious illness onto a wolf in a different cave.''' Because of this, many players create a designated Quarantine Cave to temporarily place their ill wolves into so that they will not spread their illness to other wolves if the player does not have time to cure them before rollover. | |||
Unsorted wolves are not quarantined, since they are not technically in a cave. If a wolf in your Unsorted section has a contagious illness, they will be able to pass their illness to any other wolf in your pack. This is one of the reasons that keeping wolves unsorted is not recommended. | |||
</div> | |||
<h4 class="c-header active">Cave Sorting</h4> | |||
<div class="c-content" style="display: block;"> | |||
There are many method that you can use to keep your caves and your wolves organized! | |||
Within each cave, you can decide how the wolves will be sorted. Using the dropdown in each cave panel, you could sort the wolves by name, level, age, stats, footnote, or role. | |||
Your caves themselves are sorted alphabetically by default within your Den. Caves which come first alphabetically will appear higher up on your page. However, there are some ways to get around this order. | |||
Many players chose to put numerals in front of their cave names to place them in the order they choose. If you don't want to put a number in front of your cave name, you can manually sort your caves on any cave's page using the '''Sort Cave Order''' settings just above the Delete Cave button. | |||
<center>[[File:Sort Cave Order.png|800px]]</center> | |||
Caves in your den are sorted alphabetically ascending (a, b, c...). Here you can provide a custom order using numbers. They will be sorted in ascending order (1, 2, 3...). Caves with the same number value will be sorted alphabetically. You can hit the "Reset" button to revert everything back to 0, which will then default back to automatic sorting by alphabet. | |||
</div> | |||
</div> | |||
<h3 class="c-header active">Territory Slots</h3> | |||
<div class="c-content" style="display: block;"> | |||
=== Territory Slots === | |||
In order to add more wolves to your pack, you will need to upgrade your Territory Slots. | |||
You can view how many territory slots you currently have next to Pack Adults at the top of your Den page. | |||
<center>[[File:TerritorySlots.png|600px]]</center> | |||
'''In order to get more territory slots, you will need to purchase them with [[File:icon-sc.png]] SC or [[File:icon-gc.png]] GC.''' This can be done at the bottom of your Den page. | |||
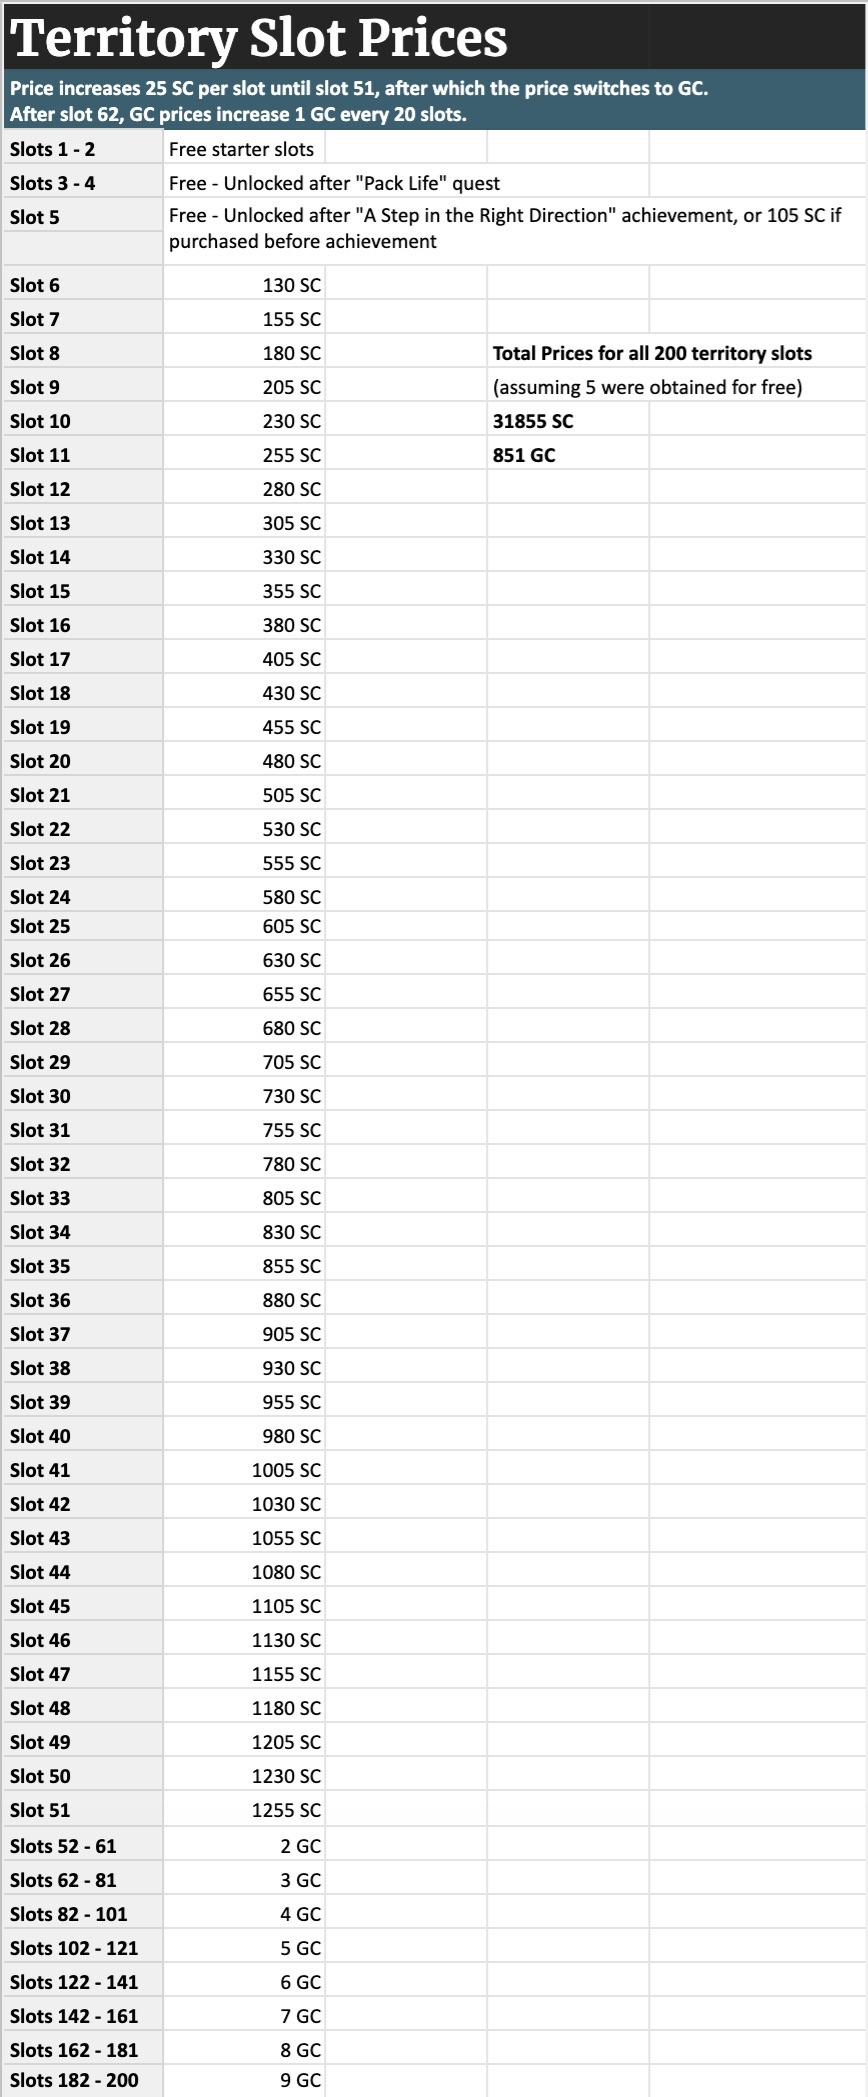
The cost of each territory slot increases every time you buy one. You will get up to 5 slots for free from completing tutorial quests. After this, the sixth slot costs 130 [[File:icon-sc.png]] SC, and each subsequent slot costs 25 [[File:icon-sc.png]] SC more. | |||
At Slot 52, the currency required to upgrade switches to [[File:icon-gc.png]] GC. There is not a way to obtain slots 1 - 51 with [[File:icon-gc.png]] GC, just as there's not a way to obtain slots 52 - 200 with [[File:icon-sc.png]] SC. | |||
There are also 2 Lead Talents which increase your territory by 10 slots each. These slots do not increase the cost of slots that you buy after obtaining them. For example, if you have 35 territory, and pick up both of these talents, your next territory slot will still cost [[File:icon-sc.png]] SC, and be the same as the 36th territory slot, despite being your 56th. | |||
The table below lists the prices for every territory slot as well as how much currency is required to purchase all 200. You can also view the table [https://grousehouse.wiki/images/d/d9/TerritoryPriceChart.png here]. | |||
<h4 class="c-header active">Territory Price Chart</h4> | |||
<div class="c-content" style="display: blank;"> | |||
<center>[[File:TerritoryPriceChart.png|500px]]</center> | |||
</div> | |||
<h4 class="c-header active">Additional Benefits of Buying Territory Slots</h4> | |||
<div class="c-content" style="display: block;"> | |||
Besides just being able to house more wolves, upgrading your territory slots also unlocks a few other abilities! | |||
The more territory slots you have, the more pups you will be able to give to the Enclave each day. The amount of pups you can leave is equal to 1/4 your territory size, rounded up. So, if you have 150 territory slots, you will be able to leave 38 pups at the Enclave each day. | |||
Territory size is also what affects how many pair bond breedings you will be able to make each month. If you have less than 10 territory, you will only be able to breed your pairbonds twice a month. At 10 slots, you will unlock an additional breeding. Then, every 10 slots, you'll get one more breeding, for a total of 22 breedings once you have 200 territory slots, or 24 breedings if you have the talents that each give you +10 slots, for a total of 220 territory slots. | |||
Finally, having more territory slots will allow you to send out more hunting parties at one time. At 25 slots, you will be able to send out 2 hunting parties at the same time, with 3 hunting simultaneous hunting parties unlocking at 50 slots and 4 unlocking at 75 slots. | |||
</div> | |||
</div> | |||
<h3 class="c-header active">Immortal Slots</h3> | |||
<div class="c-content" style="display: block;"> | |||
=== Immortal Slots === | |||
In addition to normal territory slots, you may also choose to purchase Immortal Slots. | |||
<center>[[File:ImmortalWolves.png|400px]]</center> | |||
You can purchase Immortal Wolf slots at the bottom of your Den page. These slots always cost [[File:icon-gc.png]] GC and become more expensive the more slots you buy. These slots allow you to store an immortal wolf in your pack. However, in order to immortalize a wolf, you also need to buy a Jellyfish for 10 GC from the [https://www.wolvden.com/grove Grove]. | |||
The price for an immortal slot increases by 10 GC each time you buy one. The first slot costs 10 [[File:icon-gc.png]] GC, the fifth slot costs 60 [[File:icon-gc.png]] GC, and so on. | |||
'''The maximum amount of Immortal Slots (and therefore immortal wolves) you can have is 20.''' | |||
<table style="100%; background-color: #f0f0f0;"><tr><td style="width: 5%;"></td><td style="width: 75%;"><br>'''I have an immortal slot and a jellyfish, why can't I immortalize this wolf?''' | |||
If a wolf is not showing up in the dropdown list, it could be for a variety of reasons. Pups must not be protected by a pupsitter, can't be in a trade or gift, and can't be currently training. Lead wolves cannot be immortalized outside of their retirement page and adult wolves cannot be immortalized if they gave birth recently or if they currently have a role. Wolves also cannot be in pair bonds if they are to be immortalized. If they still aren't showing up after this, make a [https://www.wolvden.com/chatter/46 Help] board post to see if anyone else has any ideas, or create a [https://www.wolvden.com/bugbox Bugbox report]. | |||
</td><td style="width: 20%;"><center>[[File:GrouseTip_right.png|150px]]</center></td></tr></table> | |||
</div> | |||
In addition to your general Den page, there are a couple pages you can use to view wolves and your pack at a glance! | |||
These pages are both accessible from your Den page, by click on the corresponding button underneath your lead wolf panel. | |||
<center>[[File:PackNavigationImages.png|800px]]</center> | |||
<h3 class="c-header active">Pack Overview</h3> | |||
<div class="c-content" style="display: block;"> | |||
=== Pack Overview === | |||
Your [https://www.wolvden.com/pack-overview Pack Overview] is where you can view your entire pack at a glance. | |||
<center>[[File:PackOverview.png|300px]]</center> | |||
The page shows your unsorted wolves at the top, and then is sorted by your cave sorting settings. Within each cave, you can sort your wolves by their individual information! | |||
This page is great for quickly checking if you have any more hungry wolves, or if any of your wolves are close to leveling up. Through the Role column, you can also quickly see which of your wolves don't have roles. | |||
This is also where you find the [https://www.wolvden.com/pack-manage Manage Pack] page, where you can quickly mass chase and assign roles to wolves in any given cave. '''Note that you can currently only manage one cave at a time. If you select wolves from multiple caves, it will only adjust those in the cave you click the "Chase Checked" or "Update Roles" buttons for.''' | |||
</div> | |||
<h3 class="c-header active">Pack Dynasty</h3> | |||
<div class="c-content" style="display: block;"> | |||
=== Pack Dynasty === | |||
Once a wolf has died or been retired, they will be moved to your [https://www.wolvden.com/dynasty/ Dynasty]. This is where you can store records of your previous wolves. | |||
<center>[[File:DynastyImage.png|300px]]</center> | |||
Immediately after a wolf dies, their records will appear in the "Unsorted" section of your dynasty. If they were a lead wolf, they will be in the Former Leaders tab, while every other wolf will be in the Pack Members tab. Wolves will keep all of their decor when they move to your dynasty, and you must remove it manually if you want to reuse it. | |||
If you have enough dynasty slots, you can press the green plus button next to the record to store it permanently. '''If you do not store the record, it will be permanently deleted after 6 rollovers.''' There is not a way to restore a record which has expired. | |||
<center>[[File:UnsortedDynasty.png|600px]]</center> | |||
You can view your total dynasty slots in the top right of the page. If you do not have enough dynasty slots to store a record, you must spend [[File:icon-gc.png]] GC to purchase more. '''The maximum dynasty slots you can have is 400.''' | |||
<center>[[File:PurchaseDynastySlots.png|300px]]</center> | |||
Wolves in your dynasty can be decorated and their names and biographies edited like living wolves, but their footnotes cannot currently be altered from what they were at the time of their death. | |||
</div> | |||
</div> | |||
<h2 class="c-header active">Den Customization</h2> | |||
<div class="c-content" style="display: block;"> | |||
== Den Customization == | |||
Work in Progress! | |||
<!-- [ Paste info here ] --> | |||
<h3 class="c-header active">Cave Display</h3> | |||
<div class="c-content" style="display: block;"> | |||
=== Cave Display === | |||
Work in Progress! | |||
<!-- [ Paste info here ] --> | |||
</div> | |||
<h3 class="c-header active">Den Notices</h3> | |||
<div class="c-content" style="display: block;"> | |||
=== Den Notices === | |||
Work in Progress! | |||
<!-- [ Paste info here ] --> | |||
</div> | |||
<h3 class="c-header active">HTML and CSS</h3> | |||
<div class="c-content" style="display: block;"> | |||
=== HTML and CSS === | |||
Work in Progress! | |||
<!-- [ Paste info here ] --> | |||
</div> | |||
</div> | |||
<h2 class="c-header active">Profile Page</h2> | |||
<div class="c-content" style="display: block;"> | |||
=== Profile Page === | |||
Work in Progress! | |||
<!-- [ Paste info here ] --> | |||
<h3 class="c-header active">Your Information</h3> | |||
<div class="c-content" style="display: block;"> | |||
=== Your Information === | |||
Work in Progress! | |||
<!-- [ Paste info here ] --> | |||
</div> | |||
<h3 class="c-header active">Friends and Groups</h3> | |||
<div class="c-content" style="display: block;"> | |||
=== Friends and Groups === | |||
Work in Progress! | |||
<!-- [ Paste info here ] --> | |||
</div> | |||
<h3 class="c-header active">Achievements</h3> | |||
<div class="c-content" style="display: block;"> | |||
=== Achievements === | |||
Work in Progress! | |||
<!-- [ Paste info here ] --> | |||
</div> | |||
<h3 class="c-header active">Wishlist</h3> | |||
<div class="c-content" style="display: block;"> | |||
=== Wishlist === | |||
Work in Progress! | |||
<!-- [ Paste info here ] --> | |||
</div> | |||
<h3 class="c-header active">Profile Settings</h3> | |||
<div class="c-content" style="display: block;"> | |||
=== Profile Settings === | |||
Work in Progress! | |||
<!-- [ Paste info here ] --> | |||
</div> | |||
<h3 class="c-header active">Other Players' Profiles</h3> | |||
<div class="c-content" style="display: block;"> | |||
=== Other Players' Profiles === | |||
Work in Progress! | |||
<!-- [ Paste info here ] --> | |||
</div> | |||
</div> | |||
Latest revision as of 23:42, 24 November 2025
| Excuse the mess... | |
 | The wiki grouse are still chipping away at this page... we'll announce once it's complete, so check back soon! |
Work in Progress!
| Table of Contents |
|---|
| Links not working? Sections must be expanded to jump to a subheader within them! |
| Pack Setup |
| Pack Name |
| Pack Biome Location |
| Moving Your Pack |
| Den Page |
| Lead and Featured Wolves |
| Caves |
| Territory Slots |
| Immortal Slots |
| Pack Overview |
| Pack Dynasty |
| Den Customization |
| Cave Display |
| Den Notices |
| HTML and CSS |
| Profile Page |
| Your Information |
| Friends and Groups |
| Achievements |
| Wishlist |
| Profile Settings |
| Other Players' Profiles |
Pack Setup
Pack Setup
Your pack is where all of your wolves call home. It's totally up to you how you want to represent it!
Pack Name
Pack Name
Your pack name is chosen during the opening sequence of the game.

It can be whatever you'd like, and doesn't even have to have the word "pack" in it! However, pack names must be completely unique. Two players cannot have the same pack names as each other. Additionally, pack names cannot be longer than 25 characters.
If you decide that you need something need, don't worry! You can change your pack name at any time in the Grove, for a small cost of 1 ![]() GC!
GC!
While you can use plain text for your pack name, many players also choose to use UTF-8 symbols. While these symbols do work on most player's devices, we generally recommend that you do not use them for the following reasons:
- They often take up more than one character, limiting how many you can use in a name.
- They do not work for all players. Many players may end up seeing your name as just blank squares, rather than the letters you intended.
- They are very inaccessible to players using screen-readers, as the screen-reader will read the character's full name (e.g. Mathematical Sans-Serif Script T) rather than combining it with the other characters to form a word.
Where possible, we strongly encourage you use plain text in your pack name, rather than Unicode symbols.
Pack Biome Location
Pack Biome Location
Also chosen during the opening sequence of the game is your pack's biome!

Your pack's biome affects many aspects of the game. However, between the first three starting biomes, the biggest differences will be aesthetic! When choosing your first biome between Grasslands, Deciduous Forest, and Mountains, we recommend going with what sounds the best to you, and not worrying about which is best for gameplay.
Later on, as you're discovered more biomes, you'll see further the differences they present when moved to. Below is a list of everything that is affected by your pack's home biome.
- Raccoon Wares stock: each biome has exclusive decorations and backgrounds.
- Hunting difficulty: More difficult biomes are much harder to hunt in and require higher-stat wolves to succeed. You can hunt in any biome you have fully discovered, however it will take longer to hunt in biomes further from your home!
- Foraging times: Each biome has a collection of herbs that can be gathered by foraging there. You can forage in any biome you have fully discovered, however it will take longer to forage in biomes further from your home!
- Fishing possibilities: Each biome has a collection of fish which can only be found in that biome.
- Weather patterns: Some biomes have weather patterns not available in other biomes. For example, in can snow during the Summer in the Mountains, but not in the Desert.
- Site-wide visuals: Moving biomes changes visuals across the whole site - including the raccoon in the shop and fishing backgrounds!
Moving Your Pack
Moving Your Pack
Regret your choice of biome, or just want a change of pace?
After you've fully discovered the three starting biomes (Deciduous Forest, Grasslands, and Mountains), you will unlock the ability to move your pack to a different biome. There are many things that moving your pack will change, which you can learn about on the Biomes page.
Moving your territory is accessible through the Questing page. You can only move your pack to a biome that you've completely discovered (it will be explorable by your lead wolf). Upon requesting to move territory, the questing snake will give a quest to slay a certain number of wolves in that specific biome before he will help you move your territory.

The amount of wolves that must be slain can be calculated by dividing your total adult wolf count by four, rounding up, and adding two to that amount. Your adult wolf count is the number outlined in the image below.

In formula, this could be written as:
For example, if I have 37 adult wolves, I can divide and round up this number to get 10, then add 2 to get 12. I would need to defeat 12 wolves in order to move a pack with 37 adult wolves.
Territory moving quests can be completed automatically with Golden Cones at a rate of 1 ![]() GC per wolf that needs to be slain. You can take the biome-moving quest as many times as you would like, even multiple times in one day. If you do not complete the quest within 5 days, it will expire and you must restart it if you still want to move.
GC per wolf that needs to be slain. You can take the biome-moving quest as many times as you would like, even multiple times in one day. If you do not complete the quest within 5 days, it will expire and you must restart it if you still want to move.
Den Page
Den Page
Your Den page is your home base! This is where all of your wolves are stored, and where you can interact with and find out more information about them.
Lead and Featured Wolves
Lead and Featured Wolves
At the top of the page, you'll notice your lead wolf panel.

Here, you'll be able to see your lead wolf and featured wolf at a quick glance, as well as information about your pack. To change the titles in front of these two wolves' names, scroll down to the bottom of your Den page!
You can also choose to Remove your featured wolf here if you'd like. Your featured wolf can be any wolf in your pack. You can set a featured wolf on the settings tab of a pack member's page.
Your Territory Biome is the biome your pack is currently located in.
Cave Slots refers to how many caves you have created. The maximum is always ten, and there's not currently a way to get any more caves than ten.
Pack Adults and Pack Pups keep track of how many wolves are currently in your pack. Note that your lead wolf is not included in the Pack Adults count. The amount of pups that you can have is always 5x the amount of adults you can have.
The maximum amount of Pack Adult slots you can have is 200, with 5000 Pack Pup slots.
Finally, Immortal Slots refers to how many immortal wolves you have. Immortal slots can be purchased with ![]() GC and you can use Jellyfish to fill those slots with immortal wolves. The maximum amount of immortal wolf slots you can have is 20.
GC and you can use Jellyfish to fill those slots with immortal wolves. The maximum amount of immortal wolf slots you can have is 20.
Caves
Caves
On your Den page, all of your wolves can be organized into Caves.
You unlock the ability to build caves after completing the Not Just for Bears quest on the Questing page.
After you've completed the quest, scroll down to the bottom of your Den page to find the cave-building panel.

Building a cave requires three materials: Large Branches, Large Leafs, and Large Rocks. These materials can be found while Exploring. Feel free to use our Explore Encounter reference to keep an eye out for encounters which have a chance of dropping them!
The amount of materials required increases with how many caves you have. The first cave you build requires no materials as it is a part of the tutorial. Each subsequent cave adds 5 of each material.
Below is a list of the required materials for each cave. In order to build all ten caves, you will need 225 of each material.
Required materials for each cave
Cave 1: 0 Large Branches, 0 Large Leaves, and 0 Large Rocks (built during the tutorial)
Cave 2: 5 Large Branches, 5 Large Leaves, and 5 Large Rocks
Cave 3: 10 Large Branches, 10 Large Leaves, and 10 Large Rocks
Cave 4: 15 Large Branches, 15 Large Leaves, and 15 Large Rocks
Cave 5: 20 Large Branches, 20 Large Leaves, and 20 Large Rocks
Cave 6: 25 Large Branches, 25 Large Leaves, and 25 Large Rocks
Cave 7: 30 Large Branches, 30 Large Leaves, and 30 Large Rocks
Cave 8: 35 Large Branches, 35 Large Leaves, and 35 Large Rocks
Cave 9: 40 Large Branches, 40 Large Leaves, and 40 Large Rocks
Cave 10: 45 Large Branches, 45 Large Leaves, and 45 Large Rocks
If you want to destroy a cave you no longer use, you can do so on the cave's page. Click on the name of the cave button in the cave's panel.
Then, click Destroy Cave at the bottom of the page

Destroying a cave does not give you your materials back. You do not get any benefit from destroying a cave.
If the cave has wolves in it when you destroy it, they will be moved to your Unsorted section.
Unsorted
When wolves first enter your pack, they are placed into your Unsorted section by default.
"Unsorted" is not a cave, just a holding place. Wolves can only be moved out of the Unsorted section, not back into it.
If you do not have any unsorted wolves, the Unsorted section will not be visible on your Den page.
Unsorted section.
Quarantine Caves
Through playing, you may notice some players referring to certain caves as "Quarantine Caves". This term relates to the passing of illnesses between wolves in caves.
A wolf in one cave cannot pass their contagious illness onto a wolf in a different cave. Because of this, many players create a designated Quarantine Cave to temporarily place their ill wolves into so that they will not spread their illness to other wolves if the player does not have time to cure them before rollover.
Unsorted wolves are not quarantined, since they are not technically in a cave. If a wolf in your Unsorted section has a contagious illness, they will be able to pass their illness to any other wolf in your pack. This is one of the reasons that keeping wolves unsorted is not recommended.
Cave Sorting
There are many method that you can use to keep your caves and your wolves organized!
Within each cave, you can decide how the wolves will be sorted. Using the dropdown in each cave panel, you could sort the wolves by name, level, age, stats, footnote, or role.
Your caves themselves are sorted alphabetically by default within your Den. Caves which come first alphabetically will appear higher up on your page. However, there are some ways to get around this order.
Many players chose to put numerals in front of their cave names to place them in the order they choose. If you don't want to put a number in front of your cave name, you can manually sort your caves on any cave's page using the Sort Cave Order settings just above the Delete Cave button.

Caves in your den are sorted alphabetically ascending (a, b, c...). Here you can provide a custom order using numbers. They will be sorted in ascending order (1, 2, 3...). Caves with the same number value will be sorted alphabetically. You can hit the "Reset" button to revert everything back to 0, which will then default back to automatic sorting by alphabet.
Territory Slots
Territory Slots
In order to add more wolves to your pack, you will need to upgrade your Territory Slots.
You can view how many territory slots you currently have next to Pack Adults at the top of your Den page.

In order to get more territory slots, you will need to purchase them with ![]() SC or
SC or ![]() GC. This can be done at the bottom of your Den page.
GC. This can be done at the bottom of your Den page.
The cost of each territory slot increases every time you buy one. You will get up to 5 slots for free from completing tutorial quests. After this, the sixth slot costs 130 ![]() SC, and each subsequent slot costs 25
SC, and each subsequent slot costs 25 ![]() SC more.
SC more.
At Slot 52, the currency required to upgrade switches to ![]() GC. There is not a way to obtain slots 1 - 51 with
GC. There is not a way to obtain slots 1 - 51 with ![]() GC, just as there's not a way to obtain slots 52 - 200 with
GC, just as there's not a way to obtain slots 52 - 200 with ![]() SC.
SC.
There are also 2 Lead Talents which increase your territory by 10 slots each. These slots do not increase the cost of slots that you buy after obtaining them. For example, if you have 35 territory, and pick up both of these talents, your next territory slot will still cost ![]() SC, and be the same as the 36th territory slot, despite being your 56th.
SC, and be the same as the 36th territory slot, despite being your 56th.
The table below lists the prices for every territory slot as well as how much currency is required to purchase all 200. You can also view the table here.
Territory Price Chart

Additional Benefits of Buying Territory Slots
Besides just being able to house more wolves, upgrading your territory slots also unlocks a few other abilities!
The more territory slots you have, the more pups you will be able to give to the Enclave each day. The amount of pups you can leave is equal to 1/4 your territory size, rounded up. So, if you have 150 territory slots, you will be able to leave 38 pups at the Enclave each day.
Territory size is also what affects how many pair bond breedings you will be able to make each month. If you have less than 10 territory, you will only be able to breed your pairbonds twice a month. At 10 slots, you will unlock an additional breeding. Then, every 10 slots, you'll get one more breeding, for a total of 22 breedings once you have 200 territory slots, or 24 breedings if you have the talents that each give you +10 slots, for a total of 220 territory slots.
Finally, having more territory slots will allow you to send out more hunting parties at one time. At 25 slots, you will be able to send out 2 hunting parties at the same time, with 3 hunting simultaneous hunting parties unlocking at 50 slots and 4 unlocking at 75 slots.
Immortal Slots
Immortal Slots
In addition to normal territory slots, you may also choose to purchase Immortal Slots.

You can purchase Immortal Wolf slots at the bottom of your Den page. These slots always cost ![]() GC and become more expensive the more slots you buy. These slots allow you to store an immortal wolf in your pack. However, in order to immortalize a wolf, you also need to buy a Jellyfish for 10 GC from the Grove.
GC and become more expensive the more slots you buy. These slots allow you to store an immortal wolf in your pack. However, in order to immortalize a wolf, you also need to buy a Jellyfish for 10 GC from the Grove.
The price for an immortal slot increases by 10 GC each time you buy one. The first slot costs 10 ![]() GC, the fifth slot costs 60
GC, the fifth slot costs 60 ![]() GC, and so on.
GC, and so on.
The maximum amount of Immortal Slots (and therefore immortal wolves) you can have is 20.
I have an immortal slot and a jellyfish, why can't I immortalize this wolf?
If a wolf is not showing up in the dropdown list, it could be for a variety of reasons. Pups must not be protected by a pupsitter, can't be in a trade or gift, and can't be currently training. Lead wolves cannot be immortalized outside of their retirement page and adult wolves cannot be immortalized if they gave birth recently or if they currently have a role. Wolves also cannot be in pair bonds if they are to be immortalized. If they still aren't showing up after this, make a Help board post to see if anyone else has any ideas, or create a Bugbox report.
|  |
In addition to your general Den page, there are a couple pages you can use to view wolves and your pack at a glance!
These pages are both accessible from your Den page, by click on the corresponding button underneath your lead wolf panel.

Pack Overview
Pack Overview
Your Pack Overview is where you can view your entire pack at a glance.

The page shows your unsorted wolves at the top, and then is sorted by your cave sorting settings. Within each cave, you can sort your wolves by their individual information!
This page is great for quickly checking if you have any more hungry wolves, or if any of your wolves are close to leveling up. Through the Role column, you can also quickly see which of your wolves don't have roles.
This is also where you find the Manage Pack page, where you can quickly mass chase and assign roles to wolves in any given cave. Note that you can currently only manage one cave at a time. If you select wolves from multiple caves, it will only adjust those in the cave you click the "Chase Checked" or "Update Roles" buttons for.
Pack Dynasty
Pack Dynasty
Once a wolf has died or been retired, they will be moved to your Dynasty. This is where you can store records of your previous wolves.

Immediately after a wolf dies, their records will appear in the "Unsorted" section of your dynasty. If they were a lead wolf, they will be in the Former Leaders tab, while every other wolf will be in the Pack Members tab. Wolves will keep all of their decor when they move to your dynasty, and you must remove it manually if you want to reuse it.
If you have enough dynasty slots, you can press the green plus button next to the record to store it permanently. If you do not store the record, it will be permanently deleted after 6 rollovers. There is not a way to restore a record which has expired.

You can view your total dynasty slots in the top right of the page. If you do not have enough dynasty slots to store a record, you must spend ![]() GC to purchase more. The maximum dynasty slots you can have is 400.
GC to purchase more. The maximum dynasty slots you can have is 400.

Wolves in your dynasty can be decorated and their names and biographies edited like living wolves, but their footnotes cannot currently be altered from what they were at the time of their death.
Den Customization
Den Customization
Work in Progress!
Cave Display
Cave Display
Work in Progress!
Den Notices
Den Notices
Work in Progress!
HTML and CSS
HTML and CSS
Work in Progress!
Profile Page
Profile Page
Work in Progress!
Your Information
Your Information
Work in Progress!
Friends and Groups
Friends and Groups
Work in Progress!
Achievements
Achievements
Work in Progress!
Wishlist
Wishlist
Work in Progress!
Profile Settings
Profile Settings
Work in Progress!
Other Players' Profiles
Other Players' Profiles
Work in Progress!