Hunting
From Grouse House Wiki
| Table of Contents |
|---|
| Links not working? Sections must be expanded to jump to a subheader within them! |
| Hunting Basics |
| Hunting Party Components |
| Party Roles and Stats |
| Proficiency |
| Synergy |
| Personalities |
| Seasonal Effects |
| Scars |
| Hunting Successfully |
| Biome Hunting Trails |
| All Possible Prey Items |
Besides trading and exploring, hunting is one of the best ways to collect food for you pack. If you have a skilled hunting team, or multiple, feeding your wolves is easy! Hunting is unlocked after completing the associated tutorial quest, "Time to Hunt". After this, it is accessible through the Hunting token on the Crossroads.
Hunting Basics
Hunting Basics
In order to start hunting, you will need to assign some of your wolves as Hunters. This role is unlocked during the Time to Hunt tutorial quest. There is no limit to the amount of hunters that you have in your pack, nor hunting parties you can make with them, but you will never be able to use more than four hunting parties concurrently.
After you've assigned a wolf the Hunter role in the Settings section of their page, you must create a hunting party. Wolves cannot be sent out to hunt unless they are in a hunting party. This can be done on the Create Hunting Party tab at the top of the Hunting page. Here, you can select up to five hunters to create a hunting party with. Once the party is built, you can view its stats on the Hunting Parties page. We'll further explain each of the values listed on this page, profiencies and synergy, in the Hunting Party Components section of this page.
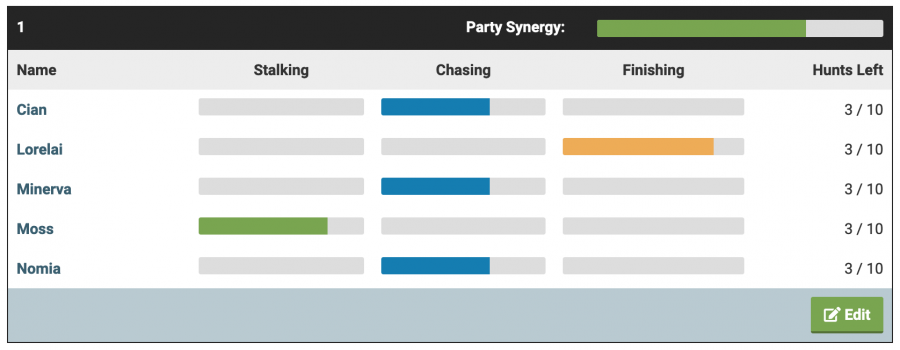
A hunting party may have fewer than five members, but single wolves will be required to double up on party roles, expending more energy each hunt. For the highest rate of success, make sure your hunting parties have five wolves in them. Each hunter is able to go on 10 hunts each rollover, and you can keep track of how many each wolf has gone on for the day on the Hunting Parties page.
Once you're all set with a hunting party, you are able to hunt in any biome that you have fully discovered through scouting. After you've reached 100% in the scouting progress bar for the biome, and it becomes explorable for your lead wolf, you will be able to send a hunting party there, as well! In order to get a hunt started, you must select the biome that you want to hunt in from the list presented on the Hunting page.
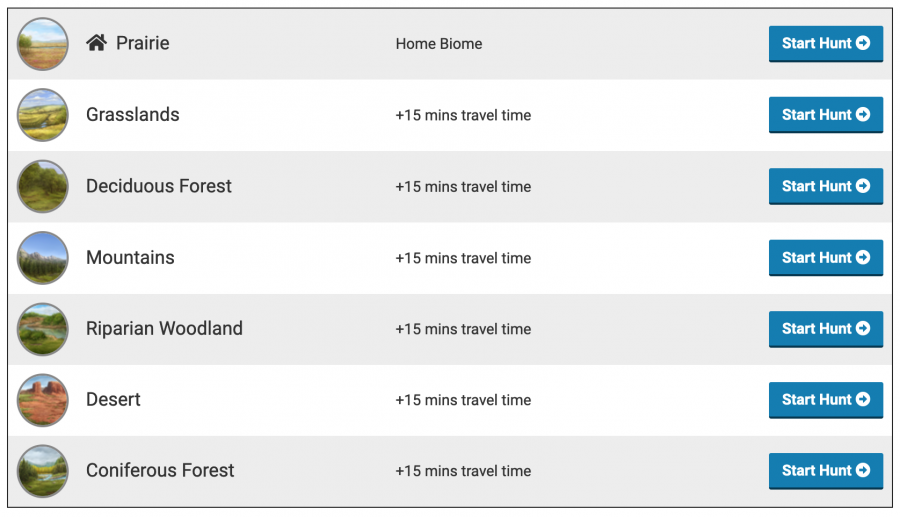
Hunts take longer in biomes that are further away from your home territory. Each border of land that your hunting party must cross in order to get to the biome they are hunting in adds +15 minutes to the total hunt time. For example, if you are located in the Grasslands and sending a hunt to the Prairie, the hunt will take 45 minutes rather than the usual 30 minutes. The list of biomes on your Hunting page will provide the travel time extensions for each available biome.
The banner at the top of the Hunting page keeps track of how many hunts you currently have in progress. The amount of hunting parties that you are able to have out at one time is dependent on your territory size. The more adult wolf slots you have, the more parties you can send out at a time, with a maximum of four. Note that this is dependent only on territory size, and not how many adult wolves you actually have at the time. So, you could have a pack size of 75, with only 30 adult wolves, and still be able to send out 4 hunting parties at once. This value does not determine how many hunting parties you can have, as you can have an unlimited number of parties. Rather, it only determines how many parties you can have hunting at once. You can only send one hunting party to each biome at any given time.

The hunting limit increases every 25 territory slots, with the maximum amount of concurrent hunts possible being four.
| Territory Adult Slots | Possible Concurrent Hunts |
|---|---|
| 1-24 slots | 1 hunting party |
| 25-49 slots | 2 hunting parties |
| 50-74 slots | 3 hunting parties |
| 75+ slots | 4 hunting parties |
Before starting a hunt, you must assign your hunters into five different positions: one stalker, three chasers, and one finisher. Each role directly affects the outcome of the hunt in different ways. The Stalker's role is to find scent trails. Having a higher stat stalker will allow the party to find larger trails and therefore larger prey. The party's chasers will tire out the prey, but the hunt may fail if they lose track of the trail. Finally, the finisher must land the final blow on the prey, and it's up to their strength to make sure it doesn't get away. Each role requires specific stats, which are explained in the Party Roles and Stats section of this page.
Every hunt, your wolves will find one to four scent trails. You will be able to pick one scent trail for the team to follow, the size of which will determine how difficult the hunt will be and what prey the team may bring back.The pool of possible prey is affected by the size of the trail, the location of the trail in the biome, and the biome itself. A list of prey for every trail and biome is provided in the Biome Hunting Trails section of this page. Before selecting a hunting trail, you can view the percent chance that your hunting party has to succeed if you were to choose this trail. This percent chance is based on the stats of your hunting party in relation to biome and trail difficulty, as well as their synergy and proficiency, and the current season. The maximum success chance in Summer and Autumn is 90%. In Spring, the maximum success chance is 100%, while it drops down to 75% in the Winter.
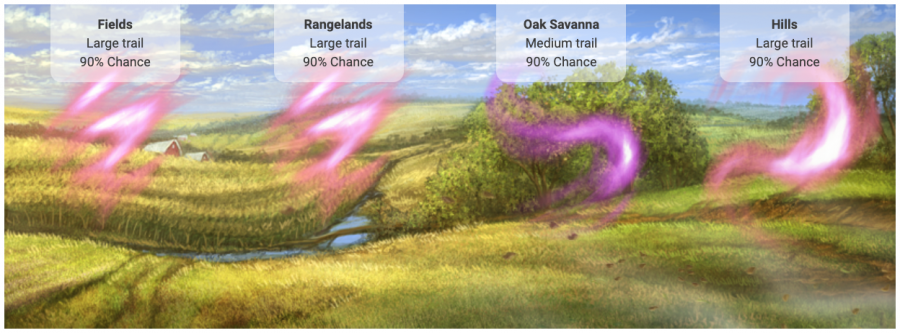
Each size of hunting trail comes in a couple different shapes, but the shape does not affect what your hunters can catch, it is purely cosmetic. If you find yourself with a daily quest or Melvin mission to send your wolves on a specific size of hunt, you will be looking for a trail of the sizes below.
Critter hunting trails are green. These are the easiest hunts, and therefore provide the lowest EXP gain. They will result in prey items with 4 uses or less.
Small hunting trails are blue. They will result in prey items with between 8 and 9 uses.
Medium hunting trails are purple. They will contain prey items with between 10 and 16 uses.
Large hunting trails are pink. These are the most difficult hunts, which will provide the highest EXP gain. They will contain prey items with between 16 and 30 uses.
There are three possible results for each hunt. If the hunt is successful, your wolves will bring back a prey item corresponding to the scent trail size and will gain a larger amount of EXP. If the hunt is unsuccessful, your hunters will gain a lower amount of EXP and they will not return a prey item corresponding to the scent trail. However, every unsuccessful hunt provides a 33% chance of bringing back a critter carcass as a consolation prize, not matter what size of trail they were originally hunting!
Hunters also have a small chance of contracting an illness after a hunt, whether successful or unsuccessful. There is a higher chance that your wolves will get an Open Wound if they are hunting a large trail, and there are other illnesses or ailments that your wolves could get, as well. More details about illnesses can be found on the Illnesses page.
Hunting Party Components
Hunting Party Components
You can have an unlimited amount of hunting parties! Each party can have up to five wolves, but parties with fewer than five will expend energy quicker as one wolf will have to double up on roles. You can view all of your hunting parties on the Hunting Parties page.
Party Roles and Stats
Party Roles and Stats
There are five different positions that must be filled in a hunting party -- one stalker, three chasers, and one finisher. You don't need five wolves to fill all five party positions, as wolf can fill multiple positions in a party, which can be helpful for new players who may not have five wolves yet. However, each position that a wolf fills up will take 20% of their energy, for a maximum expenditure of 100% of their energy if they take on all five positions. Additionally, they will only earn proficiency for the first position that they fill. For example, if a wolf acts as both a chaser and a finisher, they will only earn proficiency for the chaser position. With this in mind, it's highly recommended that you make sure your hunting parties have five wolves to guarantee the highest success rates.
Wolves with the hunter role will have three different proficiency bars which fill up based on which position in the team they take on. You can view a wolf's proficiency on the Hunting Parties tab of the Hunting page or on the Wolf Role tab of an individual wolf's page.
Each position in a hunting party uses certain stats to determine role competancy. A wolf with a high combined amount of the stats required for their hunting role will perform better in the role than a wolf with lower stats. Each role only uses these one or two specific stats, and will not pull any influence from other stats. For example, chasers will only use Speed and Agility, and will have no influence from Smarts. Stats hold a larger weight over hunting success than proficiency and synergy, so you will notice greater changes in success when stats change over when other values change. When considering which wolf to assign to each position, you should look at which of their stats are the highest. You can assign their priority stats to match their hunting role, as well, to guarantee that the stats they're using are continually increasing the most.
| Hunting Party Role | Stats Used |
|---|---|
| Stalker | Smarts and Wisdom |
| Chaser | Agility and Speed |
| Finisher | Strength |
The hunting page will automatically sort your wolves into each of these positions, but it might not sort them as accurately as you could by hand, as it may look at proficiency more than stats. We recommend sorting your wolves manually into the positions you would like them to be in until the hunting page begins to sort them this way as well.
Proficiency
Proficiency
The more a wolf hunts, the more proficient they will become that the position in the hunting party they've been placed in. A wolf can be proficient in more than one hunting party position, but will only actively gain proficiency for the first position they've been assigned to (with stalker being looked at first in the order, followed by chaser and finished). Stalking proficiency, chasing proficiency, and finishing proficiency are all separate values which do not interact with each other nor affect the two other roles with which they are not associated.
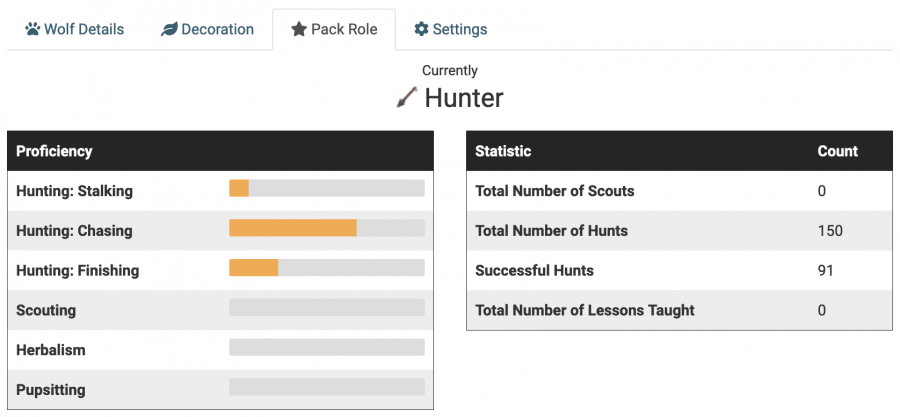
For every hunt, each wolf will gain one proficiency point, unless they're at 100 proficiency. The only thing that will make proficiency increase is hunting continually. Proficiency is not affected by stats or party synergy. Proficiency also decays by one point every rollover, so your wolf's proficiency will only increase each day if they are completing more than one hunt a day.
The more proficiency a wolf is in their hunting role, the more successful they will become in performing that role, with 100% proficiency providing the largest boost.
Synergy
Synergy
Hunting party synergy, which also contributes largely to the success of the party, increases the more a specific party hunts together. It decreases by a small margin every day, so keep sending your party on hunts together to guarantee synergy increase.

Party synergy is not affected by wolf personalities despite common conception. It is only based on how much a certain party has hunted together. Personality plays has no affect on how much synergy a party can gain.
Synergy is gained on an individual wolf level, not a whole-party level. The synergy of the party is completely dependent on the individual synergies of the wolves. When you send a wolf hunting, as long as they're in a party with two or more wolves, they will gain synergy points. From there, the synergy of the party is calculated as the average individual synergy of all of the wolves in the party. With each hunt, the wolves in a hunting party of two or more wolves will gain 2-5 synergy points each. There is no way to see each wolf's individual synergy value, but it can be theorized based on how frequently the same wolves have been hunting together uninterrupted.
Party Synergy = Average of Individual Wolf Synergies
The amount of the wolves in the hunting party can fluctuate, but the total synergy of the party will remain the average of the synergies of the wolves within it. If a single wolf with 0% synergy were to join a party of two wolves, each with 50% synergy, the party's synergy would drop from 50% (50 + 50 / 2) to approximately 33% (50 + 50 + 0 / 3). Due to the nature of this formula, if you consistently leave a wolf out of hunting in a five-wolf hunting party, you will only ever be able to get up to about 80% synergy, because the left-out wolf will have a much lower synergy than the rest (100 + 100 + 100 + 100 + 0 / 5 = 80).
When a wolf is taken out of a hunting party, its individual synergy is reset back to 0%. It's a common thought that removing a wolf from a hunting party will lower the party's synergy. However, this is mostly only true for parties which have been hunting together for a while. There is also a possibility that your party could actually gain a bit of synergy when a wolf is taken out of it. For example, a party of 5 wolves, each with the synergies of 100, 100, 75, 20, and 35, could increase in synergy if you take the last two wolves out of it, because their low synergies will no longer be dragging the average down.
The formula above can provide a good estimate, but the synergy amounts themselves fluctuate a bit within a small range when wolves join and leave a hunting party, so their actual synergy may end up being a few percentage points off of what the formula would give you.
Personalities
Personalities
The personalities of the wolves in your hunting party of very important! If the wolves do not get along, a hunt with 100% success chance could fail, just because the wolves got into a disagreement. If the personalities of two or more wolves in your hunting party are incompatible, a fail chance will be rolled on top of the success chance, which could cause a hunt to fail even when success previously seemed to be a guarantee. There is one benefit to pairing wolves with incompatible personality- hunts which fail due to disagreements can reward Scars!
| Hunters with these dispositions will disagree! |
| Hunters with these dispositions will get along! |
If you're unsure whether or not your hunting party personalities are compatible, the Personality Snake can assess your team for 50 Silver Cones. It will tell you which wolves disagree, if any, so you know which personalities you'll have to change!

Seasonal Effects
Seasonal Effects
Throughout the Wolvden year, you'll notice your hunting party's success rates fluctuating. This is because success rate is strongly affected by the current season! Hunting in the Summer and Autumn is considered the standard and your hunters will be at their base success rate. In the Winter, this rate is lowered. Hunting success rates lower by 15% in the Winter in easy biomes, and a little bit less than 15% in more difficult biomes. In Spring, this base rate is increased by 10%, a 25% increase over the Winter rates. With these changes in mind, the maximum hunting success rate is also keeped at 90% in the Summer and Autumn, about 75% in the Winter, and 100% in the Spring.
Scars
Scars
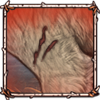
There is a small chance that your wolves will receive scars from hunts failed due to personality clashes. These scars will be automatically sent to your Hoard after the hunt results are collected.
The pool of possible scars is listed below.




Hunting Successfully
Hunting Successfully
Early on in the game, you'll notice that your hunting party will have a very hard time bringing prey back for your pack. If anything, they'll only be able to catch critters. Hunting is indeed very difficult if your hunting party is not experienced.
Try to solidify your hunting party early on, adding all five wolves and avoiding removing any. Give every wolf a set role in the party based on their stats, and make sure that they're sticking to that role every hunt. This will allow your party to gain synergy and role proficiencies quickly! You will also want to keep in mind that more difficult biomes will present more challenge when hunting. Hunting in one of the three starter biomes (Mountains, Deciduous Forest, or Grasslands) will help your success rate stay high while your hunting party is growing. Sending the hunting party to a more difficult biome may help them gain EXP quicker, but their success rate will be drastically lower.
Proficiency and synergy will only get you so far. Eventually, if you'd like guaranteed chances for catching prey, or the ability to catch prey in more difficult biomes, your wolves will need higher stats. Pay close attention to the stats associated with each of your wolves' hunting party roles. Your stalker will need high Wisdom and Smarts, your chasers will need high Speed and Agility, and your finisher will need high Strength. The amount of stats that they need in order to scent and catch prey in more difficult biomes increases with the difficulty of the biome. In order to have the chance to find larger prey in more difficult biomes, it is your stalker's stats that must increase. Then, the rest of your party must have similarly high stats in order to have a decent chance at catching the prey.
Biome Hunting Trails
Biome Hunting Trails
Each hunting biome is separated into four separate quandrants, or trails. When sending out a hunt, each scent will be located in one of the four trails. The possible prey from each hunt is dependent on the trail that the scent was located in.
| Grasslands | |||
|---|---|---|---|
| Deciduous Forest | |||
|---|---|---|---|
| Mountains | |||
|---|---|---|---|
| Riparian Woodland | |||
|---|---|---|---|
| Prairie | |||
|---|---|---|---|
| Coniferous Forest | |||
|---|---|---|---|
| Desert | |||
|---|---|---|---|
| Taiga | |||
|---|---|---|---|
| Swamp | |||
|---|---|---|---|
| Tundra | |||
|---|---|---|---|
| Rainforest | |||
|---|---|---|---|
| Glacier | |||
|---|---|---|---|
All Possible Prey Items
All Possible Prey Items
Below is a list of every prey item available in game. Some of these items can also be obtained through specific explore encounters, but each can be hunted in the right conditions.
