Marking Genetics
From Grouse House Wiki
While a wolf might look just fine with only their base, their markings are where they can really shine! Markings are an additional layer on top of your wolf's base that can give them a lot more depth, design, and character. Some markings are more valuable or more difficult to obtain than others, meaning that the marking market can get pretty competitive!
Marking Attributes
Marking Attributes
Each wolf can have up to 10 markings, and they don't necessarily have to be unique. You can find your wolf's marking details on their page under the Markings section, where each marking is separated into a slot. Higher slots appear above lower slots in the wolf's art. That is, Slot 10 will be on the top and Slot 1 will be on the bottom. If the wolf does not have a marking in a specific slot, it will display as "None". Markings in one slot will have no effect on markings in other slots, each is a separate trait. In breeding, only markings in the same slot as each other will interact.
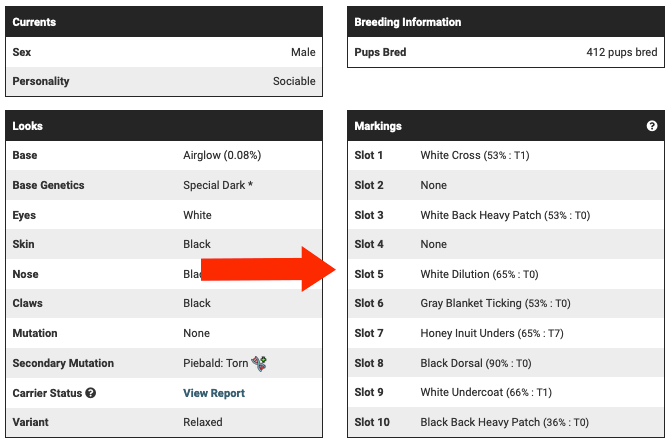
There are four parts to each marking listed in your wolf's details: color, shape, opacity, and tier.
Color
Color
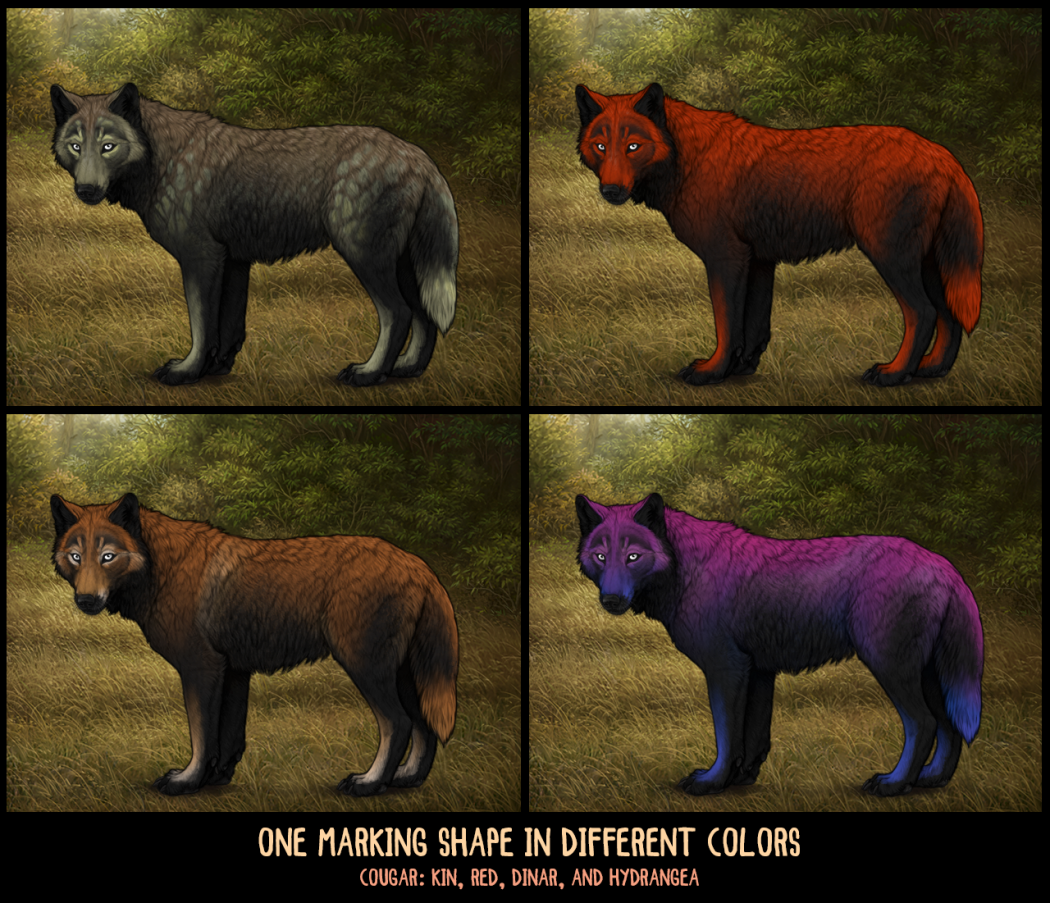
The color, listed first, is one of the descriptors of the marking's appearance. A marking's color may also help you quickly guess how rare the marking is. There currently are 67 available marking colors, and you can view every marking sorted by their color on the Marking Colors page. There is no way to change a marking's color, unless you remove and replace the marking entirely.
Shape
Shape
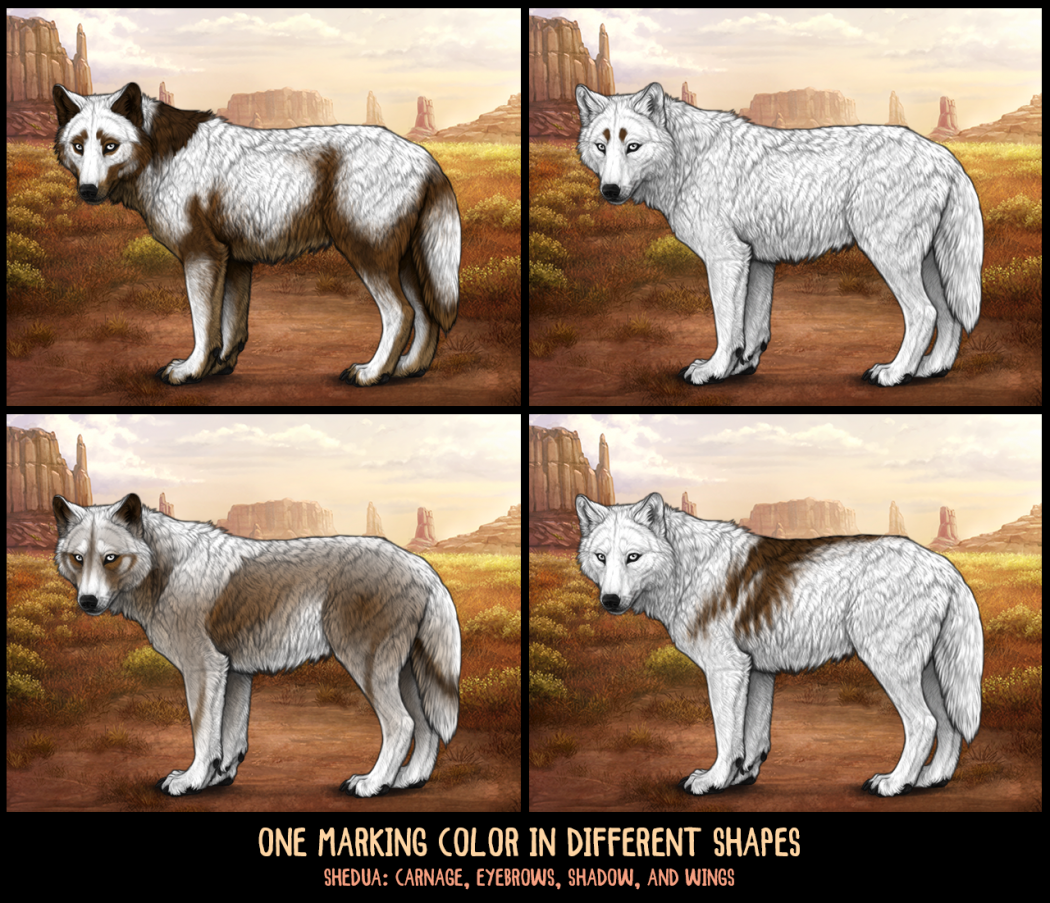
Followed by the color is the marking's shape. This name reflects how the colors appear on your wolf. They might be stripes, spots, or other splotches, but each marking shape is unique. Not every shape comes in every color. In fact, a lot of shapes only have a few color options. Others, however, have many color possibilities. There is no way to change a marking's shape, unless you replace the marking with a completely different one. Wolvden currently accepts suggestions for new marking shapes in the Game Art: Markings and Piebald/Patches ideas forum board, but be sure to read the guidelines first!
Opacity
Opacity
In parenthesis after the marking's color and shape, you'll find its opacity and tier.
Opacity is represented by a percentage out of 100. This number represents how opaque or transparent the marking is. A marking with a very low opacity might be more difficult to see, while a marking with a high opacity will appear more vibrant. Opacity has no effect on a marking's overall pass rate, so feel free to adjust opacity to your liking to make dynamic and enjoyable wolf designs! A marking's opacity does effect the opacity of a pup's marking, however. The pup's marking will be the average of the two parent's opacities in that slot, randomized within a 10% range. If the marking was to drop below 1% after this calculation, it would be corrected to 1%, and likewise to 100% if it resulted above 100%. This could be represented with the formula pup's opacity = {mother's opacity + father's opacity)/2 ± 10%. If one parent does not have a marking in a slot that the other parent does have a marking, their opacity will be calculated as 0%. So, if only one parent has a marking in that slot and the pup inherits that marking, the opacity will be 1/2 of the one parent's marking, with 10% wiggle room.
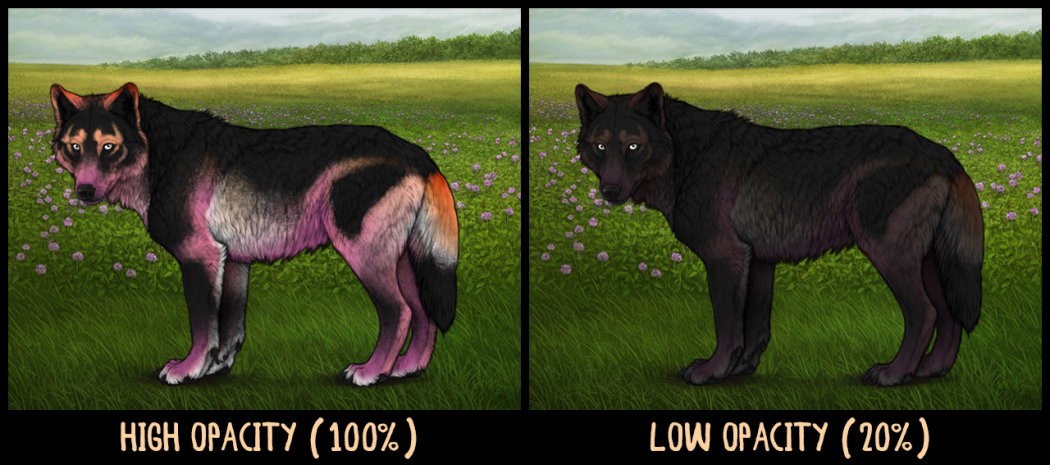
You can change any marking's opacity using the Marking Opacity Changer purchasable for 1 Gold Cone from the Grove. With this item, you can specify an exact number out of 100 to permanently change one marking's opacity to.
Tier
Tier
Every marking is sorted into a category, called a Tier, based on the way that it is obtained. You can view all markings sorted by tier on the Marking Tiers page. This tier will be visible next to the marking on your wolf's page. It's important to remember that a marking's tier does not define how rare it is. A Tier 8 marking is not necessarily more rare than a Tier 2 marking, in fact it's often the opposite. A marking's tier only defines how or where it can be obtained. In the example below, the "T7" next to each marking's opacity percentage reflects that these markings are Tier 7.
For a quick reference about what each tier means, you can hover over or tap on the ? in the top right corner of your wolf's marking box. Importantly, every marking can be obtained through Random Marking Applicators, regardless of their tier, so the method of obtention noted by its tier is not the only way to get a marking. The table below provides a little bit more information about each tier.
| Tier | Meaning |
|---|---|
| Tier 0 | Basic NBW markings, obtained on NBWs or through customization |
| Tier 1 | Custom markings, obtained through customization |
| Tier 2 | Raffle markings, obtained through breeding to a Raffle Stud |
| Tier 3 | Applicator markings, obtained using an event applicator |
| Tier 4 | Empty category not used for any markings |
| Tier 5 | Placeholder/unreleased tier, using for markings that are not meant to be obtainable in RMAs/Total Shuffles, like raffle stud markings before the raffle is pulled and event markings before the event is over. |
| Tier 6 | Combo markings, obtained through breeding specific colors |
| Tier 7 | RMA-Exclusive markings, obtained rarely when using a Random Marking Applicator or Total Shuffle |
| Tier 8 | Rare NBW markings, obtained on starred NBWs after lead wolf level 15 |
Pass Rates
Pass Rates
Every marking has the same chance to pass onto a wolf's pups, and the likelihood of this happening depends on a few factors.
If both parents have the same marking in a specific slot, the pup has a 75% chance of getting that exact marking and a 25% chance of getting no marking. If the parents both have a marking in the specific slot, but they are different markings, the pup has an estimated 60% chance of getting a marking in general, with an equal chance of getting either parent's marking. If only one wolf has a marking in a specific slot, the pup has a 50% chance to get the marking and a 50% chance to get no marking.
| Marking Combination | Pass Rate |
|---|---|
| Same Marking in Same Slot | Confirmed 75% chance for exact marking and 25% for no marking |
| Different Markings in Same Slot | Estimated* 60% chance for a marking and 40% chance for no marking, with an even chance of getting either parent's exact marking * This value is estimated by players based on collected data and has not been confirmed by developers. |
| Only One Parent has Marking in Specific Slot | Confirmed 50% chance for exact marking and 50% chance for no marking |
There are a couple calculations that can happen after it's been decided that a pup will get a marking in a specific slot which could effect exactly what the pup's marking will be. Combo breeding is an additional calculation that applies if the markings' shapes and colors are compatible, while marking deviation is a rare occurrence for some Tier 0 and Tier 1 markings. You can read about these mechanics below. With these in mind, there's sometimes a small chance that the above pass rates will have an exception applied. For example, if both parents have the same marking, but the marking is capable of deviation, the pup may not get the identical marking if it were to deviate.
Combo Markings
Combo Markings
A unique breeding challenge, combo markings are markings that can only be obtained through breeding specific colors and shapes together! You can view a list of all combo markings on the Combo Markings page.
In order to produce a combo color, the wolves that are bred must have compatible marking colors and shapes in the same marking slot. The marking shapes do not have to be the same as each other, but one of the shapes must also have a version in the combo color. For example, if a parent has White Paws in Slot 6 and the other parent has Black Dilution in Slot 6, the pup would be able to get the Silver Dilution combo marking in Slot 6, but not a Silver Paws marking as that specific marking does not exist. If colors that typically produce a combo are bred, but the shapes do not have combo versions, combo markings will not be possible.
Combo markings can be passed through breeding the same way as any other marking. Like other markings, they can also be obtained randomly through Random Marking Applicators and Total Shuffles, but at a low rate.
The following table lists every combo color and what combinations are required to breed them.
| Possible Marking Combo Colors | |
|---|---|
| Auburn | Black + Red |
| Cocoa | Black + Cream |
| Deira | Beige + Honey |
| Dinar | Brown + Honey |
| Doubloon | Honey + Yellow |
| Ducat | White + Yellow |
| Rufous | Dark Brown + Red |
| Saffron | Beige + Yellow |
| Sepia | Brown + Yellow |
| Shedua | Black + Yellow |
| Silver | Black + White |
| Sterling | Black + Silver |
| Tuff | Cream + Silver |
| Zircon | Cream + Red |
Marking Deviations
Marking Deviations
As a rare possibility, some marking shapes have a chance to "mutate" into a different, but similar shape!
This can only occur with Tier 0 and Tier 1 markings, and they can only deviate into a marking in the same tier. This is not possible with all marking shapes, just those with multiple similar variations. It will not affect the marking's shape, just the color. For example, the Cape marking in Tier 0 can mutate into a Cape Ticking marking of the same color and tier.
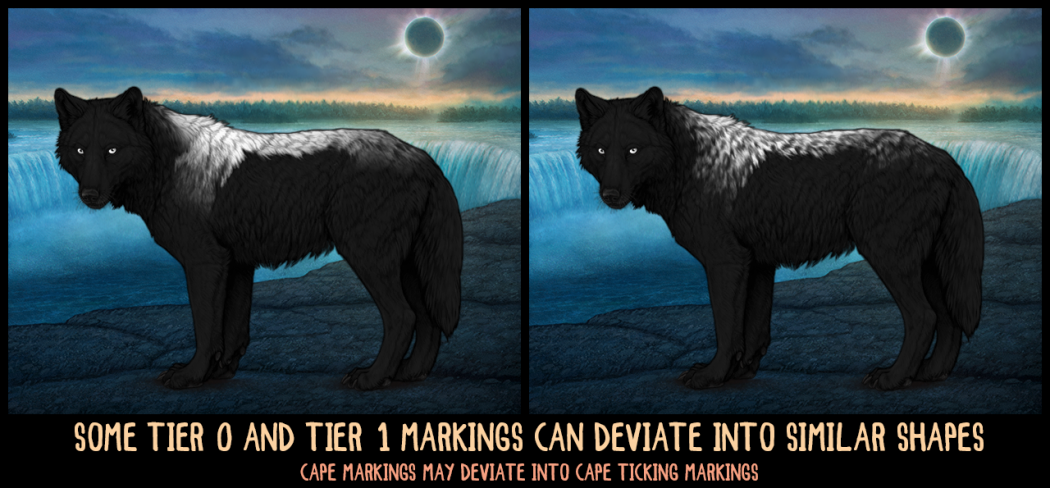
Markings that are not in Tier 0 or Tier 1 will not have a chance to deviate, even if the shapes are similar. So, the Wings markings cannot deviate into the Wings Heavy or Wings Scarce markings, since these are in Tier 2.
One marking shape is exclusive to marking deviation, Shepherd Heavy. This shape can only be obtained through a random mutation of the Shepherd marking in Tier 0.
