
Illnesses and Herbalism: Difference between revisions
From Grouse House Wiki
No edit summary |
No edit summary |
||
| Line 60: | Line 60: | ||
Once there, you can select the Forager you would like to send as well as the biome you would like to send them to. It's implied that eventually foragers may be able to collect more than just herbs, hence the additional dropdown menu in which Herbs is currently the only option. You can forage in any biome you have fully scouted. However, the further the biome is away from your home biome, the longer the foraging mission will take. You can send all three of your foragers out at the same time. Only wolves with the Forager role may be sent | Once there, you can select the Forager you would like to send as well as the biome you would like to send them to. It's implied that eventually foragers may be able to collect more than just herbs, hence the additional dropdown menu in which Herbs is currently the only option. You can forage in any biome you have fully scouted. However, the further the biome is away from your home biome, the longer the foraging mission will take. You can send all three of your foragers out at the same time, each to a different biome. Only wolves with the Forager role may be sent foraging—Herbalists may not. | ||
| Line 68: | Line 68: | ||
By default, Foragers will bring back one or two herbs as a standard reward. With every 25 proficiency your Forager gains, they will bring back one additional herb, with 75 being the last threshold. So, a Forager with 75+ proficiency will bring back five herbs, the current max amount of herbs possible. | By default, Foragers will bring back one or two herbs as a standard reward. With every 25 proficiency your Forager gains, they will bring back one additional herb, with 75 being the last threshold. So, a Forager with 75+ proficiency will bring back five herbs, the current max amount of herbs possible. However, in the '''winter''', the max amount of herbs that your Forager may bring home will be '''lowered by one'''. | ||
The amount of time that each forage takes is affected by the Forager's <b>Speed</b> stat. The Speed stat divided by ten determines how much time is removed from the forager, with 10 minutes being the maximum. | The amount of time that each forage takes is affected by the Forager's <b>Speed</b> stat. The Speed stat divided by ten determines how much time is removed from the forager, with 10 minutes being the maximum. | ||
If your lead wolf has the [[talent]] "Gatherer", foraging time will be further reduced by 10%. | |||
| Line 81: | Line 84: | ||
=== Herbs === | === Herbs === | ||
Herbs are used to craft medicines for your wolves. They are also used in crafting recipes for decors and backgrounds, and can be used to craft Nesting Materials as well! | Herbs are used to craft medicines for your wolves. They are also used in crafting recipes for decors and backgrounds, and can be used to craft Nesting Materials as well! Foragers can bring home herbs from foraging. You can also find herbs randomly while exploring. | ||
| Line 90: | Line 93: | ||
Below is a table of every herb, including what they are used for and where you can find them. '''When | Below is a table of every herb, including what they are used for and where you can find them. '''When a herb is listed as being in a certain biome, this means that it can both be foraged there as well as found there while exploring normally'''. There are a few explore encounters, such as the raven, which can give you herbs from any biome regardless of what their native biome is. | ||
| Line 527: | Line 530: | ||
'''You can have one herbalist total''' and you are stuck with just one, there is no way to increase the amount of herbalists you can have. When you switch the herbalist role from one wolf to another, whether that be because the previous herbalist died or just because you want a new one, your wolves will '''forget up to three medicine recipes'''. You will have to relearn these recipes normally with your new herbalist. It does not tell you when you switch herbalists that recipes have been lost. You have to check your user log to see which ones were forgotten. Restoring the same herbalist to the position will not restore the recipes. | '''You can have one herbalist total''' and you are stuck with just one, there is no way to increase the amount of herbalists you can have. When you switch the herbalist role from one wolf to another, whether that be because the previous herbalist died or just because you want a new one, your wolves will '''forget up to three medicine recipes'''. The recipes for Cure-for-All and Rich Healing Salve are not protected and may be forgotten as well as regular medicines. You will have to relearn these recipes normally with your new herbalist. It does not tell you when you switch herbalists that recipes have been lost. You have to check your user log to see which ones were forgotten. Restoring the same herbalist to the position will not restore the recipes. | ||
| Line 534: | Line 537: | ||
=== Mixing Medicine === | === Mixing Medicine === | ||
Herbalists gain experience by mixing medicines. Mixing medicines is an important step in curing any illnesses that your wolves contract. The first time a herbalist crafts a medicine, they must use collected herbs to research it. This can be done from the Research Medicine tab. The researching will result in a | Herbalists gain experience by mixing medicines. Mixing medicines is an important step in curing any illnesses that your wolves contract. The first time a herbalist crafts a medicine, they must use collected herbs to research it. This can be done from the Research Medicine tab. The researching will result in a one-use version of the cure, and will add the cure to your Medicines Known tab. The ingredients used to learn to create a cure are the same ingredients that are used to create them each subsequent time. | ||
| Line 544: | Line 547: | ||
The time it takes to craft/research a medicine is dependent on the herbalist's level, and each medicine takes 20% energy. The higher the level, the shorter the crafting/research time. You can have up to 5 medicines queued for crafting/researching at a time, assuming your herbalist started with 100% energy. | The time it takes to craft/research a medicine is dependent on the herbalist's level, and each medicine takes 20% energy. The higher the level, the shorter the crafting/research time. You can have up to 5 medicines queued for crafting/researching at a time, assuming your herbalist started with 100% energy. | ||
If your lead wolf has the [[talent]] "Physician", the amount of time it takes to craft known medicines is further reduced by 10%. This does not apply to medicines which are being newly researched. | |||
| Line 809: | Line 815: | ||
== Illnesses == | == Illnesses == | ||
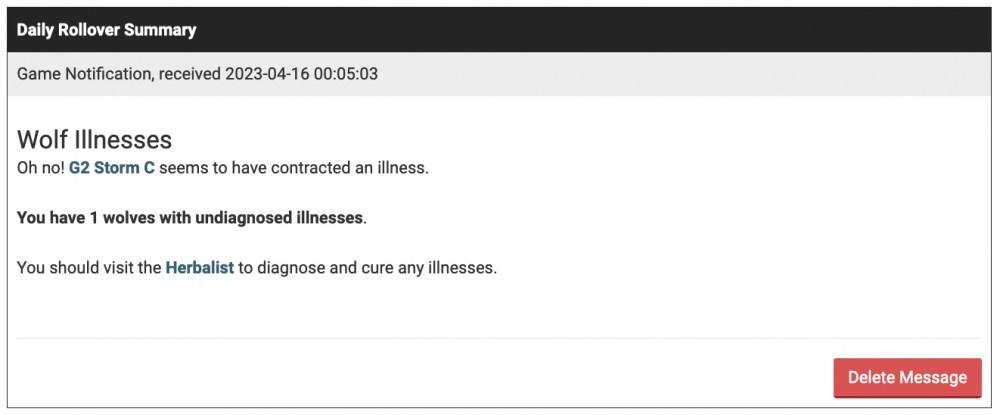
There are currently 18 possible illnesses, each with their own set of effects. Based on these effects, some illnesses are much more severe than others. When a wolf develops an illness, a banner will appear on their page listing symptoms, to give you an idea of what the wolf might have before diagnosis. For some illnesses, like Tapeworms, this notice can also provide insight on the illness's effects. | There are currently 18 possible illnesses, each with their own set of effects. Based on these effects, some illnesses are much more severe than others. When a wolf develops an illness, a banner will appear on their page listing symptoms, to give you an idea of what the wolf might have before diagnosis. For some illnesses, like Tapeworms, this notice can also provide insight on the illness's effects. '''All illnesses also double mood loss at rollover, meaning any sick wolf will lose 10% mood instead of 5% mood every day'''. | ||
| Line 822: | Line 828: | ||
=== Getting Sick === | === Getting Sick === | ||
Wolves can get sick through a variety of means, many unpredictable. Every wolf in your pack has the ability to | Wolves can get sick through a variety of means, many unpredictable. Every wolf in your pack has the ability to develop an illness, even pups, so it's important to keep an eye on your pack to make sure that everyone is healthy! | ||
| Line 965: | Line 971: | ||
Some players choose a harsher method of preventing severe | Some players choose a harsher method of preventing severe illnesses—illness farming. Giving every wolf in your pack a mild illness like Fleas will prevent them from developing a more severe or lethal illness like Distemper. This also gives you the opportunity to farm experience for your herbalist by diagnosing and curing the illness, only for the wolf to catch it again the next day from one of the many other wolves who still have it. There are some downsides to this method, like greater mood loss, but many players find it effective in fending off severe outbreaks. | ||
</div> | </div> | ||
<h3 class="c-header hidden">Diagnosing Illness</h3> | <h3 class="c-header hidden">Diagnosing and Curing Illness</h3> | ||
<div class="c-content" style="display: none;"> | <div class="c-content" style="display: none;"> | ||
=== Diagnosing Illness === | === Diagnosing and CUring Illness === | ||
In order to cure a wolf's illness, you must use a specific medicine designated for that ailment. Medicines typically have the illness's name in their name. For example, Open Wound Salve will cure Open Wound and it cannot be used for any other illnesses. The only exception to this is Antidote, which cures Poison. | |||
Before curing an illness, the wolf must be '''diagnosed at the herbalist'''. Diagnosis is required before you are able to cure an illness, but having a herbalist is not required to do it. If you do not have a herbalist, Herbert will help you diagnose your wolf's illness instead. | |||
| Line 983: | Line 992: | ||
<th style="width: 60%;">Proficiency</th><th style="width: 40%;">Cost</th> | <th style="width: 60%;">Proficiency</th><th style="width: 40%;">Cost</th> | ||
</tr> | </tr> | ||
<tr><td>0% | <tr><td>0% – 3%</td><td>20 [[File:icon-sc.png]] SC</td></tr> | ||
<tr><td>4% | <tr><td>4% – 7%</td><td>19 [[File:icon-sc.png]] SC</td></tr> | ||
<tr><td>8% | <tr><td>8% – 11%</td><td>18 [[File:icon-sc.png]] SC</td></tr> | ||
<tr><td>12% | <tr><td>12% – 15%</td><td>17 [[File:icon-sc.png]] SC</td></tr> | ||
<tr><td>16% | <tr><td>16% – 19%</td><td>16 [[File:icon-sc.png]] SC</td></tr> | ||
<tr><td>20% | <tr><td>20% – 23%</td><td>15 [[File:icon-sc.png]] SC</td></tr> | ||
<tr><td>24% | <tr><td>24% – 27%</td><td>14 [[File:icon-sc.png]] SC</td></tr> | ||
<tr><td>28% | <tr><td>28% – 31%</td><td>13 [[File:icon-sc.png]] SC</td></tr> | ||
<tr><td>32% | <tr><td>32% – 35%</td><td>12 [[File:icon-sc.png]] SC</td></tr> | ||
<tr><td>36% | <tr><td>36% – 39%</td><td>11 [[File:icon-sc.png]] SC</td></tr> | ||
<tr><td>40% | <tr><td>40% – 43%</td><td>10 [[File:icon-sc.png]] SC</td></tr> | ||
<tr><td>44% | <tr><td>44% – 47%</td><td>9 [[File:icon-sc.png]] SC</td></tr> | ||
<tr><td>48% | <tr><td>48% – 51%</td><td>8 [[File:icon-sc.png]] SC</td></tr> | ||
<tr><td>52% | <tr><td>52% – 55%</td><td>7 [[File:icon-sc.png]] SC</td></tr> | ||
<tr><td>56% | <tr><td>56% – 59%</td><td>6 [[File:icon-sc.png]] SC</td></tr> | ||
<tr><td>60% | <tr><td>60% – 63%</td><td>5 [[File:icon-sc.png]] SC</td></tr> | ||
<tr><td>64% | <tr><td>64% – 67%</td><td>4 [[File:icon-sc.png]] SC</td></tr> | ||
<tr><td>68% | <tr><td>68% – 71%</td><td>3 [[File:icon-sc.png]] SC</td></tr> | ||
<tr><td>72% | <tr><td>72% – 75%</td><td>2 [[File:icon-sc.png]] SC</td></tr> | ||
<tr><td>76% | <tr><td>76% – 79%</td><td>1 [[File:icon-sc.png]] SC</td></tr> | ||
<tr><td>80% | <tr><td>80% – 100%</td><td>Free</td></tr> | ||
</td> | </td> | ||
</tr> | </tr> | ||
| Line 1,009: | Line 1,018: | ||
After diagnosing the wolf at the [[Herbalism|herbalist]], you can give them the cure from the Sick Wolves page or your Hoard. This will cure their illness and provide '''one rollover of illness immunity''' to the wolf. This means that the wolf will be unable to contract any more illnesses until you rollover one time. | |||
There are some illnesses—Constipation, Cough, Cystitis, and Diarrhea—which have a small chance to cure themselves on rollover. If this occurs, you will see a note in your Daily Rollover Summary informing you that the wolf is feeling better. Besides with these illnesses, wolves will stay sick until you cure them. | |||
| Line 1,268: | Line 1,058: | ||
Lead wolves and breeding males are immune to lethal illness and cannot be killed by illnesses. The only way to remove a lead wolf or breeding male early is to spend Gold Cones to retire them manually. | '''Lead wolves and breeding males are immune to lethal illness and cannot be killed by illnesses'''. The only way to remove a lead wolf or breeding male early is to spend Gold Cones to retire them manually. | ||
| Line 1,280: | Line 1,070: | ||
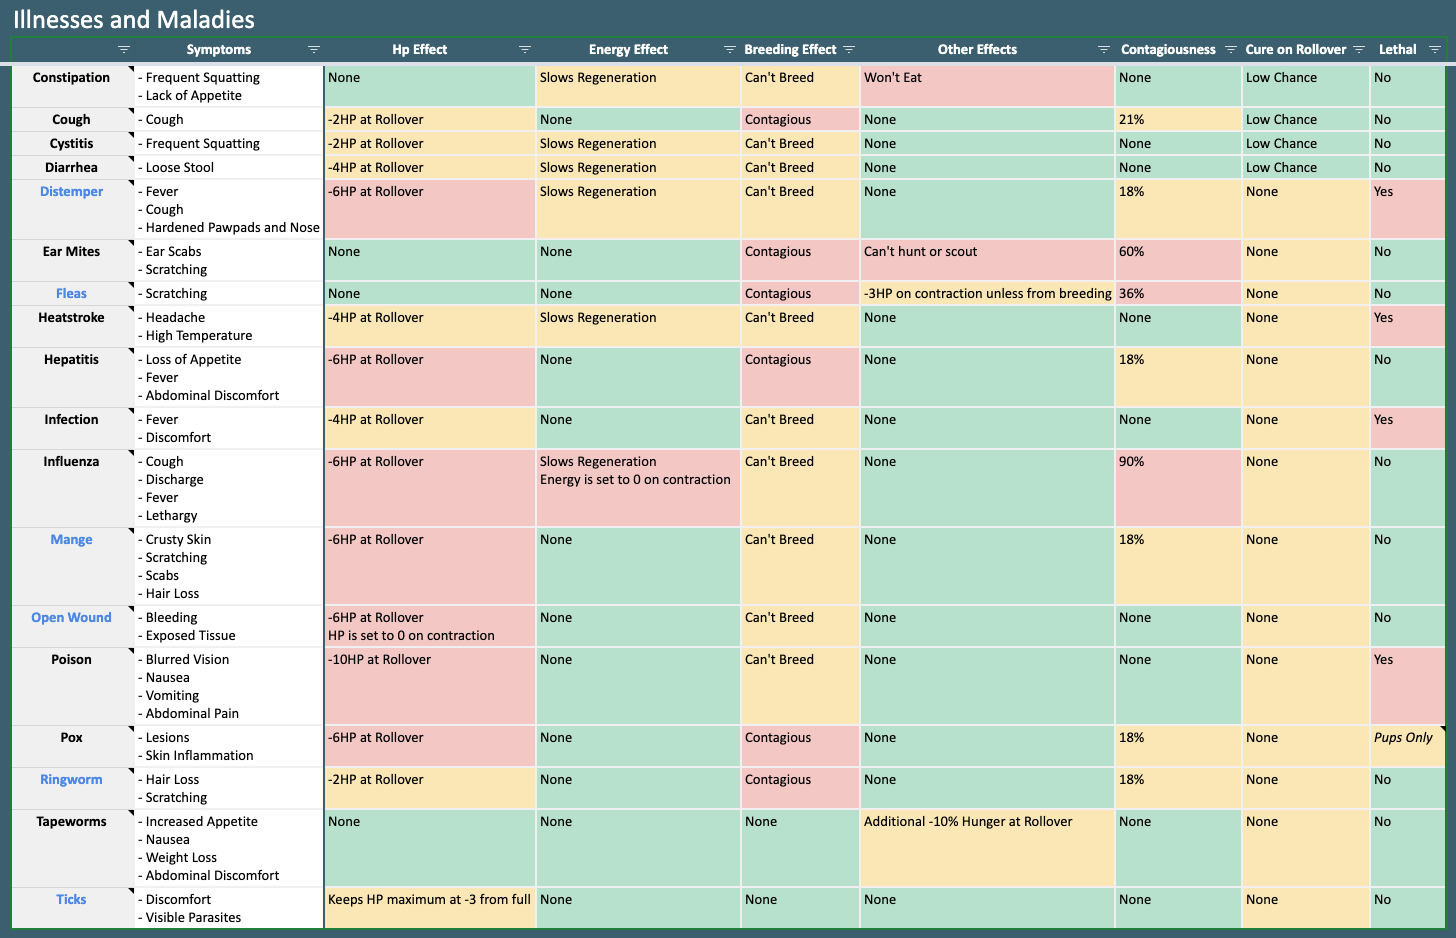
The HP effect column indicates how much HP is lost every rollover due to this illness. The energy effect and breeding effect indicates the effects the illness has on energy regeneration and breeding respectively. Contagiousness details the percent chance of the illness passing to one other wolf on rollover. Other Effects might include lethality, an illness's special effects, chance to cure on rollover, etc. | The HP effect column indicates how much HP is lost every rollover due to this illness. The energy effect and breeding effect indicates the effects the illness has on energy regeneration and breeding respectively. Contagiousness details the percent chance of the illness passing to one other wolf on rollover. Other Effects might include lethality, an illness's special effects, chance to cure on rollover, etc. Like noted at the top of the table, all illnesses cause double mood loss at rollove.r | ||
| Line 1,291: | Line 1,081: | ||
<th style="width:16.6%;"><b>Contagiousness</b></th> | <th style="width:16.6%;"><b>Contagiousness</b></th> | ||
<th style="width:16.6%;"><b>Other Effects</b></th> | <th style="width:16.6%;"><b>Other Effects</b></th> | ||
</tr> | |||
<tr> | |||
<td colspan=6 style="text-align:center;">Note: ALL illnesses cause double mood loss at rollover (5% becomes 10%)</td> | |||
</tr> | </tr> | ||
<tr> | <tr> | ||
| Line 1,296: | Line 1,089: | ||
</tr> | </tr> | ||
<tr style="background:#ebebeb;"> | <tr style="background:#ebebeb;"> | ||
<th style="text-align:center;">Cough</th><td> | <th style="text-align:center;">Cough</th><td>−2 HP</td><td>None</td><td>Contagious</td><td>21%</td><td>Low chance to cure on rollover</td> | ||
</tr> | </tr> | ||
<tr> | <tr> | ||
<th style="text-align:center;">Cystitis</th><td> | <th style="text-align:center;">Cystitis</th><td>−2 HP</td><td>Slows Regeneration</td><td>Can't Breed</td><td>Not Contagious</td><td>Low chance to cure on rollover</td> | ||
</tr> | </tr> | ||
<tr style="background:#ebebeb;"> | <tr style="background:#ebebeb;"> | ||
<th style="text-align:center;">Diarrhea</th><td> | <th style="text-align:center;">Diarrhea</th><td>−4 HP</td><td>Slows Regeneration</td><td>Can't Breed</td><td>Not Contagious</td><td>Low chance to cure on rollover</td> | ||
</tr> | </tr> | ||
<tr> | <tr> | ||
<th style="text-align:center;">Distemper</th><td> | <th style="text-align:center;">Distemper</th><td>−6 HP</td><td>Slows Regeneration</td><td>Can't Breed</td><td>18%</td><td>Lethal</td> | ||
</tr> | </tr> | ||
<tr style="background:#ebebeb;"> | <tr style="background:#ebebeb;"> | ||
| Line 1,311: | Line 1,104: | ||
</tr> | </tr> | ||
<tr> | <tr> | ||
<th style="text-align:center;">Fleas</th><td>None</td><td>None</td><td>Contagious</td><td>36%</td><td> | <th style="text-align:center;">Fleas</th><td>None</td><td>None</td><td>Contagious</td><td>36%</td><td>−3 HP on contraction unless from breeding</td> | ||
</tr> | </tr> | ||
<tr style="background:#ebebeb;"> | <tr style="background:#ebebeb;"> | ||
<th style="text-align:center;">Heatstroke</th><td> | <th style="text-align:center;">Heatstroke</th><td>−4 HP</td><td>Slows Regeneration</td><td>Can't Breed</td><td>Not Contagious</td><td>Lethal</td> | ||
</tr> | </tr> | ||
<tr> | <tr> | ||
<th style="text-align:center;">Hepatitis</th><td> | <th style="text-align:center;">Hepatitis</th><td>−6 HP</td><td>None</td><td>Contagious</td><td>18%</td><td>None</td> | ||
</tr> | </tr> | ||
<tr style="background:#ebebeb;"> | <tr style="background:#ebebeb;"> | ||
<th style="text-align:center;">Infection</th><td> | <th style="text-align:center;">Infection</th><td>−4 HP</td><td>None</td><td>Can't Breed</td><td>Not Contagious</td><td>Lethal</td> | ||
</tr> | </tr> | ||
<tr> | <tr> | ||
<th style="text-align:center;">Influenza</th><td> | <th style="text-align:center;">Influenza</th><td>−6 HP</td><td>Slows Regeneration</td><td>Can't Breed</td><td>90%</td><td>Energy set to 0 on contraction</td> | ||
</tr> | </tr> | ||
<tr style="background:#ebebeb;"> | <tr style="background:#ebebeb;"> | ||
<th style="text-align:center;">Mange</th><td> | <th style="text-align:center;">Mange</th><td>−6 HP</td><td>None</td><td>Can't Breed</td><td>18%</td><td>None</td> | ||
</tr> | </tr> | ||
<tr> | <tr> | ||
<th style="text-align:center;">Open Wound</th><td> | <th style="text-align:center;">Open Wound</th><td>−6 HP</td><td>None</td><td>Can't Breed</td><td>Not Contagious</td><td>HP set to 0 on contraction</td> | ||
</tr> | </tr> | ||
<tr style="background:#ebebeb;"> | <tr style="background:#ebebeb;"> | ||
<th style="text-align:center;">Poison</th><td> | <th style="text-align:center;">Poison</th><td>−10 HP</td><td>None</td><td>Can't Breed</td><td>Not Contagious</td><td>Lethal</td> | ||
</tr> | </tr> | ||
<tr> | <tr> | ||
<th style="text-align:center;">Pox</th><td> | <th style="text-align:center;">Pox</th><td>−6 HP</td><td>None</td><td>Contagious</td><td>18%</td><td>Lethal to pups after 1 rollover</td> | ||
</tr> | </tr> | ||
<tr style="background:#ebebeb;"> | <tr style="background:#ebebeb;"> | ||
<th style="text-align:center;">Ringworm</th><td> | <th style="text-align:center;">Ringworm</th><td>−2 HP</td><td>None</td><td>Contagious</td><td>18%</td><td>None</td> | ||
</tr> | </tr> | ||
<tr> | <tr> | ||
| Line 1,344: | Line 1,137: | ||
</tr> | </tr> | ||
<tr style="background:#ebebeb;"> | <tr style="background:#ebebeb;"> | ||
<th style="text-align:center;">Ticks</th><td>Keeps HP max at | <th style="text-align:center;">Ticks</th><td>Keeps HP max at −3 from full</td><td>None</td><td>None</td><td>Not Contagious</td><td>None</td> | ||
</tr> | </tr> | ||
</table> | </table> | ||
Revision as of 18:49, 2 January 2026
| Table of Contents |
|---|
| Links not working? Sections must be expanded to jump to a subheader within them! |
| Foraging |
| Herbs |
| Herbalists |
| Mixing Medicine |
| All Medicines |
| Illnesses |
| Getting Sick |
| Preventing Illness |
| Diagnosing Illness |
| Curing Illness |
| Contagious Illnesses |
| Lethal Illnesses |
| Illness List |
Illnesses are a persistent mechanic that add a level of unpredictability and challenge to the Wolvden experience! While playing casually, your wolves will be able to get sick and injured, and you will be able to assist them with the help of a Herbalist. Illnesses can catch you off-guard if you're not prepared to address them as they pop up, so understanding illnesses and herbalism can be very important to ensuring your pack's longevity.

Illnesses and herbalism are unlocked on your 4th rollover with a new unique quest, Sickness and Health. Upon rolling over, Tala will inform you that your lead wolf has fallen ill and will walk you through assigning a Herbalist and treating the illness. New players have a brief illness immunity: until you have completed the Sickness and Health quest and rolled over five times, your wolves will be incapable of developing illnesses and you will be unable to assign wolves the Herbalist and Forager roles.


