
Raffle Studs: Difference between revisions
From Grouse House Wiki
| Line 228: | Line 228: | ||
{{MarkingNoSource|Brown Catshark Heavy|/images/0/05/marking_catsharkheavy_brown_preview_white.png|[[Raffle Studs]]|Tier 2}} | {{MarkingNoSource|Brown Catshark Heavy|/images/0/05/marking_catsharkheavy_brown_preview_white.png|[[Raffle Studs]]|Tier 2}} | ||
{{MarkingNoSource|Dark Brown Catshark Heavy|/images/0/08/marking_catsharkheavy_darkbrown_preview_white.png|[[Raffle Studs]]|Tier 2}} | {{MarkingNoSource|Dark Brown Catshark Heavy|/images/0/08/marking_catsharkheavy_darkbrown_preview_white.png|[[Raffle Studs]]|Tier 2}} | ||
{{MarkingNoSource|Ebony Catshark Heavy|/images/1/10/marking_catsharkheavy_ebony_preview_white.png|[[Raffle Studs]]|Tier 2}} | |||
{{MarkingNoSource|Gray Catshark Heavy|/images/1/13/marking_catsharkheavy_gray_preview_black.png|[[Raffle Studs]]|Tier 2}} | {{MarkingNoSource|Gray Catshark Heavy|/images/1/13/marking_catsharkheavy_gray_preview_black.png|[[Raffle Studs]]|Tier 2}} | ||
{{MarkingNoSource|Henna Catshark Heavy|/images/1/13/marking_catsharkheavy_henna_preview_white.png|[[Raffle Studs]]|Tier 2}} | {{MarkingNoSource|Henna Catshark Heavy|/images/1/13/marking_catsharkheavy_henna_preview_white.png|[[Raffle Studs]]|Tier 2}} | ||
| Line 248: | Line 249: | ||
{{MarkingNoSource|Brown Catshark Light|/images/0/05/marking_catsharklight_brown_preview_white.png|[[Raffle Studs]]|Tier 2}} | {{MarkingNoSource|Brown Catshark Light|/images/0/05/marking_catsharklight_brown_preview_white.png|[[Raffle Studs]]|Tier 2}} | ||
{{MarkingNoSource|Dark Brown Catshark Light|/images/0/08/marking_catsharklight_darkbrown_preview_white.png|[[Raffle Studs]]|Tier 2}} | {{MarkingNoSource|Dark Brown Catshark Light|/images/0/08/marking_catsharklight_darkbrown_preview_white.png|[[Raffle Studs]]|Tier 2}} | ||
{{MarkingNoSource|Ebony Catshark Light|/images/1/10/marking_catsharklight_ebony_preview_white.png|[[Raffle Studs]]|Tier 2}} | |||
{{MarkingNoSource|Gray Catshark Light|/images/1/13/marking_catsharklight_gray_preview_black.png|[[Raffle Studs]]|Tier 2}} | {{MarkingNoSource|Gray Catshark Light|/images/1/13/marking_catsharklight_gray_preview_black.png|[[Raffle Studs]]|Tier 2}} | ||
{{MarkingNoSource|Henna Catshark Light|/images/1/13/marking_catsharklight_henna_preview_white.png|[[Raffle Studs]]|Tier 2}} | {{MarkingNoSource|Henna Catshark Light|/images/1/13/marking_catsharklight_henna_preview_white.png|[[Raffle Studs]]|Tier 2}} | ||
| Line 267: | Line 269: | ||
{{MarkingNoSource|Black Cougar|/images/0/04/marking_cougar_black_preview_white.png|[[Raffle Studs]]|Tier 2}} | {{MarkingNoSource|Black Cougar|/images/0/04/marking_cougar_black_preview_white.png|[[Raffle Studs]]|Tier 2}} | ||
{{MarkingNoSource|Brown Cougar|/images/0/05/marking_cougar_brown_preview_white.png|[[Raffle Studs]]|Tier 2}} | {{MarkingNoSource|Brown Cougar|/images/0/05/marking_cougar_brown_preview_white.png|[[Raffle Studs]]|Tier 2}} | ||
{{MarkingNoSource|Ebony Cougar|/images/1/10/marking_cougar_ebony_preview_white.png|[[Raffle Studs]]|Tier 2}} | |||
{{MarkingNoSource|Gold Cougar|/images/1/12/marking_cougar_gold_preview_black.png|[[Raffle Studs]]|Tier 2}} | {{MarkingNoSource|Gold Cougar|/images/1/12/marking_cougar_gold_preview_black.png|[[Raffle Studs]]|Tier 2}} | ||
{{MarkingNoSource|Henna Cougar|/images/1/13/marking_cougar_henna_preview_white.png|[[Raffle Studs]]|Tier 2}} | {{MarkingNoSource|Henna Cougar|/images/1/13/marking_cougar_henna_preview_white.png|[[Raffle Studs]]|Tier 2}} | ||
{{MarkingNoSource|Honey Cougar|/images/1/14/marking_cougar_honey_preview_black.png|[[Raffle Studs]]|Tier 2}} | {{MarkingNoSource|Honey Cougar|/images/1/14/marking_cougar_honey_preview_black.png|[[Raffle Studs]]|Tier 2}} | ||
{{MarkingNoSource|Lilac Cougar|/images/1/14/marking_cougar_lilac_preview_black.png|[[Raffle Studs]]|Tier 2}} | |||
{{MarkingNoSource|Pumice Cougar|/images/1/16/marking_cougar_pumice_preview_white.png|[[Raffle Studs]]|Tier 2}} | {{MarkingNoSource|Pumice Cougar|/images/1/16/marking_cougar_pumice_preview_white.png|[[Raffle Studs]]|Tier 2}} | ||
{{MarkingNoSource|Red Cougar|/images/1/16/marking_cougar_red_preview_black.png|[[Raffle Studs]]|Tier 2}} | {{MarkingNoSource|Red Cougar|/images/1/16/marking_cougar_red_preview_black.png|[[Raffle Studs]]|Tier 2}} | ||
| Line 289: | Line 293: | ||
{{MarkingNoSource|Honey Inverted Panda|/images/1/14/marking_invertedpanda_honey_preview_black.png|[[Raffle Studs]]|Tier 2}} | {{MarkingNoSource|Honey Inverted Panda|/images/1/14/marking_invertedpanda_honey_preview_black.png|[[Raffle Studs]]|Tier 2}} | ||
{{MarkingNoSource|Red Inverted Panda|/images/1/16/marking_invertedpanda_red_preview_black.png|[[Raffle Studs]]|Tier 2}} | {{MarkingNoSource|Red Inverted Panda|/images/1/16/marking_invertedpanda_red_preview_black.png|[[Raffle Studs]]|Tier 2}} | ||
{{MarkingNoSource|Salt Inverted Panda|/images/1/17/marking_invertedpanda_salt_preview_black.png|[[Raffle Studs]]|Tier 2}} | |||
{{MarkingNoSource|Shell Inverted Panda|/images/1/18/marking_invertedpanda_shell_preview_black.png|[[Raffle Studs]]|Tier 2}} | {{MarkingNoSource|Shell Inverted Panda|/images/1/18/marking_invertedpanda_shell_preview_black.png|[[Raffle Studs]]|Tier 2}} | ||
{{MarkingNoSource|White Inverted Panda|/images/2/21/marking_invertedpanda_white_preview_black.png|[[Raffle Studs]]|Tier 2}} | {{MarkingNoSource|White Inverted Panda|/images/2/21/marking_invertedpanda_white_preview_black.png|[[Raffle Studs]]|Tier 2}} | ||
{{MarkingNoSource|Xanthic Inverted Panda|/images/2/23/marking_invertedpanda_xanthic_preview_black.png|[[Raffle Studs]]|Tier 2}} | |||
{{MarkingNoSource|Yellow Inverted Panda|/images/2/23/marking_invertedpanda_yellow_preview_black.png|[[Raffle Studs]]|Tier 2}} | {{MarkingNoSource|Yellow Inverted Panda|/images/2/23/marking_invertedpanda_yellow_preview_black.png|[[Raffle Studs]]|Tier 2}} | ||
| Line 307: | Line 313: | ||
{{MarkingNoSource|Brown Leopard Shark|/images/0/05/marking_leopardshark_brown_preview_white.png|[[Raffle Studs]]|Tier 2}} | {{MarkingNoSource|Brown Leopard Shark|/images/0/05/marking_leopardshark_brown_preview_white.png|[[Raffle Studs]]|Tier 2}} | ||
{{MarkingNoSource|Dark Brown Leopard Shark|/images/0/08/marking_leopardshark_darkbrown_preview_white.png|[[Raffle Studs]]|Tier 2}} | {{MarkingNoSource|Dark Brown Leopard Shark|/images/0/08/marking_leopardshark_darkbrown_preview_white.png|[[Raffle Studs]]|Tier 2}} | ||
{{MarkingNoSource|Ebony Leopard Shark|/images/1/10/marking_leopardshark_ebony_preview_white.png|[[Raffle Studs]]|Tier 2}} | |||
{{MarkingNoSource|Gray Leopard Shark|/images/1/13/marking_leopardshark_gray_preview_black.png|[[Raffle Studs]]|Tier 2}} | {{MarkingNoSource|Gray Leopard Shark|/images/1/13/marking_leopardshark_gray_preview_black.png|[[Raffle Studs]]|Tier 2}} | ||
{{MarkingNoSource|Henna Leopard Shark|/images/1/13/marking_leopardshark_henna_preview_white.png|[[Raffle Studs]]|Tier 2}} | {{MarkingNoSource|Henna Leopard Shark|/images/1/13/marking_leopardshark_henna_preview_white.png|[[Raffle Studs]]|Tier 2}} | ||
{{MarkingNoSource|Honey Leopard Shark|/images/1/14/marking_leopardshark_honey_preview_black.png|[[Raffle Studs]]|Tier 2}} | {{MarkingNoSource|Honey Leopard Shark|/images/1/14/marking_leopardshark_honey_preview_black.png|[[Raffle Studs]]|Tier 2}} | ||
{{MarkingNoSource|Lilac Leopard Shark|/images/1/14/marking_leopardshark_lilac_preview_black.png|[[Raffle Studs]]|Tier 2}} | |||
{{MarkingNoSource|Pumice Leopard Shark|/images/1/16/marking_leopardshark_pumice_preview_white.png|[[Raffle Studs]]|Tier 2}} | {{MarkingNoSource|Pumice Leopard Shark|/images/1/16/marking_leopardshark_pumice_preview_white.png|[[Raffle Studs]]|Tier 2}} | ||
{{MarkingNoSource|Red Leopard Shark|/images/1/16/marking_leopardshark_red_preview_black.png|[[Raffle Studs]]|Tier 2}} | {{MarkingNoSource|Red Leopard Shark|/images/1/16/marking_leopardshark_red_preview_black.png|[[Raffle Studs]]|Tier 2}} | ||
| Line 330: | Line 338: | ||
{{MarkingNoSource|Cream Lupos|/images/0/07/marking_lupos_cream_preview_black.png|[[Raffle Studs]]|Tier 2}} | {{MarkingNoSource|Cream Lupos|/images/0/07/marking_lupos_cream_preview_black.png|[[Raffle Studs]]|Tier 2}} | ||
{{MarkingNoSource|Dark Brown Lupos|/images/0/08/marking_lupos_darkbrown_preview_white.png|[[Raffle Studs]]|Tier 2}} | {{MarkingNoSource|Dark Brown Lupos|/images/0/08/marking_lupos_darkbrown_preview_white.png|[[Raffle Studs]]|Tier 2}} | ||
{{MarkingNoSource|Ebony Lupos|/images/1/10/marking_lupos_ebony_preview_white.png|[[Raffle Studs]]|Tier 2}} | |||
{{MarkingNoSource|Gold Lupos|/images/1/12/marking_lupos_gold_preview_black.png|[[Raffle Studs]]|Tier 2}} | {{MarkingNoSource|Gold Lupos|/images/1/12/marking_lupos_gold_preview_black.png|[[Raffle Studs]]|Tier 2}} | ||
{{MarkingNoSource|Lilac Lupos|/images/1/14/marking_lupos_lilac_preview_black.png|[[Raffle Studs]]|Tier 2}} | |||
{{MarkingNoSource|Nocturne Lupos|/images/1/15/marking_lupos_nocturne_preview_white.png|[[Raffle Studs]]|Tier 2}} | {{MarkingNoSource|Nocturne Lupos|/images/1/15/marking_lupos_nocturne_preview_white.png|[[Raffle Studs]]|Tier 2}} | ||
{{MarkingNoSource|Red Lupos|/images/1/16/marking_lupos_red_preview_black.png|[[Raffle Studs]]|Tier 2}} | {{MarkingNoSource|Red Lupos|/images/1/16/marking_lupos_red_preview_black.png|[[Raffle Studs]]|Tier 2}} | ||
{{MarkingNoSource|White Lupos|/images/2/21/marking_lupos_white_preview_black.png|[[Raffle Studs]]|Tier 2}} | {{MarkingNoSource|White Lupos|/images/2/21/marking_lupos_white_preview_black.png|[[Raffle Studs]]|Tier 2}} | ||
{{MarkingNoSource|Xanthic Lupos|/images/2/23/marking_lupos_xanthic_preview_black.png|[[Raffle Studs]]|Tier 2}} | |||
{{MarkingNoSource|Yellow Lupos|/images/2/23/marking_lupos_yellow_preview_black.png|[[Raffle Studs]]|Tier 2}} | {{MarkingNoSource|Yellow Lupos|/images/2/23/marking_lupos_yellow_preview_black.png|[[Raffle Studs]]|Tier 2}} | ||
| Line 349: | Line 360: | ||
{{MarkingNoSource|Cream Merle|/images/0/07/marking_merle_cream_preview_black.png|[[Raffle Studs]]|Tier 2}} | {{MarkingNoSource|Cream Merle|/images/0/07/marking_merle_cream_preview_black.png|[[Raffle Studs]]|Tier 2}} | ||
{{MarkingNoSource|Honey Merle|/images/1/14/marking_merle_honey_preview_black.png|[[Raffle Studs]]|Tier 2}} | {{MarkingNoSource|Honey Merle|/images/1/14/marking_merle_honey_preview_black.png|[[Raffle Studs]]|Tier 2}} | ||
{{MarkingNoSource|Salt Merle|/images/1/17/marking_merle_salt_preview_black.png|[[Raffle Studs]]|Tier 2}} | |||
{{MarkingNoSource|Shell Merle|/images/1/18/marking_merle_shell_preview_black.png|[[Raffle Studs]]|Tier 2}} | {{MarkingNoSource|Shell Merle|/images/1/18/marking_merle_shell_preview_black.png|[[Raffle Studs]]|Tier 2}} | ||
{{MarkingNoSource|White Merle|/images/2/21/marking_merle_white_preview_black.png|[[Raffle Studs]]|Tier 2}} | {{MarkingNoSource|White Merle|/images/2/21/marking_merle_white_preview_black.png|[[Raffle Studs]]|Tier 2}} | ||
{{MarkingNoSource|Xanthic Merle|/images/2/23/marking_merle_xanthic_preview_black.png|[[Raffle Studs]]|Tier 2}} | |||
{{MarkingNoSource|Yellow Merle|/images/2/23/marking_merle_yellow_preview_black.png|[[Raffle Studs]]|Tier 2}} | {{MarkingNoSource|Yellow Merle|/images/2/23/marking_merle_yellow_preview_black.png|[[Raffle Studs]]|Tier 2}} | ||
| Line 367: | Line 380: | ||
{{MarkingNoSource|Brown Merle Patches|/images/0/05/marking_merlepatches_brown_preview_white.png|[[Raffle Studs]]|Tier 2}} | {{MarkingNoSource|Brown Merle Patches|/images/0/05/marking_merlepatches_brown_preview_white.png|[[Raffle Studs]]|Tier 2}} | ||
{{MarkingNoSource|Dark Brown Merle Patches|/images/0/08/marking_merlepatches_darkbrown_preview_white.png|[[Raffle Studs]]|Tier 2}} | {{MarkingNoSource|Dark Brown Merle Patches|/images/0/08/marking_merlepatches_darkbrown_preview_white.png|[[Raffle Studs]]|Tier 2}} | ||
{{MarkingNoSource|Ebony Merle Patches|/images/1/10/marking_merlepatches_ebony_preview_white.png|[[Raffle Studs]]|Tier 2}} | |||
</div> | </div> | ||
| Line 387: | Line 401: | ||
{{MarkingNoSource|Honey Orca|/images/1/14/marking_orca_honey_preview_black.png|[[Raffle Studs]]|Tier 2}} | {{MarkingNoSource|Honey Orca|/images/1/14/marking_orca_honey_preview_black.png|[[Raffle Studs]]|Tier 2}} | ||
{{MarkingNoSource|Red Orca|/images/1/16/marking_orca_red_preview_black.png|[[Raffle Studs]]|Tier 2}} | {{MarkingNoSource|Red Orca|/images/1/16/marking_orca_red_preview_black.png|[[Raffle Studs]]|Tier 2}} | ||
{{MarkingNoSource|Salt Orca|/images/1/17/marking_orca_salt_preview_black.png|[[Raffle Studs]]|Tier 2}} | |||
{{MarkingNoSource|Shell Orca|/images/1/18/marking_orca_shell_preview_black.png|[[Raffle Studs]]|Tier 2}} | {{MarkingNoSource|Shell Orca|/images/1/18/marking_orca_shell_preview_black.png|[[Raffle Studs]]|Tier 2}} | ||
{{MarkingNoSource|White Orca|/images/2/21/marking_orca_white_preview_black.png|[[Raffle Studs]]|Tier 2}} | {{MarkingNoSource|White Orca|/images/2/21/marking_orca_white_preview_black.png|[[Raffle Studs]]|Tier 2}} | ||
{{MarkingNoSource|Xanthic Orca|/images/2/23/marking_orca_xanthic_preview_black.png|[[Raffle Studs]]|Tier 2}} | |||
{{MarkingNoSource|Yellow Orca|/images/2/23/marking_orca_yellow_preview_black.png|[[Raffle Studs]]|Tier 2}} | {{MarkingNoSource|Yellow Orca|/images/2/23/marking_orca_yellow_preview_black.png|[[Raffle Studs]]|Tier 2}} | ||
| Line 405: | Line 421: | ||
{{MarkingNoSource|Brown Panda|/images/0/05/marking_panda_brown_preview_white.png|[[Raffle Studs]]|Tier 2}} | {{MarkingNoSource|Brown Panda|/images/0/05/marking_panda_brown_preview_white.png|[[Raffle Studs]]|Tier 2}} | ||
{{MarkingNoSource|Dark Brown Panda|/images/0/08/marking_panda_darkbrown_preview_white.png|[[Raffle Studs]]|Tier 2}} | {{MarkingNoSource|Dark Brown Panda|/images/0/08/marking_panda_darkbrown_preview_white.png|[[Raffle Studs]]|Tier 2}} | ||
{{MarkingNoSource|Ebony Panda|/images/1/10/marking_panda_ebony_preview_white.png|[[Raffle Studs]]|Tier 2}} | |||
{{MarkingNoSource|Henna Panda|/images/1/13/marking_panda_henna_preview_white.png|[[Raffle Studs]]|Tier 2}} | {{MarkingNoSource|Henna Panda|/images/1/13/marking_panda_henna_preview_white.png|[[Raffle Studs]]|Tier 2}} | ||
{{MarkingNoSource|Nocturne Panda|/images/1/15/marking_panda_nocturne_preview_white.png|[[Raffle Studs]]|Tier 2}} | {{MarkingNoSource|Nocturne Panda|/images/1/15/marking_panda_nocturne_preview_white.png|[[Raffle Studs]]|Tier 2}} | ||
| Line 423: | Line 440: | ||
{{MarkingNoSource|Brown Wings|/images/0/05/marking_wings_brown_preview_white.png|[[Raffle Studs]]|Tier 2}} | {{MarkingNoSource|Brown Wings|/images/0/05/marking_wings_brown_preview_white.png|[[Raffle Studs]]|Tier 2}} | ||
{{MarkingNoSource|Dark Brown Wings|/images/0/08/marking_wings_darkbrown_preview_white.png|[[Raffle Studs]]|Tier 2}} | {{MarkingNoSource|Dark Brown Wings|/images/0/08/marking_wings_darkbrown_preview_white.png|[[Raffle Studs]]|Tier 2}} | ||
{{MarkingNoSource|Ebony Wings|/images/1/10/marking_wings_ebony_preview_white.png|[[Raffle Studs]]|Tier 2}} | |||
{{MarkingNoSource|Gold Wings|/images/1/12/marking_wings_gold_preview_black.png|[[Raffle Studs]]|Tier 2}} | {{MarkingNoSource|Gold Wings|/images/1/12/marking_wings_gold_preview_black.png|[[Raffle Studs]]|Tier 2}} | ||
{{MarkingNoSource|Honey Wings|/images/1/14/marking_wings_honey_preview_black.png|[[Raffle Studs]]|Tier 2}} | {{MarkingNoSource|Honey Wings|/images/1/14/marking_wings_honey_preview_black.png|[[Raffle Studs]]|Tier 2}} | ||
{{MarkingNoSource|Lilac Wings|/images/1/14/marking_wings_lilac_preview_black.png|[[Raffle Studs]]|Tier 2}} | |||
{{MarkingNoSource|Nocturne Wings|/images/1/15/marking_wings_nocturne_preview_white.png|[[Raffle Studs]]|Tier 2}} | {{MarkingNoSource|Nocturne Wings|/images/1/15/marking_wings_nocturne_preview_white.png|[[Raffle Studs]]|Tier 2}} | ||
{{MarkingNoSource|Red Wings|/images/1/16/marking_wings_red_preview_black.png|[[Raffle Studs]]|Tier 2}} | {{MarkingNoSource|Red Wings|/images/1/16/marking_wings_red_preview_black.png|[[Raffle Studs]]|Tier 2}} | ||
| Line 443: | Line 462: | ||
{{MarkingNoSource|Brown Wings Heavy|/images/0/05/marking_wingsheavy_brown_preview_white.png|[[Raffle Studs]]|Tier 2}} | {{MarkingNoSource|Brown Wings Heavy|/images/0/05/marking_wingsheavy_brown_preview_white.png|[[Raffle Studs]]|Tier 2}} | ||
{{MarkingNoSource|Dark Brown Wings Heavy|/images/0/08/marking_wingsheavy_darkbrown_preview_white.png|[[Raffle Studs]]|Tier 2}} | {{MarkingNoSource|Dark Brown Wings Heavy|/images/0/08/marking_wingsheavy_darkbrown_preview_white.png|[[Raffle Studs]]|Tier 2}} | ||
{{MarkingNoSource|Ebony Wings Heavy|/images/1/10/marking_wingsheavy_ebony_preview_white.png|[[Raffle Studs]]|Tier 2}} | |||
{{MarkingNoSource|Gold Wings Heavy|/images/1/12/marking_wingsheavy_gold_preview_black.png|[[Raffle Studs]]|Tier 2}} | {{MarkingNoSource|Gold Wings Heavy|/images/1/12/marking_wingsheavy_gold_preview_black.png|[[Raffle Studs]]|Tier 2}} | ||
{{MarkingNoSource|Honey Wings Heavy|/images/1/14/marking_wingsheavy_honey_preview_black.png|[[Raffle Studs]]|Tier 2}} | {{MarkingNoSource|Honey Wings Heavy|/images/1/14/marking_wingsheavy_honey_preview_black.png|[[Raffle Studs]]|Tier 2}} | ||
{{MarkingNoSource|Lilac Wings Heavy|/images/1/14/marking_wingsheavy_lilac_preview_black.png|[[Raffle Studs]]|Tier 2}} | |||
{{MarkingNoSource|Nocturne Wings Heavy|/images/1/15/marking_wingsheavy_nocturne_preview_white.png|[[Raffle Studs]]|Tier 2}} | {{MarkingNoSource|Nocturne Wings Heavy|/images/1/15/marking_wingsheavy_nocturne_preview_white.png|[[Raffle Studs]]|Tier 2}} | ||
{{MarkingNoSource|Red Wings Heavy|/images/1/16/marking_wingsheavy_red_preview_black.png|[[Raffle Studs]]|Tier 2}} | {{MarkingNoSource|Red Wings Heavy|/images/1/16/marking_wingsheavy_red_preview_black.png|[[Raffle Studs]]|Tier 2}} | ||
| Line 463: | Line 484: | ||
{{MarkingNoSource|Brown Wings Scarce|/images/0/05/marking_wingsscarce_brown_preview_white.png|[[Raffle Studs]]|Tier 2}} | {{MarkingNoSource|Brown Wings Scarce|/images/0/05/marking_wingsscarce_brown_preview_white.png|[[Raffle Studs]]|Tier 2}} | ||
{{MarkingNoSource|Dark Brown Wings Scarce|/images/0/08/marking_wingsscarce_darkbrown_preview_white.png|[[Raffle Studs]]|Tier 2}} | {{MarkingNoSource|Dark Brown Wings Scarce|/images/0/08/marking_wingsscarce_darkbrown_preview_white.png|[[Raffle Studs]]|Tier 2}} | ||
{{MarkingNoSource|Ebony Wings Scarce|/images/1/10/marking_wingsscarce_ebony_preview_white.png|[[Raffle Studs]]|Tier 2}} | |||
{{MarkingNoSource|Gold Wings Scarce|/images/1/12/marking_wingsscarce_gold_preview_black.png|[[Raffle Studs]]|Tier 2}} | {{MarkingNoSource|Gold Wings Scarce|/images/1/12/marking_wingsscarce_gold_preview_black.png|[[Raffle Studs]]|Tier 2}} | ||
{{MarkingNoSource|Honey Wings Scarce|/images/1/14/marking_wingsscarce_honey_preview_black.png|[[Raffle Studs]]|Tier 2}} | {{MarkingNoSource|Honey Wings Scarce|/images/1/14/marking_wingsscarce_honey_preview_black.png|[[Raffle Studs]]|Tier 2}} | ||
{{MarkingNoSource|Lilac Wings Scarce|/images/1/14/marking_wingsscarce_lilac_preview_black.png|[[Raffle Studs]]|Tier 2}} | |||
{{MarkingNoSource|Nocturne Wings Scarce|/images/1/15/marking_wingsscarce_nocturne_preview_white.png|[[Raffle Studs]]|Tier 2}} | {{MarkingNoSource|Nocturne Wings Scarce|/images/1/15/marking_wingsscarce_nocturne_preview_white.png|[[Raffle Studs]]|Tier 2}} | ||
{{MarkingNoSource|Red Wings Scarce|/images/1/16/marking_wingsscarce_red_preview_black.png|[[Raffle Studs]]|Tier 2}} | {{MarkingNoSource|Red Wings Scarce|/images/1/16/marking_wingsscarce_red_preview_black.png|[[Raffle Studs]]|Tier 2}} | ||
Latest revision as of 02:38, 27 October 2025
Taking a look at any of the weekly Community Updates, posted every Friday, you'll notice an announcement about a new Raffle Stud! The Raffle Stud is a weekly raffle that players Level 10 or higher can enter for a chance to win a breeding with a special, custom wolf. These wolves are created from scratch by site admins to contain rare, raffle-exclusive markings and eyes.
Every Friday shortly before the Community Update, the raffle stud is swapped out for a new one, and the winners of the previous week's raffle will be granted the ability to breed one of their wolves to the stud!
| Table of Contents |
|---|
| Links not working? Sections must be expanded to jump to a subheader within them! |
| About Raffle Studs |
| How to Enter the Raffle |
| Winning a Stud Raffle |
| Raffle-Exclusive Traits |
| Raffle Eyes |
| Raffle Markings |
| Raffle Stud List |
| 2021 Studs |
| 2022 Studs |
| 2023 Studs |
| 2024 Studs |
| 2025 Studs |
About Raffle Studs
About Raffle Studs
The raffle stud raffle is a weekly raffle put on by site admins that allows players the chance to win a breeding with a special wolf. Raffle Studs are unique wolves custom-made by the site's staff to have multiple raffle-exclusive traits that can only be obtained through breeding.

While the raffle studs exist in game, they aren't owned by any player. Instead, they're stored in their own special pack operated by the site's developers. These wolves will never rollover or age, and they will never leave this pack. Previously, a contest was held to create a design for the leader of the Raffle Stud Pack. You can view the contest and all of the entrants in this forum topic!
Each raffle stud has exactly 200 stats with a bonus 7 stats being granted by their individual personalities. Since the bonus stats are determined by personality, each raffle stud will have a different stat array. One stud may have 37 Agility and 40 Wisdom, while another stud has 47 Agility and 43 Wisdom. Regardless of how their stats are spread out, they will always add up to 207.
Raffle studs will never be carriers of mutations and will always have a Tier I or Tier II base. They do not have any heritage, and their designs will never be reused on a different raffle stud.
Raffle studs have randomly generated names submitted by players, though they're not updated frequently! You can suggest your own names on this forum topic.
How to Enter the Raffle
How to Enter the Raffle
You can find the raffle stud raffle at the bottom of the News page or through the link provided on any Community Update news post. Clicking on the wolf's image on the News page will bring you to the raffle!
In order to view the Raffle Stud page and enter the raffle, your lead wolf must be at least Level 10. If your lead wolf is lower level than this, you will be denied access to the page. Once your lead wolf is high enough level, you'll find a page with all of the stud's details, and then a menu where you can select an item to enter the raffle with.

Each raffle stud asks for an item in exchange for entrance into the raffle, and the type of item requested is randomized every week. The items asked for always been Food, Amusement Items, Medicine, or Herbs. In order to enter an item into the raffle, it must be full-use. Entering an item in the raffle removes the item from your Hoard.
You can only enter the raffle stud raffle once per week, and you can't undo your entry once it's sent. You can enter the raffle up until about mid-day on Friday, after which it's closed to calculate results and update the page with a new stud.
Winning a Stud Raffle
Winning a Stud Raffle
The raffle stud raffle is pulled manually by an admin every Friday, so there's no set time that winners are decided. To be safe, make sure you've entered before Friday for a chance to win!

If you win the raffle, you will receive a notification providing a breeding link. You'll also be able to find this link on the News page if you misplace the notification. You must follow the link from either of these places to bred to the stud- you cannot breed to him directly from his wolf page. An achievement will be granted if it's your first time winning the raffle, as well!

| Winner Winner | |
 | Win a ticket in the Raffle Stud raffle. |
Once you've won the raffle, you have seven days from the moment you received the notification to breed to the raffle stud. This is counted in real life days, not rollovers, so delaying your rollover won't work to delay your raffle stud breeding! After these seven days are up, you've lost your chance to breed to the raffle stud. You're welcome to give your female wolf any breeding items you'd like for this breeding, but the female must be in heat. There's no guaranteed amount of puppies from a raffle stud breeding, so make sure to use a sage if you'd like to ensure you get a certain amount!
If you'd not like to use your raffle stud breeding, you may also choose to sell it to another player. This is a promise-based transaction, so trade at your own risk! For someone to purchase the raffle stud breeding from you, they must send you their female wolf, and you must breed their female wolf to the stud before sending her back to them.
Raffle-Exclusive Traits
Raffle-Exclusive Traits
Every raffle stud has a selection of exclusive markings or eyes chosen each week by their designer! These traits originate from raffle studs and can only be obtained through breeding to the raffle stud or another wolf who has the trait.
Raffle markings that have already been released on a stud can be obtained via RMAs, but at a very rare chance. Newly-released raffle markings, on the other hand, are placed in Tier 5 until they are available to be bred on a stud, making it so that they cannot be obtained via RMA until they are bred and moved into Tier 2.
You can view a list of all raffle-exclusive traits below!
Raffle Eyes
Raffle Eyes

![]()
Blue
![]()
Green
![]()
Indigo
![]()
Lavender
![]()
Purple
![]()
Red
![]()
Sapphire
![]()
Violet

![]()
Red
![]()
White

![]()
Black
![]()
Brown
![]()
Hazel
![]()
Olive

![]()
Black
![]()
Brown
![]()
Gray
![]()
Orange

![]()
Green
![]()
Red
![]()
Olive

![]()
Blue
![]()
Ice
![]()
White

![]()
Blue
![]()
Sapphire
![]()
Red
![]()
Violet

![]()
Blue
![]()
Green
![]()
Ice
![]()
Yellow

![]()
Blue
![]()
Dust
![]()
Storm

![]()
Black
![]()
Gray
![]()
Hetero Black & White
![]()
Hetero White & Black
![]()
White

![]()
Black
![]()
Blue
![]()
Gray

![]()
Black
![]()
Blue
![]()
Gray
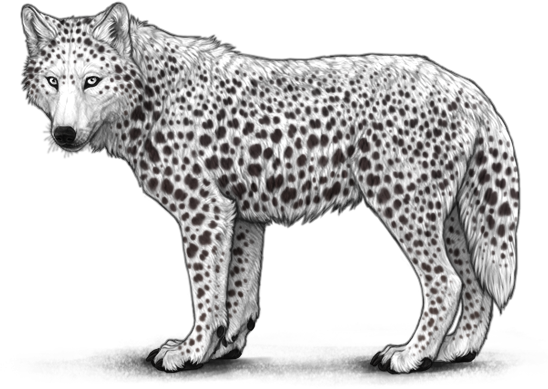
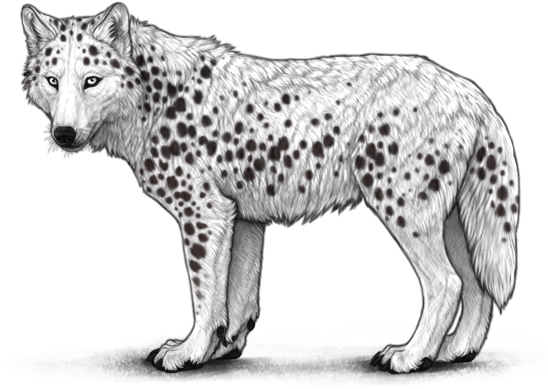
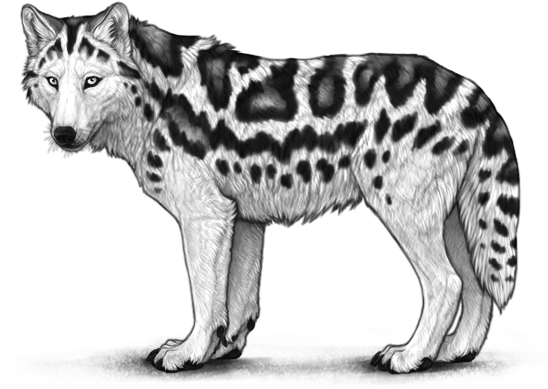
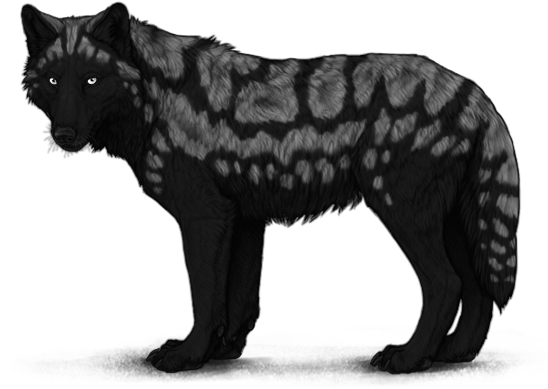
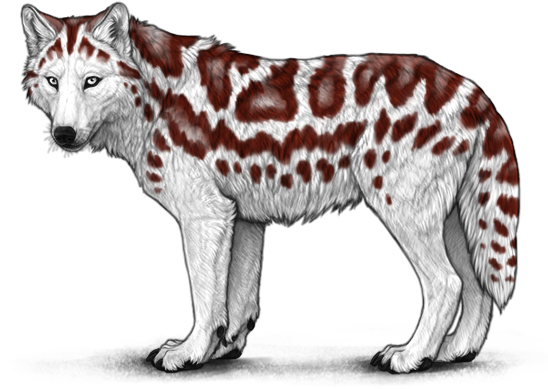
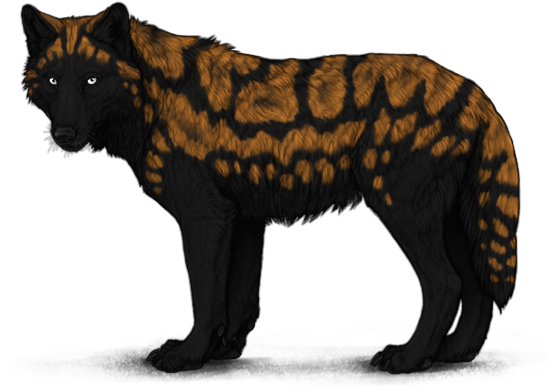
Raffle Markings
Raffle Markings
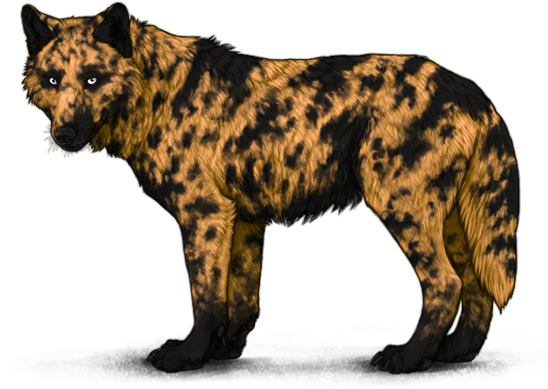
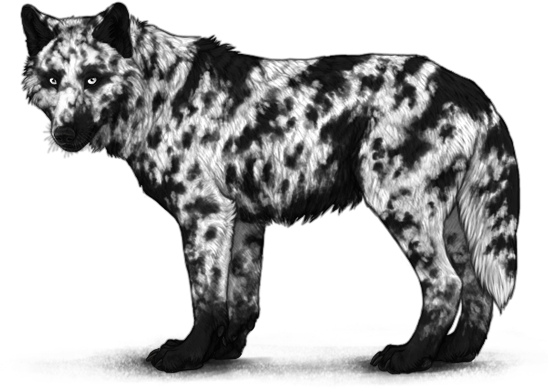
Catshark Heavy


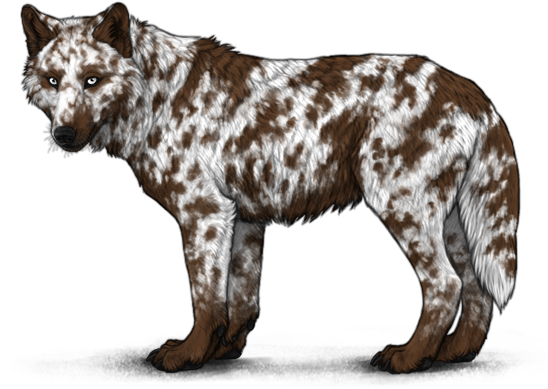
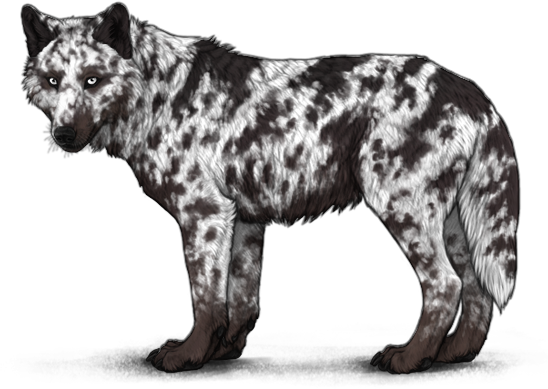
Catshark Light


Cougar
Inverted Panda


Leopard Shark


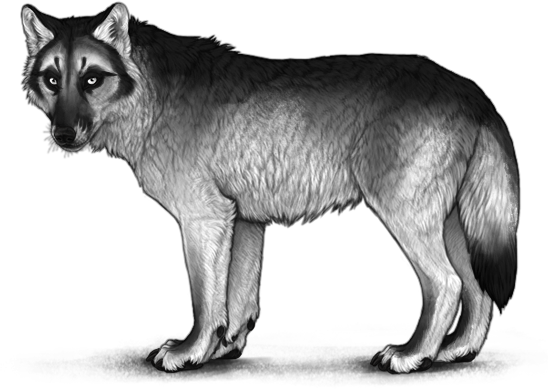
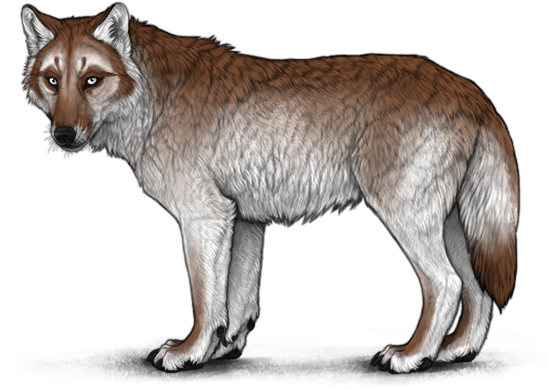
Lupos


Merle


Merle Patches

Orca


Panda
Wings


Wings Heavy


Wings Scarce

Raffle Stud List
Raffle Stud List
2021 Studs
2021 Studs
| Kodan | 6/25/2021 | ||
|---|---|---|---|
 | |||
| Raffle Traits | Pups Bred | ||
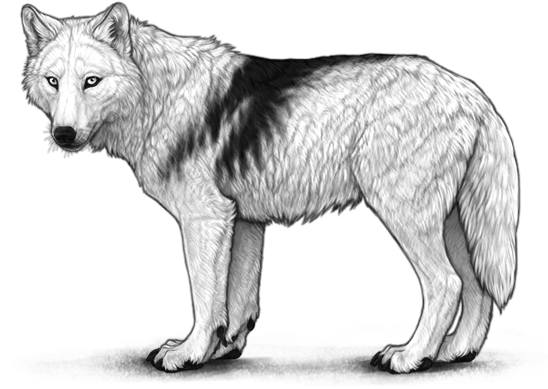
| Dust Eyes, Dark Brown Panda | 119 | ||
| Wardrobe Details | |||
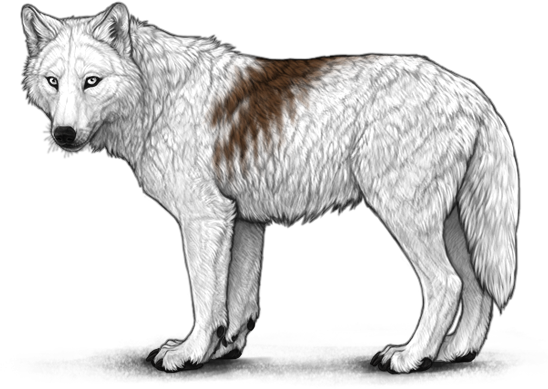
| Base | Blonde | Slot 1 | Dark Brown Back Stripe (100%) |
| Base Genetics | Muted Medium II | Slot 2 | Cream Undercoat (80%) |
| Eyes | Dust | Slot 3 | White Undersides (60%) |
| Skin | Brown | Slot 4 | Dark Brown Head Stripe (80%) |
| Nose | Brown | Slot 5 | White Muzzle (80%) |
| Claws | Dark | Slot 6 | Dark Brown Panda (100%) |
| Variant | Default | Slot 7 | White Ear Tips (100%) |
| Background | Canyon | Slot 8 | White Tail Tip (100%) |
| Personality | Charming | Slot 9 | Cream Limbs (50%) |
| Stat Changes | STR +7, SMR +3, WIS -3 | Slot 10 | White Socks (70%) |
| Otsoa | 7/2/2021 | ||
|---|---|---|---|
 | |||
| Raffle Traits | Pups Bred | ||
| Smoke Eyes, Black Wings | 123 | ||
| Wardrobe Details | |||
| Base | Steele | Slot 1 | Black Tail Tip (100%) |
| Base Genetics | Monochrome Medium II | Slot 2 | Black Merle Patches (50%) |
| Eyes | Smoke | Slot 3 | Silver Limbs (80%) |
| Skin | Black | Slot 4 | White Marbled Unders (50%) |
| Nose | Black | Slot 5 | White Merle (50%) |
| Claws | Black | Slot 6 | Black Inuit Unders (85%) |
| Variant | Default | Slot 7 | Silver Shaded (80%) |
| Background | [Middle America] Guatemala - Sierra Madre | Slot 8 | White Patchy Unders (100%) |
| Personality | Sullen | Slot 9 | Black Dilution (80%) |
| Stat Changes | AGI +7, STR +3, SMR -3 | Slot 10 | Black Wings (100%) |
| Brogan | 7/9/2021 | ||
|---|---|---|---|
 | |||
| Raffle Traits | Pups Bred | ||
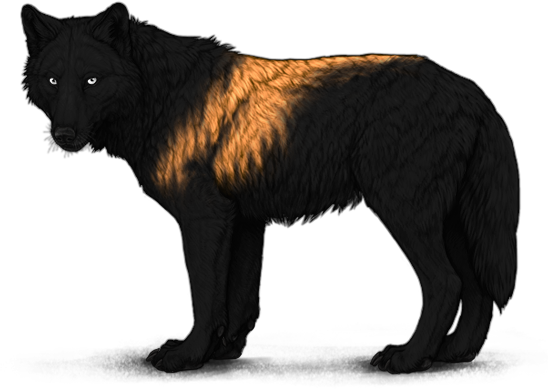
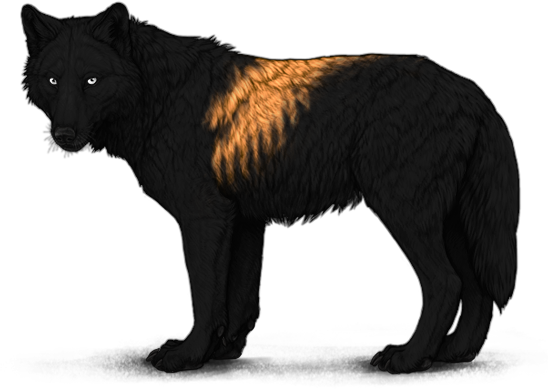
| Storm Eyes, Black Lupos | 137 | ||
| Wardrobe Details | |||
| Base | Sarder | Slot 1 | Black Smudge Heavy (80%) |
| Base Genetics | Warm Dark II | Slot 2 | Black Shoulders (80%) |
| Eyes | Storm | Slot 3 | Auburn Agouti (70%) |
| Skin | Black | Slot 4 | Cream Predator (100%) |
| Nose | Black | Slot 5 | Black Cover (80%) |
| Claws | Black | Slot 6 | Zircon Undercoat (60%) |
| Variant | Default | Slot 7 | Black Lupos (100%) |
| Background | Dark Mangrove Forest | Slot 8 | Cream Spectacles (100%) |
| Personality | Vulgar | Slot 9 | White Tamaskan Unders (90%) |
| Stat Changes | AGI +7, SPD +3, STR -3 | Slot 10 | White Tail Tip (100%) |
| Brogan II | 7/16/2021 | ||
|---|---|---|---|
 | |||
| Raffle Traits | Pups Bred | ||
| Dust Eyes, White Lupos | 131 | ||
| Wardrobe Details | |||
| Base | Diorite | Slot 1 | White Inuit Unders (50%) |
| Base Genetics | Cool Medium II | Slot 2 | Red Agouti (20%) |
| Eyes | Dust | Slot 3 | Red Dilution (20%) |
| Skin | Blue | Slot 4 | White Merle (30%) |
| Nose | Blue | Slot 5 | White Blaze (100%) |
| Claws | White | Slot 6 | Red Shaded (20%) |
| Variant | Default | Slot 7 | White Lupos (100%) |
| Background | Hubbard Glacier | Slot 8 | White Nose Line (100%) |
| Personality | Humble | Slot 9 | White Cheek Fluff (100%) |
| Stat Changes | AGI +7, WIS +3, STR -3 | Slot 10 | White Socks (100%) |
| Kodan II | 7/23/2021 | ||
|---|---|---|---|
 | |||
| Raffle Traits | Pups Bred | ||
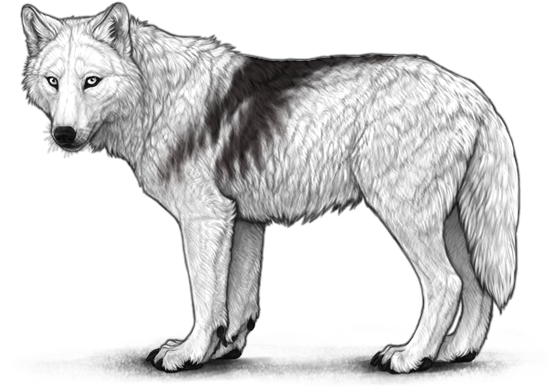
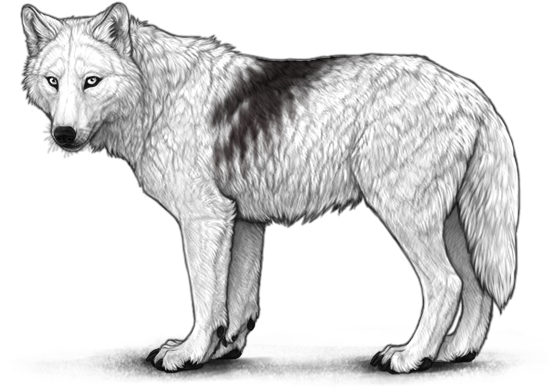
| Storm Eyes, White Inverted Panda | 128 | ||
| Wardrobe Details | |||
| Base | Biotite | Slot 1 | Silver Patchy Unders (100%) |
| Base Genetics | Monchrome Dark II | Slot 2 | White Merle (40%) |
| Eyes | Storm | Slot 3 | Black Cross (100%) |
| Skin | Black | Slot 4 | White Limbs (100%) |
| Nose | Black | Slot 5 | White Inverted Panda (100%) |
| Claws | Black | Slot 6 | Black Agouti (90%) |
| Variant | Default | Slot 7 | Gray Back Heavy Patch (90%) |
| Background | Misty Trail | Slot 8 | Black Head Stripe (70%) |
| Personality | Arrogant | Slot 9 | White Tail Tip (100%) |
| Stat Changes | STR +7, AGI +3, WIS -3 | Slot 10 | Black Dilution (60%) |
| Mercury | 7/30/2021 | ||
|---|---|---|---|
 | |||
| Raffle Traits | Pups Bred | ||
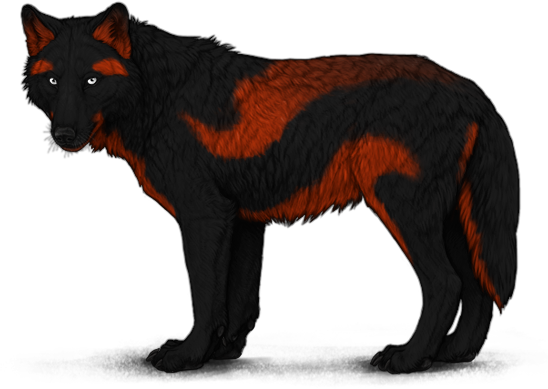
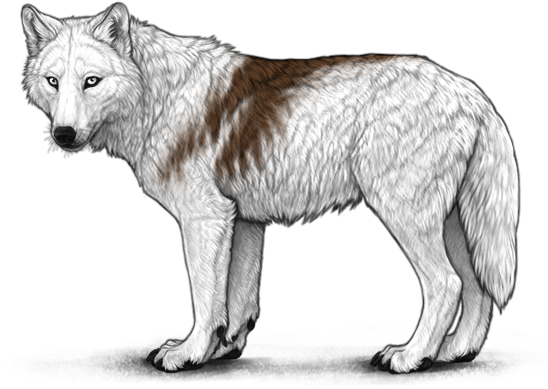
| Brown Panda | 110 | ||
| Wardrobe Details | |||
| Base | Sepia | Slot 1 | Black Blanket Ticking (100%) |
| Base Genetics | Muted Dark II | Slot 2 | Black Shepherd (50%) |
| Eyes | Hazel | Slot 3 | Sepia Inverted Cross (100%) |
| Skin | Dark Brown | Slot 4 | Sepia Shaded (100%) |
| Nose | Dark Brown | Slot 5 | Black Mantle (40%) |
| Claws | Root | Slot 6 | Beige Urajiro (100%) |
| Variant | Default | Slot 7 | White Undercoat (50%) |
| Background | [USA] Arizona - The Buttes | Slot 8 | Brown Panda (100%) |
| Personality | Helpful | Slot 9 | Beige Gentle Unders (100%) |
| Stat Changes | SMR +7, SPD +3, AGI -3 | Slot 10 | Black Back (100%) |
| Buckeye | 8/6/2021 | ||
|---|---|---|---|
 | |||
| Raffle Traits | Pups Bred | ||
| Smoke Eyes, Black Wings Heavy | 97 | ||
| Wardrobe Details | |||
| Base | Titanium | Slot 1 | White Irish (100%) |
| Base Genetics | Monochrome Light II | Slot 2 | Black Full Mask (100%) |
| Eyes | Smoke | Slot 3 | Gray Neck (100%) |
| Skin | Black | Slot 4 | Black Half Cover (100%) |
| Nose | Gray | Slot 5 | Sterling Cross (50%) |
| Claws | White | Slot 6 | Gray Saddle (60%) |
| Variant | Default | Slot 7 | White Patchy Unders (80%) |
| Background | [USA] Virginia - Great Dismal Swamp | Slot 8 | Silver Neck Band (60%) |
| Personality | Malicious | Slot 9 | Black Wings Heavy (100%) |
| Stat Changes | STR +7, SMR +3, AGI -3 | Slot 10 | Black Cape (100%) |
| Walker | 8/13/2021 | ||
|---|---|---|---|
 | |||
| Raffle Traits | Pups Bred | ||
| Red Wings | 91 | ||
| Wardrobe Details | |||
| Base | Henna | Slot 1 | Black Full Rump (100%) |
| Base Genetics | Warm Dark I | Slot 2 | Red Carnage (70%) |
| Eyes | Red | Slot 3 | Black Belly Stripe (100%) |
| Skin | Black | Slot 4 | Black Rump Stripe (100%) |
| Nose | Black | Slot 5 | Black Blanket (70%) |
| Claws | Oxblood | Slot 6 | Black Points (100%) |
| Variant | Default | Slot 7 | Red Butcher (50%) |
| Background | Flickering Forest | Slot 8 | Black Shaded (80%) |
| Personality | Quiet | Slot 9 | White Underbelly (100%) |
| Stat Changes | WIS +7, SMR +3, SPD -3 | Slot 10 | Red Wings (100%) |
| Beethoven | 8/20/2021 | ||
|---|---|---|---|
 | |||
| Raffle Traits | Pups Bred | ||
| Smoke Eyes, White Wings Scarce | 121 | ||
| Wardrobe Details | |||
| Base | Sky | Slot 1 | Black Patchy Unders (40%) |
| Base Genetics | Cool Light II | Slot 2 | White Bottoms (100%) |
| Eyes | Smoke | Slot 3 | Black Back Half Patch (70%) |
| Skin | Blue | Slot 4 | White Cape (50%) |
| Nose | Gray | Slot 5 | White Mask (60%) |
| Claws | White | Slot 6 | Silver Shaded (50%) |
| Variant | Default | Slot 7 | Silver Lupos (100%) |
| Background | [Canada] Newfoundland - Gros Morne | Slot 8 | Black Back (40%) |
| Personality | Scatterbrained | Slot 9 | White Wings Scarce (100%) |
| Stat Changes | SPD +7, STR +3, SMR -3 | Slot 10 | White Limbs (60%) |
| Xenon | 8/27/2021 | ||
|---|---|---|---|
 | |||
| Raffle Traits | Pups Bred | ||
| Cream Inverted Panda | 110 | ||
| Wardrobe Details | |||
| Base | Almond | Slot 1 | Brown Chest (60%) |
| Base Genetics | Muted Light II | Slot 2 | Brown Rump Edge (100%) |
| Eyes | Glass | Slot 3 | Brown Dorsal (50%) |
| Skin | Brown | Slot 4 | Brown Blanket (20%) |
| Nose | Brown | Slot 5 | Cream Inverted Cross (40%) |
| Claws | Bone | Slot 6 | Brown Butcher (50%) |
| Variant | Sentinel | Slot 7 | Dark Brown Smoke (50%) |
| Background | Ellesmere Island | Slot 8 | Cream Inverted Panda (70%) |
| Personality | Optimistic | Slot 9 | White Carnage (80%) |
| Stat Changes | AGI +7, SPD +3, WIS -3 | Slot 10 | White Cape Ticking (40%) |
| Meatloaf | 9/3/2021 | ||
|---|---|---|---|
 | |||
| Raffle Traits | Pups Bred | ||
| Storm Eyes, Black Panda | 114 | ||
| Wardrobe Details | |||
| Base | Lilac | Slot 1 | Black Undercoat (90%) |
| Base Genetics | Cool Dark II | Slot 2 | Black Dorsal (40%) |
| Eyes | Storm | Slot 3 | Silver Unders (90%) |
| Skin | Black | Slot 4 | Gray Mantle (40%) |
| Nose | Black | Slot 5 | Black Back Patch (60%) |
| Claws | Light | Slot 6 | Black Stained Limbs (50%) |
| Variant | Default | Slot 7 | Black Panda (100%) |
| Background | Mountain Laurel Blossoms | Slot 8 | White Eyebrows (80%) |
| Personality | Imaginative | Slot 9 | White Nose Line (100%) |
| Stat Changes | WIS +7, SPD +3, STR -3 | Slot 10 | White Inner Ear (100%) |
| Dhampir | 9/10/2021 | ||
|---|---|---|---|
 | |||
| Raffle Traits | Pups Bred | ||
| Dark Brown Wings Heavy | 93 | ||
| Wardrobe Details | |||
| Base | Buff | Slot 1 | Dark Brown Snout (100%) |
| Base Genetics | Muted Light II | Slot 2 | White Blaze (100%) |
| Eyes | Hetero Blue & Brown | Slot 3 | Brown Carnage (60%) |
| Skin | Dark Brown | Slot 4 | Brown Smudge Heavy (40%) |
| Nose | Dark Brown | Slot 5 | Brown Cheek Fluff (100%) |
| Claws | Light | Slot 6 | White Underfur (100%) |
| Variant | Default | Slot 7 | White Spectacles (100%) |
| Background | Klamath Basin | Slot 8 | Dark Brown Wings Heavy (100%) |
| Personality | Aloof | Slot 9 | White Trim (100%) |
| Stat Changes | SMR +7, AGI +3, WIS -3 | Slot 10 | Dark Brown Tail Tip (100%) |
| Corvus | 9/17/2021 | ||
|---|---|---|---|
 | |||
| Raffle Traits | Pups Bred | ||
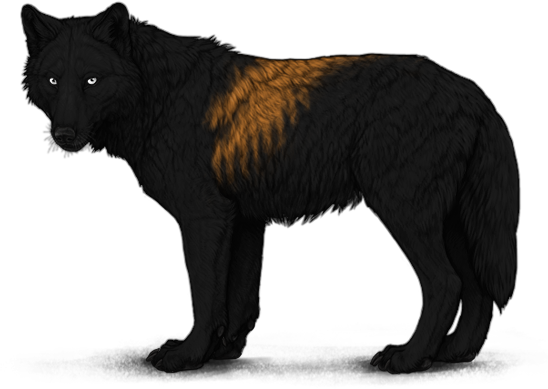
| Dust Eyes, Brown Lupos | 102 | ||
| Wardrobe Details | |||
| Base | Doubloon | Slot 1 | Cream Tuxedo (100%) |
| Base Genetics | Warm Medium II | Slot 2 | Dark Brown Shoulder Patch (100%) |
| Eyes | Dust | Slot 3 | Dark Brown Forehead (100%) |
| Skin | Light Brown | Slot 4 | Cream Neck Band (100%) |
| Nose | Dark Brown | Slot 5 | Brown Smudge (100%) |
| Claws | Brown | Slot 6 | Cream Low Bottoms (100%) |
| Variant | Default | Slot 7 | Ducat Undercoat (80%) |
| Background | Burrows Among the Roots | Slot 8 | Cream Underbelly (70%) |
| Personality | Dutiful | Slot 9 | Brown Lupos (100%) |
| Stat Changes | STR +7, WIS +3, SMR -3 | Slot 10 | Cream Eyebrows (100%) |
| Rasputin | 9/24/2021 | ||
|---|---|---|---|
 | |||
| Raffle Traits | Pups Bred | ||
| Black Wings Scarce | 87 | ||
| Wardrobe Details | |||
| Base | Sphalerite | Slot 1 | Black Shaded (80%) |
| Base Genetics | Monochrome Dark II | Slot 2 | White Merle (60%) |
| Eyes | Ice | Slot 3 | White Toes (100%) |
| Skin | Black | Slot 4 | Black Snout (100%) |
| Nose | Black | Slot 5 | Black Smoke (40%) |
| Claws | Gray | Slot 6 | Black Wings Scarce (100%) |
| Variant | Default | Slot 7 | Black Chest (40%) |
| Background | Winter Cave | Slot 8 | White Cheek Fluff (100%) |
| Personality | Keen | Slot 9 | White Half Mask (80%) |
| Stat Changes | SPD +7, SMR +3, STR -3 | Slot 10 | Black Stained Limbs (100%) |
| Bear | 10/1/2021 | ||
|---|---|---|---|
 | |||
| Raffle Traits | Pups Bred | ||
| Storm Eyes, White Wings | 103 | ||
| Wardrobe Details | |||
| Base | Nepheline | Slot 1 | Black Dilution (100%) |
| Base Genetics | Monochrome Light II | Slot 2 | Black Carnage (80%) |
| Eyes | Storm | Slot 3 | Gray Smoke (50%) |
| Skin | Black | Slot 4 | Black Trim (100%) |
| Nose | Gray | Slot 5 | White Back Heavy Patch (30%) |
| Claws | Gray | Slot 6 | Black Saddle (40%) |
| Variant | Default | Slot 7 | Gray Neck (100%) |
| Background | [USA] Tennessee - Great Smoky Mountains | Slot 8 | White Light Husky (100%) |
| Personality | Bossy | Slot 9 | Black Cover (80%) |
| Stat Changes | WIS +7, STR +3, AGI -3 | Slot 10 | White Wings (100%) |
| Clay | 10/8/2021 | ||
|---|---|---|---|
 | |||
| Raffle Traits | Pups Bred | ||
| White Wings Heavy | 96 | ||
| Wardrobe Details | |||
| Base | Lavender | Slot 1 | White Irish (50%) |
| Base Genetics | Cool Light II | Slot 2 | Red Smoke (20%) |
| Eyes | White | Slot 3 | White Merle (40%) |
| Skin | Pale | Slot 4 | Red Dilution (20%) |
| Nose | Pale | Slot 5 | White Predator (60%) |
| Claws | White | Slot 6 | White Nose Line (100%) |
| Variant | Default | Slot 7 | White Wings Heavy (80%) |
| Background | [USA] Michigan - Pictured Rocks | Slot 8 | White Half Mask (40%) |
| Personality | Sociable | Slot 9 | White Blaze (100%) |
| Stat Changes | SMR +7, SPD +3, STR -3 | Slot 10 | White Neck (80%) |
| Rasputin II | 10/15/2021 | ||
|---|---|---|---|
 | |||
| Raffle Traits | Pups Bred | ||
| Yellow Lupos | 92 | ||
| Wardrobe Details | |||
| Base | Ducat | Slot 1 | Beige Irish (100%) |
| Base Genetics | Warm Light II | Slot 2 | Beige Elbows (80%) |
| Eyes | Yellow | Slot 3 | Brown Saddle (40%) |
| Skin | Tan | Slot 4 | Brown Back Patch (90%) |
| Nose | Tan | Slot 5 | Brown Rump (40%) |
| Claws | Oxblood | Slot 6 | Yellow Lupos (80%) |
| Variant | Default | Slot 7 | Cream Merle (60%) |
| Background | White Mountains | Slot 8 | White Underbelly (100%) |
| Personality | Confident | Slot 9 | White Nose Bridge (100%) |
| Stat Changes | STR +7, SPD +3, AGI -3 | Slot 10 | Honey Dorsal (40%) |
| Kismet | 10/22/2021 | ||
|---|---|---|---|
 | |||
| Raffle Traits | Pups Bred | ||
| Smoke Eyes, Dark Brown Wings Scarce | 91 | ||
| Wardrobe Details | |||
| Base | Sandy | Slot 1 | Brown Rump Patch (80%) |
| Base Genetics | Muted Medium II | Slot 2 | Cream Trim (70%) |
| Eyes | Smoke | Slot 3 | Beige Muzzle Patch (100%) |
| Skin | Dark | Slot 4 | White Toes (50%) |
| Nose | Dark | Slot 5 | Ducat Tamaskan Unders (60%) |
| Claws | Sandy | Slot 6 | Dark Brown Belly Stripe (40%) |
| Variant | Sentinel | Slot 7 | Beige Throat (100%) |
| Background | Great Swamp Refuge | Slot 8 | Cream Neck (60%) |
| Personality | Anxious | Slot 9 | Dark Brown Wings Scarce (100%) |
| Stat Changes | SPD +7, AGI +3, STR -3 | Slot 10 | Cream Half Cape Ticking (50%) |
| Perseus | 10/29/2021 | ||
|---|---|---|---|
 | |||
| Raffle Traits | Pups Bred | ||
| Dust Eyes, Henna Panda | 94 | ||
| Wardrobe Details | |||
| Base | Auburn | Slot 1 | Ducat Inuit Unders (100%) |
| Base Genetics | Warm Dark II | Slot 2 | Black Smoke (70%) |
| Eyes | Dust | Slot 3 | Black Cross (80%) |
| Skin | Dark Brown | Slot 4 | Black Dorsal (70%) |
| Nose | Dark Brown | Slot 5 | Black Shoulders (50%) |
| Claws | Oxblood | Slot 6 | Red Shaded (40%) |
| Variant | Default | Slot 7 | Black Cape Ticking (100%) |
| Background | Anniversary! Tala's Welcome | Slot 8 | Henna Panda (60%) |
| Personality | Amiable | Slot 9 | Beige Inner Ear (90%) |
| Stat Changes | WIS +7, AGI +3, STR -3 | Slot 10 | Doubloon Underbelly (100%) |
| Aegir | 11/5/2021 | ||
|---|---|---|---|
 | |||
| Raffle Traits | Pups Bred | ||
| Dust Eyes, Beige Inverted Panda | 101 | ||
| Wardrobe Details | |||
| Base | Pecan | Slot 1 | Beige Marbled Unders (70%) |
| Base Genetics | Muted Dark II | Slot 2 | Dark Brown Merle Patches (80%) |
| Eyes | Dust | Slot 3 | Dark Brown Butcher (40%) |
| Skin | Dark Brown | Slot 4 | Beige Inverted Panda (80%) |
| Nose | Dark Brown | Slot 5 | Dark Brown Points (70%) |
| Claws | Sandy | Slot 6 | Brown Dilution (50%) |
| Variant | Default | Slot 7 | Dark Brown Back Stripe (80%) |
| Background | Rattlesnake Den | Slot 8 | Dark Brown Rump Patch (80%) |
| Personality | Trusting | Slot 9 | Beige Underbelly (70%) |
| Stat Changes | AGI +7, WIS +3, SMR -3 | Slot 10 | Beige Toes (100%) |
| Butterscotch | 11/12/2021 | ||
|---|---|---|---|
 | |||
| Raffle Traits | Pups Bred | ||
| Red Panda | 113 | ||
| Wardrobe Details | |||
| Base | Peach | Slot 1 | Cream Elbow Patch (70%) |
| Base Genetics | Muted Light II | Slot 2 | White Undercoat (80%) |
| Eyes | Ice | Slot 3 | White Neck Band (50%) |
| Skin | Pink | Slot 4 | Auburn Smudge Heavy (40%) |
| Nose | Pink | Slot 5 | Beige Neck (60%) |
| Claws | White | Slot 6 | Red Panda (60%) |
| Variant | Default | Slot 7 | Cream Butcher (40%) |
| Background | Giant's Causeway | Slot 8 | White Tuxedo (100%) |
| Personality | Fair | Slot 9 | White Socks (40%) |
| Stat Changes | SMR +7, WIS +3, SPD -3 | Slot 10 | White Irish (100%) |
| Barkenstein | 11/19/2021 | ||
|---|---|---|---|
 | |||
| Raffle Traits | Pups Bred | ||
| Honey Inverted Panda | 110 | ||
| Wardrobe Details | |||
| Base | Saffron | Slot 1 | Honey Half Cape (60%) |
| Base Genetics | Warm Medium II | Slot 2 | Honey Limbs (100%) |
| Eyes | Green | Slot 3 | White Nose Line (100%) |
| Skin | Marbled | Slot 4 | Dark Brown Rump (60%) |
| Nose | Light Brown | Slot 5 | Honey Inverted Panda (80%) |
| Claws | Oxblood | Slot 6 | Yellow Socks (100%) |
| Variant | Default | Slot 7 | Ducat Light Husky (100%) |
| Background | Cedar Trees | Slot 8 | Cream Back Patch (40%) |
| Personality | Sneaky | Slot 9 | Beige Underfur (50%) |
| Stat Changes | SMR +7, AGI +3, SPD -3 | Slot 10 | Honey Paws (40%) |
| Ophiuchus | 11/26/2021 | ||
|---|---|---|---|
 | |||
| Raffle Traits | Pups Bred | ||
| Red Wings Scarce | 106 | ||
| Wardrobe Details | |||
| Base | Obsidian | Slot 1 | Black Rump Edge (80%) |
| Base Genetics | Monochrome Dark II | Slot 2 | Red Tamaskan Unders (40%) |
| Eyes | Glass | Slot 3 | Black Belly Stripe (100%) |
| Skin | Black | Slot 4 | Red Butcher (40%) |
| Nose | Bistre | Slot 5 | Auburn Points (100%) |
| Claws | Root | Slot 6 | Red Shaded (30%) |
| Variant | Default | Slot 7 | Black Dilution (40%) |
| Background | Timberline of Denali | Slot 8 | Red Wings Scarce (70%) |
| Personality | Sneaky | Slot 9 | Red Mask (40%) |
| Stat Changes | SMR +7, AGI +3, SPD -3 | Slot 10 | Black Half Mask (80%) |
| Adam | 12/3/2021 | ||
|---|---|---|---|
 | |||
| Raffle Traits | Pups Bred | ||
| Dust Eyes, Dark Brown Lupos | 107 | ||
| Wardrobe Details | |||
| Base | Sandy | Slot 1 | Beige Medium Husky (100%) |
| Base Genetics | Muted Medium II | Slot 2 | Brown Shaded (100%) |
| Eyes | Dust | Slot 3 | White Undersides (90%) |
| Skin | Fallow | Slot 4 | White Throat Patch (100%) |
| Nose | Fallow | Slot 5 | Cream Back Patch (100%) |
| Claws | Bone | Slot 6 | Dark Brown Lupos (100%) |
| Variant | Default | Slot 7 | White Eyebrows (100%) |
| Background | Pupsitter Den | Slot 8 | White Tuxedo (100%) |
| Personality | Confident | Slot 9 | Cream Highlights (30%) |
| Stat Changes | STR +7, SPD +3, AGI -3 | Slot 10 | White Socks (100%) |
| Algernon | 12/10/2021 | ||
|---|---|---|---|
 | |||
| Raffle Traits | Pups Bred | ||
| Storm Eyes, Brown Wings | 90 | ||
| Wardrobe Details | |||
| Base | Yellow | Slot 1 | Beige Underfur (50%) |
| Base Genetics | Warm Light II | Slot 2 | Cream Muzzle Patch (100%) |
| Eyes | Storm | Slot 3 | Brown Limbs (70%) |
| Skin | Brown | Slot 4 | Yellow Dorsal (80%) |
| Nose | Brown | Slot 5 | Beige Medium Husky (100%) |
| Claws | Sandy | Slot 6 | Doubloon Merle (50%) |
| Variant | Default | Slot 7 | Brown Half Dorsal (100%) |
| Background | Loch Ness | Slot 8 | Brown Smoke (50%) |
| Personality | Neutral | Slot 9 | Beige Urajiro (100%) |
| Stat Changes | STR +2, SPD +2, AGI +2, WIS +2, SMR +2 | Slot 10 | Brown Wings (100%) |
| Nexus | 12/17/2021 | ||
|---|---|---|---|
 | |||
| Raffle Traits | Pups Bred | ||
| Red Lupos | 106 | ||
| Wardrobe Details | |||
| Base | Maltese | Slot 1 | Black Merle Patches (80%) |
| Base Genetics | Cool Medium II | Slot 2 | Black Stained Limbs (100%) |
| Eyes | Hetero White & Black | Slot 3 | Red Predator (30%) |
| Skin | Black | Slot 4 | Black Smoke (50%) |
| Nose | Gray | Slot 5 | Red Lupos (30%) |
| Claws | Gray | Slot 6 | White Neck Band (100%) |
| Variant | Default | Slot 7 | Black Blanket Ticking (50%) |
| Background | [Canada] Yukon - Icy Shores | Slot 8 | Black Limbs (70%) |
| Personality | Selfish | Slot 9 | White Tamaskan Unders (100%) |
| Stat Changes | SMR +7, STR +3, WIS -3 | Slot 10 | White Tail Tip (100%) |
| Wealhtheow | 12/24/2021 | ||
|---|---|---|---|
 | |||
| Raffle Traits | Pups Bred | ||
| Cream Lupos | 92 | ||
| Wardrobe Details | |||
| Base | Cocoa | Slot 1 | Cream Heavy Husky (40%) |
| Base Genetics | Muted Dark II | Slot 2 | Dark Brown Smoke (50%) |
| Eyes | Hazel | Slot 3 | Cream Muzzle Patch (100%) |
| Skin | Dark | Slot 4 | Beige Undercoat (40%) |
| Nose | Brown | Slot 5 | Cream Lupos (60%) |
| Claws | Bone | Slot 6 | White Neck Band (30%) |
| Variant | Default | Slot 7 | Cream Inverted Cross (20%) |
| Background | Swimming Mallard Ducks | Slot 8 | White Inuit Unders (30%) |
| Personality | Observant | Slot 9 | Cream Cape (40%) |
| Stat Changes | WIS +7, SMR +3, AGI -3 | Slot 10 | White Underfur (80%) |
| Aegir II | 12/31/2021 | ||
|---|---|---|---|
 | |||
| Raffle Traits | Pups Bred | ||
| Red Wings Heavy | 80 | ||
| Wardrobe Details | |||
| Base | Sarder | Slot 1 | Auburn Shaded (100%) |
| Base Genetics | Warm Dark II | Slot 2 | Black Blanket Ticking (100%) |
| Eyes | Glass | Slot 3 | Black Half Mask (100%) |
| Skin | Black | Slot 4 | Black Nose Bridge (100%) |
| Nose | Black | Slot 5 | Red Smoke (30%) |
| Claws | Oxblood | Slot 6 | Black Merle Patches (70%) |
| Variant | Default | Slot 7 | Red Wings Heavy (70%) |
| Background | Flickering Forest | Slot 8 | Black Dilution (80%) |
| Personality | Combative | Slot 9 | Red Highlights (30%) |
| Stat Changes | STR +7, SPD +3, WIS -3 | Slot 10 | Black Patchy Unders (100%) |
2022 Studs
2022 Studs
| Cygnus | 1/7/2022 | ||
|---|---|---|---|
 | |||
| Raffle Traits | Pups Bred | ||
| Yellow Inverted Panda | 71 | ||
| Wardrobe Details | |||
| Base | Jacinthe | Slot 1 | Honey Urajiro (100%) |
| Base Genetics | Warm Light II | Slot 2 | Sepia Half Dorsal (100%) |
| Eyes | Yellow | Slot 3 | Honey Carnage (60%) |
| Skin | Dark Brown | Slot 4 | Honey Limbs (60%) |
| Nose | Dark | Slot 5 | Doubloon Socks (100%) |
| Claws | Sandy | Slot 6 | Yellow Inverted Panda (40%) |
| Variant | Default | Slot 7 | Honey Back (100%) |
| Background | Daffodil Fields | Slot 8 | Beige Cape (100%) |
| Personality | Aloof | Slot 9 | Yellow Back Patch (70%) |
| Stat Changes | SMR +7, AGI +3, WIS -3 | Slot 10 | Beige Gentle Unders (100%) |
| Alika | 1/14/2022 | ||
|---|---|---|---|
| |||
| Raffle Traits | Pups Bred | ||
| Dust Eyes, Bark Brown Wings | 105 | ||
| Wardrobe Details | |||
| Base | Sepia | Slot 1 | Dark Brown Back Heavy Patch (100%) |
| Base Genetics | Muted Dark II | Slot 2 | Black Merle Patches (60%) |
| Eyes | Dust | Slot 3 | Dark Brown Rump Patch (100%) |
| Skin | Black | Slot 4 | Black Shaded (80%) |
| Nose | Dark Brown | Slot 5 | Brown Smoke (30%) |
| Claws | Dark | Slot 6 | Deira Unders (100%) |
| Variant | Default | Slot 7 | Dark Brown Wings (100%) |
| Background | [USA] Nebraska - Chadron State Park | Slot 8 | Black Half Mask (40%) |
| Personality | Sneaky | Slot 9 | Deira Socks (100%) |
| Stat Changes | SMR +7, AGI +3, SPD -3 | Slot 10 | Beige Blaze (60%) |
| Popcorn | 1/21/2022 | ||
|---|---|---|---|
 | |||
| Raffle Traits | Pups Bred | ||
| Red Inverted Panda | 91 | ||
| Wardrobe Details | |||
| Base | Arkose | Slot 1 | Cream Merle (50%) |
| Base Genetics | Warm Light II | Slot 2 | Beige Unders (60%) |
| Eyes | Ice | Slot 3 | Red Inverted Panda (30%) |
| Skin | Pink | Slot 4 | White Snout (50%) |
| Nose | Pink | Slot 5 | White Tail Tip (100%) |
| Claws | White | Slot 6 | White Tuxedo (100%) |
| Variant | Default | Slot 7 | Beige Cape Ticking (80%) |
| Background | [USA] Rhode Island - Oceanfront Beach | Slot 8 | White Shaded (40%) |
| Personality | Lazy | Slot 9 | White Blaze (100%) |
| Stat Changes | AGI +7, WIS +3, SPD -3 | Slot 10 | White Eyebrows (100%) |
| Halcyon | 1/28/2022 | ||
|---|---|---|---|
 | |||
| Raffle Traits | Pups Bred | ||
| Smoke Eyes, Brown Wings Heavy | 81 | ||
| Wardrobe Details | |||
| Base | Oroide | Slot 1 | Yellow Half Socks (100%) |
| Base Genetics | Muted Dark II | Slot 2 | Cream Half Cape Ticking (100%) |
| Eyes | Smoke | Slot 3 | Brown Smudge Heavy (60%) |
| Skin | Dark Brown | Slot 4 | Brown Shaded (80%) |
| Nose | Dark Brown | Slot 5 | Deira Inverted Agouti (80%) |
| Claws | Bone | Slot 6 | Beige Toes (100%) |
| Variant | Default | Slot 7 | Beige Throat Patch (100%) |
| Background | [USA] Minnesota - Boundary Waters | Slot 8 | Yellow Highlights (100%) |
| Personality | Dedicated | Slot 9 | Beige Neck Band (50%) |
| Stat Changes | WIS +7, STR +3, SMR -3 | Slot 10 | Brown Wings Heavy (70%) |
| Lacerta | 2/4/2022 | ||
|---|---|---|---|
 | |||
| Raffle Traits | Pups Bred | ||
| Honey Wings | 53 | ||
| Wardrobe Details | |||
| Base | Onyx | Slot 1 | Honey Butcher (60%) |
| Base Genetics | Monochrome Dark II | Slot 2 | Brown Rump Edge (70%) |
| Eyes | Hetero Blue & Brown | Slot 3 | Brown Smoke (40%) |
| Skin | Dark Brown | Slot 4 | Deira Bottoms (80%) |
| Nose | Dark Brown | Slot 5 | Ducat Tuxedo (100%) |
| Claws | Oxblood | Slot 6 | Brown Half Cape Ticking (100%) |
| Variant | Default | Slot 7 | Ducat Socks (100%) |
| Background | [USA] New Mexico - Rio Grande | Slot 8 | Honey Wings (100%) |
| Personality | Bossy | Slot 9 | Honey Ear Tips (100%) |
| Stat Changes | WIS +7, STR +3, AGI -3 | Slot 10 | Honey Eyebrows (100%) |
| Halibut | 2/11/2022 | ||
|---|---|---|---|
 | |||
| Raffle Traits | Pups Bred | ||
| Brown Wings Scarce | 72 | ||
| Wardrobe Details | |||
| Base | Vanilla | Slot 1 | White Patchy Unders (100%) |
| Base Genetics | Muted Medium II | Slot 2 | Dark Brown Smoke (80%) |
| Eyes | Olive | Slot 3 | Dark Brown Full Rump (40%) |
| Skin | Dark Brown | Slot 4 | Cream Highlights (100%) |
| Nose | Brown | Slot 5 | White Carnage (50%) |
| Claws | Bone | Slot 6 | Brown Wings Scarce (100%) |
| Variant | Default | Slot 7 | Brown Smudge Heavy (80%) |
| Background | Redwood Sorrel Meadow | Slot 8 | White Trim (100%) |
| Personality | Anxious | Slot 9 | Beige Back Half Patch (50%) |
| Stat Changes | SPD +7, AGI +3, STR -3 | Slot 10 | Beige Irish (40%) |
| Altgeld | 2/18/2022 | ||
|---|---|---|---|
 | |||
| Raffle Traits | Pups Bred | ||
| Honey Wings Heavy | 60 | ||
| Wardrobe Details | |||
| Base | Sulphur | Slot 1 | Yellow Shaded (100%) |
| Base Genetics | Warm Medium II | Slot 2 | Honey Cape (90%) |
| Eyes | Glass | Slot 3 | Cream Points (50%) |
| Skin | Tan | Slot 4 | Brown Smoke (40%) |
| Nose | Tan | Slot 5 | Dark Brown Shoulder Patch (90%) |
| Claws | Bistre | Slot 6 | White Undercoat (100%) |
| Variant | Sentinel | Slot 7 | Honey Wings Heavy (100%) |
| Background | Hudson Bay | Slot 8 | White Nose Line (100%) |
| Personality | Neutral | Slot 9 | Ducat Dilution (40%) |
| Stat Changes | STR +2, SPD +2, AGI +2, WIS +2, SMR +2 | Slot 10 | White Tail Tip (100%) |
| Adam II | 2/25/2022 | ||
|---|---|---|---|
 | |||
| Raffle Traits | Pups Bred | ||
| Storm Eyes, Honey Wings Scarce | 78 | ||
| Wardrobe Details | |||
| Base | Dinar | Slot 1 | Ducat Marbled Unders (100%) |
| Base Genetics | Warm Dark II | Slot 2 | Cream Shoulder Patch (70%) |
| Eyes | Storm | Slot 3 | Yellow Merle (70%) |
| Skin | Dark Brown | Slot 4 | Deira Patchy Unders (100%) |
| Nose | Dark Brown | Slot 5 | Honey Shaded (60%) |
| Claws | Bone | Slot 6 | Black Shepherd Heavy (100%) |
| Variant | Default | Slot 7 | Dark Brown Blanket Ticking (70%) |
| Background | Overgrown Cave | Slot 8 | Beige Urajiro (100%) |
| Personality | Vulgar | Slot 9 | Honey Wings Scarce (100%) |
| Stat Changes | AGI +7, SPD +3, STR -3 | Slot 10 | Beige Muzzle Patch (100%) |
| Avalanche | 3/4/2022 | ||
|---|---|---|---|
 | |||
| Raffle Traits | Pups Bred | ||
| Black Wings Heavy | 79 | ||
| Wardrobe Details | |||
| Base | Sterling | Slot 1 | White Merle (40%) |
| Base Genetics | Monochrome Medium II | Slot 2 | Black Shaded (100%) |
| Eyes | Hetero Black & White | Slot 3 | Black Back Stripe (100%) |
| Skin | Black | Slot 4 | White Underbelly (100%) |
| Nose | Black | Slot 5 | White Eyebrows (100%) |
| Claws | Black | Slot 6 | Black Neck Stripe (100%) |
| Variant | Default | Slot 7 | Silver Dilution (40%) |
| Background | Salt Point State Park | Slot 8 | Black Limbs (60%) |
| Personality | Dutiful | Slot 9 | White Low Bottoms (100%) |
| Stat Changes | STR +7, WIS +3, SMR -3 | Slot 10 | Black Wings Heavy (100%) |
| Yellowstone | 3/11/2022 | ||
|---|---|---|---|
 | |||
| Raffle Traits | Pups Bred | ||
| Dust Eyes, Dark Brown Lupos | 57 | ||
| Wardrobe Details | |||
| Base | Doubloon | Slot 1 | Beige Light Husky (100%) |
| Base Genetics | Warm Medium II | Slot 2 | Brown Blanket Ticking (100%) |
| Eyes | Dust | Slot 3 | Dark Brown Smoke (40%) |
| Skin | Dark Brown | Slot 4 | Dinar Shoulders (100%) |
| Nose | Dark Brown | Slot 5 | Cream Cape Ticking (100%) |
| Claws | Brown | Slot 6 | Zircon Predator (90%) |
| Variant | Relaxed | Slot 7 | Beige Bottoms (100%) |
| Background | Thistle Meadow | Slot 8 | Dark Brown Lupos (80%) |
| Personality | Humble | Slot 9 | Cream Merle (60%) |
| Stat Changes | AGI +7, WIS +3, STR -3 | Slot 10 | Doubloon Half Socks (100%) |
| Bogdan | 3/18/2022 | ||
|---|---|---|---|
 | |||
| Raffle Traits | Pups Bred | ||
| Smoke Eyes, Black Panda | 67 | ||
| Wardrobe Details | |||
| Base | Ebony | Slot 1 | Black Merle Patches (100%) |
| Base Genetics | Muted Dark II | Slot 2 | Black Half Mask (100%) |
| Eyes | Smoke | Slot 3 | Black Cape Ticking (100%) |
| Skin | Black | Slot 4 | Black Back Heavy Patch (100%) |
| Nose | Black | Slot 5 | White Unders (100%) |
| Claws | Black | Slot 6 | Black Dilution (50%) |
| Variant | Relaxed | Slot 7 | White Eyebrows (100%) |
| Background | Eternal Slumber | Slot 8 | Black Panda (100%) |
| Personality | Trusting | Slot 9 | White Ear Tips (100%) |
| Stat Changes | AGI +7, WIS +3, SMR -3 | Slot 10 | White Toes (100%) |
| Absalom | 3/25/2022 | ||
|---|---|---|---|
 | |||
| Raffle Traits | Pups Bred | ||
| Dark Brown Lupos, Honey Wings Heavy | 63 | ||
| Wardrobe Details | |||
| Base | Rime | Slot 1 | Dark Brown Lupos (100%) |
| Base Genetics | Monochrome Light II | Slot 2 | Honey Shaded (40%) |
| Eyes | Ice | Slot 3 | Zircon Points (60%) |
| Skin | Brown | Slot 4 | Black Inverted Cross (30%) |
| Nose | Brown | Slot 5 | White Merle (40%) |
| Claws | Sandy | Slot 6 | Dinar Dilution (60%) |
| Variant | Default | Slot 7 | Brown Saddle (40%) |
| Background | [Canada] Ontario - Algonquin Park | Slot 8 | White Underfur (100%) |
| Personality | Helpful | Slot 9 | Honey Wings Heavy (60%) |
| Stat Changes | SMR +7, SPD +3, AGI -3 | Slot 10 | White Tail Tip (100%) |
| Fionn | 4/1/2022 | ||
|---|---|---|---|
 | |||
| Raffle Traits | Pups Bred | ||
| Brown Wings Heavy, Yellow Inverted Panda | 52 | ||
| Wardrobe Details | |||
| Base | Calcite | Slot 1 | Brown Dorsal (100%) |
| Base Genetics | Warm Light II | Slot 2 | Cream Highlights (100%) |
| Eyes | Hazel | Slot 3 | Honey Carnage (40%) |
| Skin | Light Brown | Slot 4 | Beige Butcher (80%) |
| Nose | Tan | Slot 5 | Yellow Inverted Panda (60%) |
| Claws | Bone | Slot 6 | Honey Mantle (60%) |
| Variant | Relaxed | Slot 7 | White Marbled Unders (100%) |
| Background | Fields of Tansy | Slot 8 | Brown Wings Heavy (80%) |
| Personality | Scatterbrained | Slot 9 | White Bottoms (100%) |
| Stat Changes | SPD +7, STR +3, SMR -3 | Slot 10 | Honey Dilution (60%) |
| Draven | 4/8/2022 | ||
|---|---|---|---|
 | |||
| Raffle Traits | Pups Bred | ||
| Black Wings Heavy, White Wings | 65 | ||
| Wardrobe Details | |||
| Base | Pale | Slot 1 | Gray Back Patch (100%) |
| Base Genetics | Cool Light II | Slot 2 | White Mask (70%) |
| Eyes | Hetero White & Black | Slot 3 | Black Wings Heavy (100%) |
| Skin | Black | Slot 4 | Gray Smudge Heavy (100%) |
| Nose | Black | Slot 5 | White Merle (60%) |
| Claws | White | Slot 6 | Black Points (40%) |
| Variant | Default | Slot 7 | White Butcher (90%) |
| Background | [Canada] Quebec - Frozen Lakes | Slot 8 | Gray Chest (80%) |
| Personality | Combative | Slot 9 | White Wings (100%) |
| Stat Changes | STR +7, SPD +3, WIS -3 | Slot 10 | Silver Inuit Unders (100%) |
| Corvus II | 4/15/2022 | ||
|---|---|---|---|
 | |||
| Raffle Traits | Pups Bred | ||
| Dust Eyes, Red Inverted Panda, Red Wings | 68 | ||
| Wardrobe Details | |||
| Base | Rust | Slot 1 | Auburn Points (100%) |
| Base Genetics | Warm Medium II | Slot 2 | Auburn Cover (50%) |
| Eyes | Dust | Slot 3 | Cream Back Patch (100%) |
| Skin | Dark Brown | Slot 4 | Cream Marbled Unders (100%) |
| Nose | Dark Brown | Slot 5 | Beige Eyebrows (50%) |
| Claws | Bistre | Slot 6 | Auburn Inverted Cross (30%) |
| Variant | Relaxed | Slot 7 | Beige Cheek Fluff (100%) |
| Background | Forest Dwelling | Slot 8 | Red Inverted Panda (30%) |
| Personality | Precise | Slot 9 | Red Wings (40%) |
| Stat Changes | AGI +7, SMR +3, SPD -3 | Slot 10 | Zircon Undercoat (100%) |
| Gungnir | 4/22/2022 | ||
|---|---|---|---|
 | |||
| Raffle Traits | Pups Bred | ||
| Smoke Eyes, Black Lupos, White Inverted Panda | 86 | ||
| Wardrobe Details | |||
| Base | Silver | Slot 1 | White Socks (100%) |
| Base Genetics | Monochrome Medium II | Slot 2 | Black Blanket Ticking (60%) |
| Eyes | Smoke | Slot 3 | Black Unders (60%) |
| Skin | Black | Slot 4 | Black Half Cover (90%) |
| Nose | Black | Slot 5 | Black Lupos (100%) |
| Claws | Black | Slot 6 | White Inverted Panda (100%) |
| Variant | Relaxed | Slot 7 | Black Back (60%) |
| Background | Night in the Forest | Slot 8 | White Tamaskan Unders (100%) |
| Personality | Obnoxious | Slot 9 | Black Snout (100%) |
| Stat Changes | AGI +7, SPD +3, SMR -3 | Slot 10 | Black Saddle Ticking (100%) |
| Otsoa II | 4/29/2022 | ||
|---|---|---|---|
 | |||
| Raffle Traits | Pups Bred | ||
| Honey Inverted Panda, Honey Wings | 85 | ||
| Wardrobe Details | |||
| Base | Ducat | Slot 1 | Dark Brown Shepherd (100%) |
| Base Genetics | Warm Light II | Slot 2 | Beige Cape Ticking (100%) |
| Eyes | Hetero Brown & Blue | Slot 3 | Yellow Cape (100%) |
| Skin | Dark Brown | Slot 4 | Dark Brown Tail Tip (100%) |
| Nose | Dark | Slot 5 | Beige Undercoat (100%) |
| Claws | Brown | Slot 6 | Honey Wings (100%) |
| Variant | Default | Slot 7 | White Gentle Unders (100%) |
| Background | Root Cave | Slot 8 | Honey Inverted Panda (40%) |
| Personality | Capable | Slot 9 | Beige Eyebrows (100%) |
| Stat Changes | STR +7, WIS +3, AGI -3 | Slot 10 | Ducat Half Cape (50%) |
| Buckeye II | 5/6/2022 | ||
|---|---|---|---|
 | |||
| Raffle Traits | Pups Bred | ||
| Henna Panda, Red Lupos | 61 | ||
| Wardrobe Details | |||
| Base | Feldspar | Slot 1 | Auburn Smudge Heavy (50%) |
| Base Genetics | Muted Light II | Slot 2 | Zircon Butcher (50%) |
| Eyes | Green | Slot 3 | Cream Half Cape (50%) |
| Skin | Light Brown | Slot 4 | White Undercoat (100%) |
| Nose | Pink | Slot 5 | Henna Panda (70%) |
| Claws | Bone | Slot 6 | Red Lupos (30%) |
| Variant | Default | Slot 7 | Auburn Spectacles (100%) |
| Background | Cozy Den | Slot 8 | White Socks (100%) |
| Personality | Scatterbrained | Slot 9 | White Neck (100%) |
| Stat Changes | SPD +7, STR +3, SMR -3 | Slot 10 | White Tail Tip (100%) |
| Ulbrecht | 5/13/2022 | ||
|---|---|---|---|
 | |||
| Raffle Traits | Pups Bred | ||
| Dust Eyes, Black Cougar | 73 | ||
| Wardrobe Details | |||
| Base | Siqoq | Slot 1 | Gray Smudge Heavy (100%) |
| Base Genetics | Monochrome Light II | Slot 2 | White Trim (100%) |
| Eyes | Dust | Slot 3 | Black Neck (100%) |
| Skin | Black | Slot 4 | Sterling Shaded (60%) |
| Nose | Black | Slot 5 | Black Back Half Patch (80%) |
| Claws | Dark | Slot 6 | White Unders (50%) |
| Variant | Default | Slot 7 | Black Forehead (40%) |
| Background | [USA] Tennessee - Great Smoky Mountains | Slot 8 | White Inner Ear (100%) |
| Personality | Conceited | Slot 9 | Black Cougar (100%) |
| Stat Changes | STR +7, AGI +3, SMR -3 | Slot 10 | Black Cape Ticking (40%) |
| Wren | 5/20/2022 | ||
|---|---|---|---|
 | |||
| Raffle Traits | Pups Bred | ||
| Dust Eyes, Brown Cougar | 90 | ||
| Wardrobe Details | |||
| Base | Antler | Slot 1 | Beige Trim (100%) |
| Base Genetics | Muted Medium II | Slot 2 | White Bottoms (100%) |
| Eyes | Dust | Slot 3 | Brown Butcher (40%) |
| Skin | Dark Brown | Slot 4 | Brown Cape (100%) |
| Nose | Brown | Slot 5 | Cream Inverted Agouti (30%) |
| Claws | Sandy | Slot 6 | Cream Dilution (50%) |
| Variant | Sentinel | Slot 7 | Brown Cougar (100%) |
| Background | [Canada] Nova Scotia - Cape Breton | Slot 8 | White Throat (80%) |
| Personality | Independent | Slot 9 | Dark Brown Rump Edge (40%) |
| Stat Changes | WIS +7, AGI +3, SPD -3 | Slot 10 | Beige Throat Patch (50%) |
| Foxtrot | 5/27/2022 | ||
|---|---|---|---|
 | |||
| Raffle Traits | Pups Bred | ||
| Henna Cougar | 90 | ||
| Wardrobe Details | |||
| Base | Russet | Slot 1 | Beige Neck (100%) |
| Base Genetics | Warm Dark II | Slot 2 | Beige Light Husky (40%) |
| Eyes | Glass | Slot 3 | Beige Butcher (60%) |
| Skin | Dark | Slot 4 | Black Half Cover (40%) |
| Nose | Dark | Slot 5 | Auburn Back (50%) |
| Claws | Root | Slot 6 | Auburn Half Dorsal (40%) |
| Variant | Relaxed | Slot 7 | Cream Sallander (50%) |
| Background | Meadow in the Thicket | Slot 8 | White Inuit Unders (70%) |
| Personality | Vulgar | Slot 9 | Henna Cougar (100%) |
| Stat Changes | AGI +7, SPD +3, STR -3 | Slot 10 | Black Cape (70%) |
| Agate | 6/3/2022 | ||
|---|---|---|---|
 | |||
| Raffle Traits | Pups Bred | ||
| Honey Cougar | 67 | ||
| Wardrobe Details | |||
| Base | Jacinthe | Slot 1 | Dinar Cross (100%) |
| Base Genetics | Warm Light II | Slot 2 | Beige Dilution (100%) |
| Eyes | Yellow | Slot 3 | White Underfur (100%) |
| Skin | Dark | Slot 4 | Doubloon Merle (50%) |
| Nose | Light Brown | Slot 5 | Doubloon Tamaskan Unders (90%) |
| Claws | Bone | Slot 6 | White Socks (70%) |
| Variant | Sentinel | Slot 7 | Honey Cougar (100%) |
| Background | Green Ravine | Slot 8 | White Tail Tip (70%) |
| Personality | Dutiful | Slot 9 | White Cheek Fluff (70%) |
| Stat Changes | STR +7, WIS +3, SMR -3 | Slot 10 | Deira Spectacles (100%) |
| Cypress | 6/10/2022 | ||
|---|---|---|---|
 | |||
| Raffle Traits | Pups Bred | ||
| Red Cougar | 66 | ||
| Wardrobe Details | |||
| Base | Sarder | Slot 1 | Black Shaded (80%) |
| Base Genetics | Warm Dark II | Slot 2 | Black Smudge Heavy (80%) |
| Eyes | Glass | Slot 3 | Auburn Points (100%) |
| Skin | Dark Brown | Slot 4 | Black Back Edge Patch (100%) |
| Nose | Dark Brown | Slot 5 | Beige Tamaskan Unders (40%) |
| Claws | Bone | Slot 6 | White Gentle Unders (80%) |
| Variant | Default | Slot 7 | Red Cougar (40%) |
| Background | The Mojave | Slot 8 | Auburn Dilution (100%) |
| Personality | Dedicated | Slot 9 | White Tail Tip (60%) |
| Stat Changes | WIS +7, STR +3, SMR -3 | Slot 10 | White Toes (100%) |
| Winston | 6/17/2022 | ||
|---|---|---|---|
 | |||
| Raffle Traits | Pups Bred | ||
| Black Panda, White Lupos | 72 | ||
| Wardrobe Details | |||
| Base | Galena | Slot 1 | Black Back (100%) |
| Base Genetics | Cool Medium II | Slot 2 | Black Half Mask (100%) |
| Eyes | Ice | Slot 3 | Gray Half Cape (100%) |
| Skin | Black | Slot 4 | Sterling Shaded (40%) |
| Nose | Black | Slot 5 | White Lupos (60%) |
| Claws | White | Slot 6 | Black Panda (100%) |
| Variant | Relaxed | Slot 7 | Gray Back Heavy Patch (60%) |
| Background | Lights Over Water Trail | Slot 8 | White Cheek Fluff (100%) |
| Personality | Pessimistic | Slot 9 | White Highlights (60%) |
| Stat Changes | AGI +7, STR +3, SPD -3 | Slot 10 | Black Dilution (50%) |
| Pyxis | 6/24/2022 | ||
|---|---|---|---|
 | |||
| Raffle Traits | Pups Bred | ||
| Storm Eyes, Black Wings Heavy, White Inverted Panda | 83 | ||
| Wardrobe Details | |||
| Base | Nepheline | Slot 1 | White Sallander (100%) |
| Base Genetics | Monochrome Light II | Slot 2 | White Inverted Panda (80%) |
| Eyes | Storm | Slot 3 | Black Wings Heavy (100%) |
| Skin | Black | Slot 4 | Black Blanket (100%) |
| Nose | Black | Slot 5 | Black Forehead (100%) |
| Claws | Black | Slot 6 | White Shaded (50%) |
| Variant | Sentinel | Slot 7 | White Underfur (100%) |
| Background | Boreal Forest | Slot 8 | Black Limbs (40%) |
| Personality | Sullen | Slot 9 | Silver Predator (80%) |
| Stat Changes | AGI +7, STR +3, SMR -3 | Slot 10 | White Bottoms (100%) |
| Alligator | 7/1/2022 | ||
|---|---|---|---|
 | |||
| Raffle Traits | Pups Bred | ||
| Black Cougar, Dark Brown Wings | 69 | ||
| Wardrobe Details | |||
| Base | Tuff | Slot 1 | Dark Brown Sallander (100%) |
| Base Genetics | Muted Medium II | Slot 2 | Ducat Bottoms (100%) |
| Eyes | Hazel | Slot 3 | Deira Underbelly (50%) |
| Skin | Dark Brown | Slot 4 | Cream Cheek Fluff (100%) |
| Nose | Dark Brown | Slot 5 | Black Shaded (80%) |
| Claws | White | Slot 6 | Tuff Undercoat (100%) |
| Variant | Relaxed | Slot 7 | Black Cougar (40%) |
| Background | [Canada] British Columbia - Kootenay National Park | Slot 8 | Brown Smoke (50%) |
| Personality | Scatterbrained | Slot 9 | Dark Brown Wings (100%) |
| Stat Changes | SPD +7, STR +3, SMR -3 | Slot 10 | Tuff Trim (100%) |
| Circinus | 7/8/2022 | ||
|---|---|---|---|
 | |||
| Raffle Traits | Pups Bred | ||
| Brown Wings Scarce, Cream Inverted Panda | 51 | ||
| Wardrobe Details | |||
| Base | Isabel | Slot 1 | Brown Dilution (100%) |
| Base Genetics | Muted Light II | Slot 2 | Beige Limbs (50%) |
| Eyes | Ice | Slot 3 | Dark Brown Saddle (100%) |
| Skin | Tan | Slot 4 | Cream Inverted Panda (40%) |
| Nose | Pallid | Slot 5 | Brown Wings Scarce (60%) |
| Claws | Bone | Slot 6 | Brown Smudge Heavy (40%) |
| Variant | Default | Slot 7 | White Half Socks (100%) |
| Background | Dead Stream Swamp | Slot 8 | Cream Merle (30%) |
| Personality | Helpful | Slot 9 | White Half Mask (70%) |
| Stat Changes | SMR +7, SPD +3, AGI -3 | Slot 10 | White Undercoat (80%) |
| Del Tule | 7/15/2022 | ||
|---|---|---|---|
 | |||
| Raffle Traits | Pups Bred | ||
| Storm Eyes, Black Panda, White Wings | 65 | ||
| Wardrobe Details | |||
| Base | Denim | Slot 1 | Black Panda (50%) |
| Base Genetics | Cool Dark II | Slot 2 | Black Smoke (100%) |
| Eyes | Storm | Slot 3 | White Inner Ear (90%) |
| Skin | Black | Slot 4 | White Heavy Husky (60%) |
| Nose | Gray | Slot 5 | Silver Patchy Unders (60%) |
| Claws | Root | Slot 6 | Silver Butcher (40%) |
| Variant | Sentinel | Slot 7 | Black Dilution (40%) |
| Background | Lunar Forest Fog | Slot 8 | White Tamaskan Unders (70%) |
| Personality | Quiet | Slot 9 | White Wings (100%) |
| Stat Changes | WIS +7, SMR +3, SPD -3 | Slot 10 | White Cheek Fluff (60%) |
| Jeff | 7/22/2022 | ||
|---|---|---|---|
 | |||
| Raffle Traits | Pups Bred | ||
| Dust Eyes, Beige Inverted Panda, Brown Panda | 68 | ||
| Wardrobe Details | |||
| Base | Tawny | Slot 1 | Beige Undersides (80%) |
| Base Genetics | Warm Medium II | Slot 2 | Beige Inverted Panda (40%) |
| Eyes | Dust | Slot 3 | Dark Brown Blanket (100%) |
| Skin | Dark | Slot 4 | Cream Highlights (50%) |
| Nose | Brown | Slot 5 | Brown Panda (60%) |
| Claws | Bone | Slot 6 | Yellow Underfur (70%) |
| Variant | Default | Slot 7 | Yellow Shaded (30%) |
| Background | El Yunque Rainforest | Slot 8 | Cream Underfur (60%) |
| Personality | Aloof | Slot 9 | White Underbelly (80%) |
| Stat Changes | SMR +7, AGI +3, WIS -3 | Slot 10 | Beige Butcher (40%) |
| Quil | 7/29/2022 | ||
|---|---|---|---|
 | |||
| Raffle Traits | Pups Bred | ||
| Black Wings Scarce, Henna Panda | 72 | ||
| Wardrobe Details | |||
| Base | Auburn | Slot 1 | Dinar Inverted Cross (50%) |
| Base Genetics | Warm Dark II | Slot 2 | Dark Brown Chest Stripe (100%) |
| Eyes | Hetero Blue & Brown | Slot 3 | Henna Panda (50%) |
| Skin | Dark Brown | Slot 4 | Doubloon Heavy Husky (90%) |
| Nose | Dark Brown | Slot 5 | Black Agouti (80%) |
| Claws | Sandy | Slot 6 | Auburn Mantle (60%) |
| Variant | Relaxed | Slot 7 | Black Wings Scarce (100%) |
| Background | Hoh Rainforest | Slot 8 | Ducat Undersides (100%) |
| Personality | Observant | Slot 9 | Beige Trim (100%) |
| Stat Changes | WIS +7, SMR +3, AGI -3 | Slot 10 | White Underbelly (60%) |
| Zagreus | 8/5/2022 | ||
|---|---|---|---|
 | |||
| Raffle Traits | Pups Bred | ||
| Dark Brown Lupos, Dark Brown Wings Heavy | 61 | ||
| Wardrobe Details | |||
| Base | Melchior | Slot 1 | Dark Brown Lupos (100%) |
| Base Genetics | Monochrome Light II | Slot 2 | White Highlights (100%) |
| Eyes | Olive | Slot 3 | Dark Brown Points (30%) |
| Skin | Dark | Slot 4 | White Merle (40%) |
| Nose | Dark | Slot 5 | Dark Brown Wings Heavy (60%) |
| Claws | Dark | Slot 6 | White Shaded (80%) |
| Variant | Sentinel | Slot 7 | Brown Dilution (30%) |
| Background | Autumn Fog | Slot 8 | Dark Brown Mantle (40%) |
| Personality | Pessimistic | Slot 9 | White Medium Husky (100%) |
| Stat Changes | AGI +7, STR +3, SPD -3 | Slot 10 | Dark Brown Half Dorsal (80%) |
| Wiglaf | 8/12/2022 | ||
|---|---|---|---|
 | |||
| Raffle Traits | Pups Bred | ||
| Dark Brown Merle Patches, Dark Brown Panda, Honey Cougar | 56 | ||
| Wardrobe Details | |||
| Base | Oroide | Slot 1 | Dark Brown Merle Patches (100%) |
| Base Genetics | Muted Dark II | Slot 2 | Ducat Sallander (50%) |
| Eyes | Glass | Slot 3 | Auburn Shaded (60%) |
| Skin | Bistre | Slot 4 | Dark Brown Panda (60%) |
| Nose | Dark | Slot 5 | Auburn Dorsal (100%) |
| Claws | Bone | Slot 6 | Honey Cougar (30%) |
| Variant | Relaxed | Slot 7 | Ducat Tamaskan Unders (100%) |
| Background | Kissimmee Prairie | Slot 8 | Black Dilution (50%) |
| Personality | Sneaky | Slot 9 | Beige Low Bottoms (100%) |
| Stat Changes | SMR +7, AGI +3, SPD -3 | Slot 10 | White Toes (100%) |
| Bear II | 8/19/2022 | ||
|---|---|---|---|
 | |||
| Raffle Traits | Pups Bred | ||
| Storm Eyes, Black Wings Heavy, White Wings Scarce | 72 | ||
| Wardrobe Details | |||
| Base | Sky | Slot 1 | Black Smoke (60%) |
| Base Genetics | Cool Light II | Slot 2 | Black Saddle Ticking (80%) |
| Eyes | Storm | Slot 3 | White Ear Tips (100%) |
| Skin | Blue | Slot 4 | Black Wings Heavy (100%) |
| Nose | Blue | Slot 5 | White Cape Ticking (100%) |
| Claws | White | Slot 6 | Black Shepherd Heavy (30%) |
| Variant | Default | Slot 7 | White Half Mask (100%) |
| Background | Cold Cave | Slot 8 | White Inuit Unders (100%) |
| Personality | Trusting | Slot 9 | White Cheek Fluff (100%) |
| Stat Changes | AGI +7, WIS +3, SMR -3 | Slot 10 | White Wings Scarce (100%) |
| Hephaestus | 8/26/2022 | ||
|---|---|---|---|
 | |||
| Raffle Traits | Pups Bred | ||
| Smoke Eyes, Brown Lupos, Honey Wings Scarce | 70 | ||
| Wardrobe Details | |||
| Base | Ducat | Slot 1 | Dark Brown Butcher (100%) |
| Base Genetics | Warm Light II | Slot 2 | Black Smoke (60%) |
| Eyes | Smoke | Slot 3 | Yellow Highlights (100%) |
| Skin | Dark Brown | Slot 4 | Brown Lupos (100%) |
| Nose | Dark Brown | Slot 5 | Beige Predator (100%) |
| Claws | Sandy | Slot 6 | Sepia Dilution (40%) |
| Variant | Default | Slot 7 | Honey Wings Scarce (60%) |
| Background | Long Range Mountains | Slot 8 | Doubloon Underfur (100%) |
| Personality | Malicious | Slot 9 | Dark Brown Shoulder Patch (80%) |
| Stat Changes | STR +7, SMR +3, AGI -3 | Slot 10 | Ducat Tamaskan Unders (80%) |
| Vela | 9/2/2022 | ||
|---|---|---|---|
 | |||
| Raffle Traits | Pups Bred | ||
| Dust Eyes, Cream Merle, Red Cougar, Red Lupos | 90 | ||
| Wardrobe Details | |||
| Base | Peach | Slot 1 | Red Lupos (40%) |
| Base Genetics | Muted Light II | Slot 2 | Cream Merle (60%) |
| Eyes | Dust | Slot 3 | Auburn Half Mask (30%) |
| Skin | Brown | Slot 4 | Beige Cape (60%) |
| Nose | Pink | Slot 5 | Red Shaded (40%) |
| Claws | Bone | Slot 6 | Red Cougar (40%) |
| Variant | Relaxed | Slot 7 | Cream Cape Ticking (60%) |
| Background | Green Meadow | Slot 8 | Zircon Undersides (100%) |
| Personality | Imaginative | Slot 9 | White Tail Tip (100%) |
| Stat Changes | WIS +7, SPD +3, STR -3 | Slot 10 | White Bottoms (100%) |
| Nexus II | 9/9/2022 | ||
|---|---|---|---|
 | |||
| Raffle Traits | Pups Bred | ||
| Black Merle Patches, Black Wings, Cream Inverted Panda | 72 | ||
| Wardrobe Details | |||
| Base | Ebony | Slot 1 | Zircon Inverted Cross (60%) |
| Base Genetics | Muted Dark II | Slot 2 | Zircon Carnage (50%) |
| Eyes | Hetero Black & White | Slot 3 | Cream Inverted Panda (40%) |
| Skin | Dark | Slot 4 | White Undercoat (100%) |
| Nose | Black | Slot 5 | Beige Underfur (60%) |
| Claws | Bone | Slot 6 | Black Merle Patches (80%) |
| Variant | Sentinel | Slot 7 | White Socks (100%) |
| Background | Massive Earthquake | Slot 8 | Black Shepherd Heavy (100%) |
| Personality | Adventurous | Slot 9 | Black Wings (100%) |
| Stat Changes | SPD +7, SMR +3, AGI -3 | Slot 10 | White Low Bottoms (100%) |
| Alligator II | 9/16/2022 | ||
|---|---|---|---|
 | |||
| Raffle Traits | Pups Bred | ||
| Red Inverted Panda, Red Wings Scarce | 60 | ||
| Wardrobe Details | |||
| Base | Dravite | Slot 1 | Zircon Tamaskan Unders (100%) |
| Base Genetics | Warm Dark II | Slot 2 | Red Inverted Panda (40%) |
| Eyes | White | Slot 3 | Black Dilution (100%) |
| Skin | Black | Slot 4 | Black Shaded (50%) |
| Nose | Bistre | Slot 5 | Auburn Undercoat (30%) |
| Claws | Bistre | Slot 6 | Black Points (40%) |
| Variant | Default | Slot 7 | Beige Marbled Unders (100%) |
| Background | Cozy Den | Slot 8 | Auburn Mask (30%) |
| Personality | Quiet | Slot 9 | Beige Eyebrows (100%) |
| Stat Changes | WIS +7, SMR +3, SPD -3 | Slot 10 | Red Wings Scarce (40%) |
| Rogir | 9/23/2022 | ||
|---|---|---|---|
 | |||
| Raffle Traits | Pups Bred | ||
| Dust Eyes, Honey Cougar, Honey Merle | 59 | ||
| Wardrobe Details | |||
| Base | Chert | Slot 1 | Black Undercoat (80%) |
| Base Genetics | Monochrome Medium II | Slot 2 | Red Smoke (40%) |
| Eyes | Dust | Slot 3 | Yellow Heavy Husky (100%) |
| Skin | Dark Brown | Slot 4 | Honey Merle (90%) |
| Nose | Oxblood | Slot 5 | Honey Cougar (80%) |
| Claws | Dark | Slot 6 | Black Smoke (90%) |
| Variant | Sentinel | Slot 7 | Dark Brown Smudge (80%) |
| Background | Deep Forest | Slot 8 | White Heavy Husky (30%) |
| Personality | Keen | Slot 9 | Cream Inverted Cross (40%) |
| Stat Changes | SPD +7, SMR +3, STR -3 | Slot 10 | Black Carnage (30%) |
| Monoceros | 9/30/2022 | ||
|---|---|---|---|
 | |||
| Raffle Traits | Pups Bred | ||
| Storm Eyes, Black Wings Heavy, White Wings Scarce | 73 | ||
| Wardrobe Details | |||
| Base | Nocturne | Slot 1 | White Tamaskan Unders (100%) |
| Base Genetics | Cool Dark II | Slot 2 | Black Wings Heavy (100%) |
| Eyes | Storm | Slot 3 | Black Smoke (40%) |
| Skin | Black | Slot 4 | White Wings Scarce (40%) |
| Nose | Black | Slot 5 | Black Butcher (30%) |
| Claws | Gray | Slot 6 | Silver Sallander (40%) |
| Variant | Default | Slot 7 | White Eyebrows (100%) |
| Background | Mirthful Meadow | Slot 8 | White Tail Tip (100%) |
| Personality | Dutiful | Slot 9 | White Ear Tips (100%) |
| Stat Changes | STR +7, WIS +3, SMR -3 | Slot 10 | Black Back Patch (100%) |
| Callum | 10/7/2022 | ||
|---|---|---|---|
 | |||
| Raffle Traits | Pups Bred | ||
| Black Merle Patches, Black Panda, White Wings | 74 | ||
| Wardrobe Details | |||
| Base | Pewter | Slot 1 | Gray Agouti (100%) |
| Base Genetics | Monochrome Dark II | Slot 2 | White Wings (100%) |
| Eyes | Hetero Black & White | Slot 3 | Silver Undercoat (100%) |
| Skin | Black | Slot 4 | Black Shepherd Heavy (80%) |
| Nose | Black | Slot 5 | White Blaze (100%) |
| Claws | Black | Slot 6 | Black Back Edge Patch (60%) |
| Variant | Relaxed | Slot 7 | Black Merle Patches (70%) |
| Background | [USA] Alaska - Aleutian Islands | Slot 8 | White Half Socks (100%) |
| Personality | Sarcastic | Slot 9 | Black Panda (30%) |
| Stat Changes | SMR +7, WIS +3, STR -3 | Slot 10 | White Marbled Unders (60%) |
| Rhubarb | 10/14/2022 | ||
|---|---|---|---|
 | |||
| Raffle Traits | Pups Bred | ||
| Brown Cougar, Brown Wings, Cream Lupos | 74 | ||
| Wardrobe Details | |||
| Base | Blonde | Slot 1 | White Underbelly (100%) |
| Base Genetics | Muted Medium II | Slot 2 | Cream Lupos (60%) |
| Eyes | Olive | Slot 3 | Cream Inverted Manicou (30%) |
| Skin | Dark Brown | Slot 4 | Dark Brown Stained Limbs (80%) |
| Nose | Dark | Slot 5 | Sepia Shaded (80%) |
| Claws | Bone | Slot 6 | Brown Wings (100%) |
| Variant | Default | Slot 7 | Honey Back (40%) |
| Background | Malpaís | Slot 8 | White Irish (50%) |
| Personality | Unfriendly | Slot 9 | Brown Cougar (100%) |
| Stat Changes | SMR +7, STR +3, WIS -3 | Slot 10 | Beige Back Heavy Patch (30%) |
| Ulbrecht II | 10/21/2022 | ||
|---|---|---|---|
 | |||
| Raffle Traits | Pups Bred | ||
| Black Merle Patches, Black Wings Scarce, Henna Cougar | 76 | ||
| Wardrobe Details | |||
| Base | Auburn | Slot 1 | Henna Manicou (40%) |
| Base Genetics | Warm Dark II | Slot 2 | Black Wings Scarce (100%) |
| Eyes | Hazel | Slot 3 | Black Trim (80%) |
| Skin | Dark Brown | Slot 4 | Beige Carnage (60%) |
| Nose | Dark Brown | Slot 5 | Black Merle Patches (100%) |
| Claws | Brown | Slot 6 | Henna Cougar (50%) |
| Variant | Relaxed | Slot 7 | Beige Underbelly (100%) |
| Background | Autumn Hot Springs | Slot 8 | Auburn Undercoat (50%) |
| Personality | Impulsive | Slot 9 | Beige Half Socks (60%) |
| Stat Changes | SPD +7, SMR +3, WIS -3 | Slot 10 | Cream Dilution (30%) |
| Chad | 10/28/2022 | ||
|---|---|---|---|
 | |||
| Raffle Traits | Pups Bred | ||
| Smoke Eyes, Black Wings, White Lupos | 79 | ||
| Wardrobe Details | |||
| Base | Titanium | Slot 1 | White Marbled Unders (100%) |
| Base Genetics | Monochrome Light II | Slot 2 | Silver Unders (100%) |
| Eyes | Smoke | Slot 3 | White Inverted Opossum (40%) |
| Skin | Black | Slot 4 | Black Wings (80%) |
| Nose | Black | Slot 5 | Silver Trim (100%) |
| Claws | Black | Slot 6 | Black Manicou (80%) |
| Variant | Default | Slot 7 | White Eyebrows (100%) |
| Background | Anniversary! Festive Winter Forest | Slot 8 | White Lupos (40%) |
| Personality | Sullen | Slot 9 | Black Chest (90%) |
| Stat Changes | AGI +7, STR +3, SMR -3 | Slot 10 | Black Dilution (40%) |
| Meteor | 11/4/2022 | ||
|---|---|---|---|
 | |||
| Raffle Traits | Pups Bred | ||
| Black Lupos, Henna Cougar, Red Inverted Panda | 95 | ||
| Wardrobe Details | |||
| Base | Rust | Slot 1 | White Inverted Agouti (30%) |
| Base Genetics | Warm Medium II | Slot 2 | Black Lupos (40%) |
| Eyes | White | Slot 3 | White Tamaskan Unders (100%) |
| Skin | Dark | Slot 4 | Black Cape Ticking (100%) |
| Nose | Dark | Slot 5 | Henna Cougar (100%) |
| Claws | Dark | Slot 6 | Black Spectacles (50%) |
| Variant | Default | Slot 7 | Red Inverted Panda (20%) |
| Background | Red Lair | Slot 8 | Black Back (60%) |
| Personality | Dishonest | Slot 9 | Black Dilution (60%) |
| Stat Changes | SPD +7, SMR +3, WIS -3 | Slot 10 | Black Tail Tip (60%) |
| Butterscotch II | 11/11/2022 | ||
|---|---|---|---|
 | |||
| Raffle Traits | Pups Bred | ||
| Red Panda, White Inverted Panda, White Lupos | 98 | ||
| Wardrobe Details | |||
| Base | Lavender | Slot 1 | Red Shaded (20%) |
| Base Genetics | Cool Light II | Slot 2 | Red Panda (20%) |
| Eyes | Ice | Slot 3 | Henna Opossum (30%) |
| Skin | Dark | Slot 4 | White Half Mask (100%) |
| Nose | Pink | Slot 5 | White Toes (100%) |
| Claws | White | Slot 6 | White Carnage (100%) |
| Variant | Relaxed | Slot 7 | Red Highlights (40%) |
| Background | Callanish Stones | Slot 8 | White Inverted Panda (30%) |
| Personality | Anxious | Slot 9 | White Lupos (80%) |
| Stat Changes | SPD +7, AGI +3, STR -3 | Slot 10 | White Limbs (30%) |
| Pictor | 11/18/2022 | ||
|---|---|---|---|
 | |||
| Raffle Traits | Pups Bred | ||
| Cream Lupos, Dark Brown Wings Scarce, Yellow Inverted Panda | 77 | ||
| Wardrobe Details | |||
| Base | Pecan | Slot 1 | Cream Carnage (40%) |
| Base Genetics | Muted Dark II | Slot 2 | Beige Undercoat (70%) |
| Eyes | Glass | Slot 3 | Dark Brown Wings Scarce (100%) |
| Skin | Dark | Slot 4 | Yellow Inverted Panda (30%) |
| Nose | Brown | Slot 5 | White Trim (100%) |
| Claws | Brown | Slot 6 | Dark Brown Half Mask (100%) |
| Variant | Sentinel | Slot 7 | Honey Agouti (30%) |
| Background | Loch Maree | Slot 8 | Cream Lupos (40%) |
| Personality | Quiet | Slot 9 | Yellow Shaded (30%) |
| Stat Changes | WIS +7, SMR +3, SPD -3 | Slot 10 | White Eyebrows (100%) |
| Barkenstein II | 11/25/2022 | ||
|---|---|---|---|
 | |||
| Raffle Traits | Pups Bred | ||
| Smoke Eyes, Black Cougar, Red Lupos | 88 | ||
| Wardrobe Details | |||
| Base | Sarder | Slot 1 | Red Mask (60%) |
| Base Genetics | Warm Dark II | Slot 2 | Red Lupos (60%) |
| Eyes | Smoke | Slot 3 | White Predator (100%) |
| Skin | Black | Slot 4 | Black Half Cover (100%) |
| Nose | Black | Slot 5 | Black Cougar (50%) |
| Claws | Root | Slot 6 | White Inverted Manicou (30%) |
| Variant | Relaxed | Slot 7 | Auburn Shaded (40%) |
| Background | Entrance Grave | Slot 8 | White Nose Line (100%) |
| Personality | Bossy | Slot 9 | Auburn Dilution (50%) |
| Stat Changes | WIS +7, STR +3, AGI -3 | Slot 10 | Auburn Dorsal (60%) |
| Jupiter | 12/2/2022 | ||
|---|---|---|---|
 | |||
| Raffle Traits | Pups Bred | ||
| Brown Merle Patches, Brown Wings, Honey Wings Heavy | 61 | ||
| Wardrobe Details | |||
| Base | Siqoq | Slot 1 | White Sallander (100%) |
| Base Genetics | Monochrome Light II | Slot 2 | Honey Back (60%) |
| Eyes | Glass | Slot 3 | Sepia Dilution (80%) |
| Skin | Brown | Slot 4 | Honey Wings Heavy (70%) |
| Nose | Brown | Slot 5 | Yellow Highlights (50%) |
| Claws | Bone | Slot 6 | Dark Brown Forehead (50%) |
| Variant | Sentinel | Slot 7 | Brown Chest (50%) |
| Background | Menhir | Slot 8 | Brown Merle Patches (40%) |
| Personality | Reliable | Slot 9 | Brown Wings (90%) |
| Stat Changes | STR +7, AGI +3, SPD -3 | Slot 10 | White Urajiro (100%) |
| Hydrus | 12/9/2022 | ||
|---|---|---|---|
 | |||
| Raffle Traits | Pups Bred | ||
| Dust Eyes, Black Cougar, Black Panda | 92 | ||
| Wardrobe Details | |||
| Base | Cocoa | Slot 1 | Dark Brown Manicou (50%) |
| Base Genetics | Muted Dark II | Slot 2 | White Bottoms (100%) |
| Eyes | Dust | Slot 3 | Beige Half Cape (80%) |
| Skin | Black | Slot 4 | Black Panda (60%) |
| Nose | Dark | Slot 5 | Cream Shoulder Patch (40%) |
| Claws | Root | Slot 6 | Cream Inverted Cross (20%) |
| Variant | Default | Slot 7 | Dark Brown Mask (40%) |
| Background | Desolate Cave | Slot 8 | Dark Brown Cross (40%) |
| Personality | Sneaky | Slot 9 | Zircon Highlights (40%) |
| Stat Changes | SMR +7, AGI +3, SPD -3 | Slot 10 | Black Cougar (40%) |
| Seraph | 12/16/2022 | ||
|---|---|---|---|
 | |||
| Raffle Traits | Pups Bred | ||
| Red Cougar, White Lupos, White Wings | 73 | ||
| Wardrobe Details | |||
| Base | Diorite | Slot 1 | Red Cougar (20%) |
| Base Genetics | Cool Medium II | Slot 2 | Red Butcher (20%) |
| Eyes | Ice | Slot 3 | White Lupos (100%) |
| Skin | Gray | Slot 4 | White Dilution (30%) |
| Nose | Blue | Slot 5 | Sterlign Shaded (40%) |
| Claws | Gray | Slot 6 | White Tamaskan Unders (100%) |
| Variant | Relaxed | Slot 7 | White Wings (100%) |
| Background | Migrating Caribou | Slot 8 | White Socks (100%) |
| Personality | Trusting | Slot 9 | White Medium Husky (40%) |
| Stat Changes | AGI +7, WIS +3, SMR -3 | Slot 10 | White Spectacles (100%) |
| Sleipnir | 12/23/2022 | ||
|---|---|---|---|
 | |||
| Raffle Traits | Pups Bred | ||
| Dust Eyes, Brown Cougar, Black Wings | 67 | ||
| Wardrobe Details | |||
| Base | Biotite | Slot 1 | Black Manicou (100%) |
| Base Genetics | Monochrome Dark II | Slot 2 | Beige Undersides (80%) |
| Eyes | Dust | Slot 3 | Brown Cougar (60%) |
| Skin | Black | Slot 4 | Brown Saddle (30%) |
| Nose | Black | Slot 5 | Black Cape (100%) |
| Claws | Brown | Slot 6 | Black Wings (100%) |
| Variant | Relaxed | Slot 7 | Sepia Dilution (80%) |
| Background | [Middle America] Mexico - Sierra de Órganos | Slot 8 | Deira Underfur (50%) |
| Personality | Unfriendly | Slot 9 | Sepia Dorsal (80%) |
| Stat Changes | SMR +7, STR +3, WIS -3 | Slot 10 | Deira Gentle Unders (100%) |
| Ursa | 12/30/2022 | ||
|---|---|---|---|
 | |||
| Raffle Traits | Pups Bred | ||
| Holly Eyes, Red Cougar, Red Inverted Panda | 65 | ||
| Wardrobe Details | |||
| Base | Sarder | Slot 1 | Red Inverted Panda (40%) |
| Base Genetics | Warm Dark II | Slot 2 | White Inverted Manicou (30%) |
| Eyes | Holly | Slot 3 | Red Sallander (40%) |
| Skin | Pink | Slot 4 | White Marbled Unders (100%) |
| Nose | Pink | Slot 5 | White Dilution (40%) |
| Claws | White | Slot 6 | White Inverted Opossum (40%) |
| Variant | Default | Slot 7 | Auburn Half Dorsal (50%) |
| Background | [Canada] Yukon - Icy Shores | Slot 8 | Red Cougar (30%) |
| Personality | Aloof | Slot 9 | White Bottoms (100%) |
| Stat Changes | SMR +7, AGI +3, WIS -3 | Slot 10 | White Highlights (30%) |
2023 Studs
2023 Studs
| Winston II | 1/6/2023 | ||
|---|---|---|---|
 | |||
| Raffle Traits | Pups Bred | ||
| Novus Eyes, Black Wings Heavy, Cream Lupos | 84 | ||
| Wardrobe Details | |||
| Base | Denim | Slot 1 | Silver Half Cape Ticking (100%) |
| Base Genetics | Cool Dark II | Slot 2 | Black Neck Stripe (100%) |
| Eyes | Novus | Slot 3 | Cream Lupos (40%) |
| Skin | Black | Slot 4 | White Dilution (20%) |
| Nose | Black | Slot 5 | Cream Highlights (30%) |
| Claws | Gray | Slot 6 | Black Wings Heavy (60%) |
| Variant | Relaxed | Slot 7 | Black Sallander (80%) |
| Background | Night Colorado River | Slot 8 | Black Head Stripe (60%) |
| Personality | Optimistic | Slot 9 | White Eyebrows (100%) |
| Stat Changes | AGI +7, SPD +3, WIS -3 | Slot 10 | Silver Unders (100%) |
| Zeus | 1/13/2023 | ||
|---|---|---|---|
 | |||
| Raffle Traits | Pups Bred | ||
| Dark Hazel Eyes, Beige Inverted Panda, Brown Lupos, Dark Brown Wings Heavy | 80 | ||
| Wardrobe Details | |||
| Base | Blonde | Slot 1 | Dark Brown Wings Heavy (100%) |
| Base Genetics | Muted Medium II | Slot 2 | Dinar Back (60%) |
| Eyes | Dark Hazel | Slot 3 | Beige Inverted Panda (40%) |
| Skin | Dark Brown | Slot 4 | Brown Smudge Heavy (50%) |
| Nose | Brown | Slot 5 | Brown Lupos (60%) |
| Claws | Sandy | Slot 6 | Dark Brown Half Mask (100%) |
| Variant | Default | Slot 7 | Cream Bottoms (80%) |
| Background | Lacandon Jungle | Slot 8 | Beige Patchy Unders (50%) |
| Personality | Optimistic | Slot 9 | White Gentle Unders (60%) |
| Stat Changes | AGI +7, SPD +3, WIS -3 | Slot 10 | Dark Brown Mantle (50%) |
| Mayonnaise | 1/20/2023 | ||
|---|---|---|---|
 | |||
| Raffle Traits | Pups Bred | ||
| Holly Eyes, Black Wings, Red Panda, Red Wings Heavy | 77 | ||
| Wardrobe Details | |||
| Base | Ebony | Slot 1 | Zircon Tamaskan Unders (100%) |
| Base Genetics | Muted Dark II | Slot 2 | Auburn Undercoat (30%) |
| Eyes | Holly | Slot 3 | Black Dilution (80%) |
| Skin | Black | Slot 4 | Red Highlights (50%) |
| Nose | Black | Slot 5 | Red Panda (20%) |
| Claws | Root | Slot 6 | Red Wings Heavy (40%) |
| Variant | Relaxed | Slot 7 | Black Wings (80%) |
| Background | [USA] Ohio - Hocking Hills | Slot 8 | Black Smoke (30%) |
| Personality | Pessimistic | Slot 9 | Black Snout (60%) |
| Stat Changes | AGI +7, STR +3, SPD -3 | Slot 10 | White Low Bottoms (60%) |
| Gungnir II | 1/27/2023 | ||
|---|---|---|---|
 | |||
| Raffle Traits | Pups Bred | ||
| Brown Panda, Brown Wings Heavy, Yellow Inverted Panda | 50 | ||
| Wardrobe Details | |||
| Base | Almond | Slot 1 | Beige Inuit Unders (100%) |
| Base Genetics | Muted Light II | Slot 2 | Yellow Inverted Panda (40%) |
| Eyes | Glass | Slot 3 | Black Shoulders (80%) |
| Skin | Dark Brown | Slot 4 | Honey Points (60%) |
| Nose | Dark Brown | Slot 5 | Brown Wings Heavy (100%) |
| Claws | Bone | Slot 6 | Brown Panda (80%) |
| Variant | Default | Slot 7 | White Marbled Unders (60%) |
| Background | Silent Autumn Night | Slot 8 | Dark Brown Smoke (100%) |
| Personality | Scatterbrained | Slot 9 | Doubloon Medium Husky (40%) |
| Stat Changes | SPD +7, STR +3, SMR -3 | Slot 10 | Black Smoke (60%) |
| Boreas | 2/3/2023 | ||
|---|---|---|---|
 | |||
| Raffle Traits | Pups Bred | ||
| Novus Eyes, Black Wings, Henna Panda, Red Wings Scarce | 74 | ||
| Wardrobe Details | |||
| Base | Maltese | Slot 1 | Henna Panda (40%) |
| Base Genetics | Cool Medium II | Slot 2 | White Underfur (80%) |
| Eyes | Novus | Slot 3 | Auburn Agouti (60%) |
| Skin | Bistre | Slot 4 | Auburn Points (40%) |
| Nose | Dark | Slot 5 | Black Wings (80%) |
| Claws | White | Slot 6 | Black Smudge Heavy (60%) |
| Variant | Sentinel | Slot 7 | Red Wings Scarce (30%) |
| Background | [USA] Oregon - Oregon Coast | Slot 8 | Auburn Dilution (50%) |
| Personality | Bossy | Slot 9 | White Highlights (20%) |
| Stat Changes | WIS +7, STR +3, AGI -3 | Slot 10 | White Low Bottoms (100%) |
| Hephaestus II | 2/10/2023 | ||
|---|---|---|---|
 | |||
| Raffle Traits | Pups Bred | ||
| Dark Hazel Eyes, Honey Merle, Yellow Inverted Panda, Yellow Lupos | 67 | ||
| Wardrobe Details | |||
| Base | Saffron | Slot 1 | Yellow Inverted Panda (50%) |
| Base Genetics | Warm Medium II | Slot 2 | Dark Brown Smoke (80%) |
| Eyes | Dark Hazel | Slot 3 | Honey Merle (50%) |
| Skin | Dark Brown | Slot 4 | Yellow Lupos (70%) |
| Nose | Brown | Slot 5 | Honey Carnage (60%) |
| Claws | Sandy | Slot 6 | Beige Predator (60%) |
| Variant | Relaxed | Slot 7 | Beige Underfur (100%) |
| Background | [USA] Colorado - Elk Mountains | Slot 8 | Sepia Dilution (30%) |
| Personality | Sneaky | Slot 9 | White Underbelly (100%) |
| Stat Changes | SMR +7, AGI +3, SPD -3 | Slot 10 | White Tail Tip (100%) |
| Rhubarb II | 2/17/2023 | ||
|---|---|---|---|
 | |||
| Raffle Traits | Pups Bred | ||
| Storm Eyes, Black Cougar, Black Lupos, White Inverted Panda | 78 | ||
| Wardrobe Details | |||
| Base | Onyx | Slot 1 | White Inverted Panda (30%) |
| Base Genetics | Monochrome Dark II | Slot 2 | Black Cougar (80%) |
| Eyes | Storm | Slot 3 | Black Dilution (60%) |
| Skin | Black | Slot 4 | White Paws (100%) |
| Nose | Black | Slot 5 | Silver Undercoat (80%) |
| Claws | Root | Slot 6 | Black Lupos (50%) |
| Variant | Sentinel | Slot 7 | Silver Snout (30%) |
| Background | [USA] North Carolina - Blue Ridge Mountains | Slot 8 | Black Shoulders (60%) |
| Personality | Scatterbrained | Slot 9 | Black Dorsal (50%) |
| Stat Changes | SPD +7, STR +3, SMR -3 | Slot 10 | White Blaze (100%) |
| Quil II | 2/24/2023 | ||
|---|---|---|---|
 | |||
| Raffle Traits | Pups Bred | ||
| Dust Eyes, Dark Brown Merle Patches, Dark Brown Lupos, Honey Wings Scarce | 71 | ||
| Wardrobe Details | |||
| Base | Rime | Slot 1 | Black Shaded (50%) |
| Base Genetics | Monochrome Light II | Slot 2 | Honey Wings Scarce (60%) |
| Eyes | Dust | Slot 3 | Dark Brown Merle Patches (40%) |
| Skin | Dark | Slot 4 | Dark Brown Lupos (60%) |
| Nose | Gray | Slot 5 | Black Half Dorsal (60%) |
| Claws | Bone | Slot 6 | Beige Tamaskan Unders (50%) |
| Variant | Relaxed | Slot 7 | Sepia Dilution (40%) |
| Background | Winterfat Trail | Slot 8 | Brown Shoulder Patch (30%) |
| Personality | Observant | Slot 9 | White Irish (60%) |
| Stat Changes | WIS +7, SMR +3, AGI -3 | Slot 10 | White Bottoms (100%) |
| Del Tule II | 3/3/2023 | ||
|---|---|---|---|
 | |||
| Raffle Traits | Pups Bred | ||
| Red Panda, White Merle, White Wings Heavy | 85 | ||
| Wardrobe Details | |||
| Base | Pale | Slot 1 | Red Panda (20%) |
| Base Genetics | Cool Light II | Slot 2 | White Light Husky (100%) |
| Eyes | Glass | Slot 3 | Red Smudge (30%) |
| Skin | Pink | Slot 4 | Red Highlights (50%) |
| Nose | Pink | Slot 5 | White Highlights (40%) |
| Claws | White | Slot 6 | White Merle (100%) |
| Variant | Default | Slot 7 | Red Inverted Cross (30%) |
| Background | Dating Spot | Slot 8 | White Wings Heavy (70%) |
| Personality | Sociable | Slot 9 | White Dilution (40%) |
| Stat Changes | SMR +7, SPD +3, STR -3 | Slot 10 | White Undercoat (60%) |
| Algernon II | 3/10/2023 | ||
|---|---|---|---|
 | |||
| Raffle Traits | Pups Bred | ||
| Dark Hazel Eyes, Cream Merle, Cream Lupos, Red Wings Heavy | 61 | ||
| Wardrobe Details | |||
| Base | Feldspar | Slot 1 | Red Wings Heavy (30%) |
| Base Genetics | Muted Light II | Slot 2 | Auburn Points (50%) |
| Eyes | Dark Hazel | Slot 3 | Cream Limbs (100%) |
| Skin | Pink | Slot 4 | Cream Lupos (60%) |
| Nose | Pink | Slot 5 | Cream Merle (30%) |
| Claws | White | Slot 6 | Cream Tamaskan Unders (100%) |
| Variant | Sentinel | Slot 7 | White Marbled Unders (100%) |
| Background | Norfolk Coast | Slot 8 | White Nose Line (100%) |
| Personality | Helpful | Slot 9 | Zircon Dilution (40%) |
| Stat Changes | SMR +7, SPD +3, AGI -3 | Slot 10 | White Bottoms (100%) |
| Ouranos | 3/17/2023 | ||
|---|---|---|---|
 | |||
| Raffle Traits | Pups Bred | ||
| Henna Panda, Honey Wings Scarce, Red Wings | 69 | ||
| Wardrobe Details | |||
| Base | Tawny | Slot 1 | Sepia Dilution (100%) |
| Base Genetics | Warm Medium II | Slot 2 | Henna Panda (50%) |
| Eyes | Hetero Brown & Blue | Slot 3 | Henna Opossum (50%) |
| Skin | Dark Brown | Slot 4 | Beige Inuit Unders (40%) |
| Nose | Dark Brown | Slot 5 | Auburn Smudge Heavy (30%) |
| Claws | Brown | Slot 6 | Red Wings (40%) |
| Variant | Relaxed | Slot 7 | Beige Blaze (50%) |
| Background | [USA] New York - Letchworth State Park | Slot 8 | Honey Wings Scarce (40%) |
| Personality | Helpful | Slot 9 | White Cheek Fluff (100%) |
| Stat Changes | SMR +7, SPD +3, AGI -3 | Slot 10 | White Underbelly (100%) |
| Eigengrau | 3/24/2023 | ||
|---|---|---|---|
 | |||
| Raffle Traits | Pups Bred | ||
| Novus Eyes, Black Panda, Black Wings Heavy, Henna Cougar | 78 | ||
| Wardrobe Details | |||
| Base | Sarder | Slot 1 | Henna Cougar (60%) |
| Base Genetics | Warm Dark II | Slot 2 | Black Panda (60%) |
| Eyes | Novus | Slot 3 | Black Limbs (30%) |
| Skin | Dark | Slot 4 | Red Inverted Cross (30%) |
| Nose | Dark | Slot 5 | Black Wings Heavy (50%) |
| Claws | Root | Slot 6 | Black Dilution (40%) |
| Variant | Default | Slot 7 | Zircon Tamaskan Unders (100%) |
| Background | Soaring Condor | Slot 8 | White Underbelly (40%) |
| Personality | Pessimistic | Slot 9 | Black Back (50%) |
| Stat Changes | AGI +7, STR +3, SPD -3 | Slot 10 | Black Smoke (80%) |
| Valentino | 3/31/2023 | ||
|---|---|---|---|
 | |||
| Raffle Traits | Pups Bred | ||
| Black Cougar, White Lupos, White Wings Scarce | 89 | ||
| Wardrobe Details | |||
| Base | Silver | Slot 1 | White Lupos (50%) |
| Base Genetics | Monochome Medium II | Slot 2 | Black Cougar (100%) |
| Eyes | Hetero Black & White | Slot 3 | Gray Half Mask (80%) |
| Skin | Black | Slot 4 | Black Rump Patch (100%) |
| Nose | Gray | Slot 5 | Silver Back Patch (100%) |
| Claws | White | Slot 6 | White Half Socks (100%) |
| Variant | Sentinel | Slot 7 | White Wings Scarce (60%) |
| Background | Hurricane | Slot 8 | Black Dilution (80%) |
| Personality | Combative | Slot 9 | White Cross (20%) |
| Stat Changes | STR +7, SPD +3, WIS -3 | Slot 10 | White Irish (100%) |
| Lorcan | 4/7/2023 | ||
|---|---|---|---|
 | |||
| Raffle Traits | Pups Bred | ||
| Holly Eyes, Cream Lupos, Henna Cougar, Red Wings | 78 | ||
| Wardrobe Details | |||
| Base | Arkose | Slot 1 | Cream Lupos (40%) |
| Base Genetics | Warm Light II | Slot 2 | Henna Cougar (40%) |
| Eyes | Holly | Slot 3 | Red Wings (30%) |
| Skin | Brown | Slot 4 | Brown Half Cape (50%) |
| Nose | Marbled | Slot 5 | Brown Neck Band (50%) |
| Claws | Bone | Slot 6 | Auburn Half Dorsal (80%) |
| Variant | Relaxed | Slot 7 | Auburn Dilution (60%) |
| Background | Romantic Walks | Slot 8 | Red Inverted Cross (20%) |
| Personality | Sarcastic | Slot 9 | Cream Limbs (50%) |
| Stat Changes | SMR +7, WIS +3, STR -3 | Slot 10 | White Undersides (80%) |
| Ragnar | 4/14/2023 | ||
|---|---|---|---|
 | |||
| Raffle Traits | Pups Bred | ||
| Smoke Eyes, Black Merle Patches, White Lupos, White Wings | 64 | ||
| Wardrobe Details | |||
| Base | Lilac | Slot 1 | Gray Underfur (100%) |
| Base Genetics | Cool Dark II | Slot 2 | Black Dilution (80%) |
| Eyes | Smoke | Slot 3 | Black Merle Patches (30%) |
| Skin | Gray | Slot 4 | White Wings (50%) |
| Nose | Gray | Slot 5 | Silver Tail Tip (100%) |
| Claws | White | Slot 6 | White Lupos (40%) |
| Variant | Default | Slot 7 | Silver Undercoat (50%) |
| Background | Cryptid Den | Slot 8 | Silver Snout (40%) |
| Personality | Dutiful | Slot 9 | White Cape (40%) |
| Stat Changes | STR +7, WIS +3, SMR -3 | Slot 10 | White Bottoms (80%) |
| Vestige | 4/21/2023 | ||
|---|---|---|---|
 | |||
| Raffle Traits | Pups Bred | ||
| Brown Merle Patches, Dark Brown Wings, White Inverted Panda | 56 | ||
| Wardrobe Details | |||
| Base | Vanilla | Slot 1 | Dark Brown Forehead (100%) |
| Base Genetics | Muted Medium II | Slot 2 | Brown Merle Patches (60%) |
| Eyes | Clay | Slot 3 | White Inverted Panda (40%) |
| Skin | Brown | Slot 4 | Brown Shaded (60%) |
| Nose | Brown | Slot 5 | Dark Brown Neck Band (100%) |
| Claws | Bone | Slot 6 | Dark Brown Wings (60%) |
| Variant | Relaxed | Slot 7 | Dark Brown Half Mask (70%) |
| Background | Leftover Bones | Slot 8 | White Socks (100%) |
| Personality | Selfish | Slot 9 | Dark Brown Unders (60%) |
| Stat Changes | SMR +7, STR +3, WIS -3 | Slot 10 | White Undercoat (100%) |
| Romeo | 4/28/2023 | ||
|---|---|---|---|
 | |||
| Raffle Traits | Pups Bred | ||
| Storm Eyes, Black Lupos, White Inverted Panda, White Wings Heavy | 57 | ||
| Wardrobe Details | |||
| Base | Galena | Slot 1 | Black Lupos (100%) |
| Base Genetics | Cool Medium II | Slot 2 | Black Manicou (50%) |
| Eyes | Storm | Slot 3 | Silver Cross (60%) |
| Skin | Dark | Slot 4 | White Inverted Panda (40%) |
| Nose | Blue | Slot 5 | Black Stained Limbs (50%) |
| Claws | White | Slot 6 | White Grizzle (60%) |
| Variant | Default | Slot 7 | Gray Shoulders (100%) |
| Background | [Canada] Alberta - Bow River | Slot 8 | Silver Half Mask (100%) |
| Personality | Anxious | Slot 9 | White Undercoat (100%) |
| Stat Changes | SPD +7, AGI +3, STR -3 | Slot 10 | White Wings Heavy (60%) |
| Cygnus II | 5/5/2023 | ||
|---|---|---|---|
 | |||
| Raffle Traits | Pups Bred | ||
| Brown Wings, Dark Brown Panda, Yellow Lupos | 56 | ||
| Wardrobe Details | |||
| Base | Buff | Slot 1 | Dark Brown Panda (60%) |
| Base Genetics | Muted Light II | Slot 2 | Doubloon Tamaskan Unders (100%) |
| Eyes | Hetero Black & White | Slot 3 | Zircon Patchy Unders (100%) |
| Skin | Oxblood | Slot 4 | Brown Wings (100%) |
| Nose | Oxblood | Slot 5 | Yellow Lupos (30%) |
| Claws | Oxblood | Slot 6 | Auburn Dorsal (100%) |
| Variant | Sentinel | Slot 7 | Sepia Shaded (60%) |
| Background | Inuksuk | Slot 8 | Black Dilution (50%) |
| Personality | Adventurous | Slot 9 | Zircon Highlights (50%) |
| Stat Changes | SPD +7, SMR +3, AGI -3 | Slot 10 | White Tail Tip (100%) |
| Zephyr | 5/12/2023 | ||
|---|---|---|---|
 | |||
| Raffle Traits | Pups Bred | ||
| Holly Eyes, Black Panda, Red Cougar, Red Wings Scarce | 65 | ||
| Wardrobe Details | |||
| Base | Obsidian | Slot 1 | Black Points (100%) |
| Base Genetics | Monochrome Dark II | Slot 2 | Auburn Mantle (40%) |
| Eyes | Holly | Slot 3 | Black Panda (100%) |
| Skin | Black | Slot 4 | Black Nose Bridge (100%) |
| Nose | Black | Slot 5 | Red Cougar (30%) |
| Claws | Root | Slot 6 | Red Wings Scarce (40%) |
| Variant | Default | Slot 7 | Black Dilution (70%) |
| Background | Fairy Mushroom Ring | Slot 8 | Black Half Mask (100%) |
| Personality | Sullen | Slot 9 | Black Spectacles (100%) |
| Stat Changes | AGI +7, STR +3, SMR -3 | Slot 10 | Auburn Unders (30%) |
| Ahusa | 5/19/2023 | ||
|---|---|---|---|
 | |||
| Raffle Traits | Pups Bred | ||
| Dark Hazel Eyes, Brown Panda, Cream Inverted Panda, Dark Brown Merle Patches | 77 | ||
| Wardrobe Details | |||
| Base | Sepia | Slot 1 | Cream Inverted Panda (80%) |
| Base Genetics | Muted Dark II | Slot 2 | Dark Brown Merle Patches (60%) |
| Eyes | Dark Hazel | Slot 3 | Yellow Tamaskan Unders (100%) |
| Skin | Dark | Slot 4 | Dark Brown Points (100%) |
| Nose | Dark Brown | Slot 5 | Beige Predator (60%) |
| Claws | Root | Slot 6 | Cream Heavy Husky (60%) |
| Variant | Relaxed | Slot 7 | Sepia Dorsal (60%) |
| Background | Dust Devil | Slot 8 | Cream Carnage (50%) |
| Personality | Humble | Slot 9 | Brown Cougar (40%) |
| Stat Changes | AGI +7, WIS +3, STR -3 | Slot 10 | White Underfur (60%) |
| Jeff II | 5/26/2023 | ||
|---|---|---|---|
 | |||
| Raffle Traits | Pups Bred | ||
| Smoke Eyes, Henna Cougar, Red Lupos, Red Wings | 51 | ||
| Wardrobe Details | |||
| Base | Nepheline | Slot 1 | Black Predator (80%) |
| Base Genetics | Monochrome Light II | Slot 2 | Black Half Dorsal (100%) |
| Eyes | Smoke | Slot 3 | Black Dilution (60%) |
| Skin | Dark | Slot 4 | Red Lupos (30%) |
| Nose | Dark | Slot 5 | Red Wings (30%) |
| Claws | Dark | Slot 6 | Sterling Cross (50%) |
| Variant | Default | Slot 7 | Auburn Shaded (40%) |
| Background | [USA] Wyoming - Grand Teton | Slot 8 | Henna Cougar (30%) |
| Personality | Arrogant | Slot 9 | White Eyebrows (100%) |
| Stat Changes | STR +7, AGI +3, WIS -3 | Slot 10 | White Undercoat (100%) |
| Hushpuppy | 6/2/2023 | ||
|---|---|---|---|
 | |||
| Raffle Traits | Pups Bred | ||
| Dark Brown Panda, Dark Brown Wings Heavy, Yellow Lupos | 59 | ||
| Wardrobe Details | |||
| Base | Dinar | Slot 1 | Cream Marbled Unders (100%) |
| Base Genetics | Warm Dark II | Slot 2 | Yellow Sallander (80%) |
| Eyes | Hetero Blue & Brown | Slot 3 | Dark Brown Panda (100%) |
| Skin | Dark Brown | Slot 4 | Ducat Underbelly (100%) |
| Nose | Oxblood | Slot 5 | Cream Undercoat (50%) |
| Claws | Brown | Slot 6 | Dark Brown Wings Heavy (100%) |
| Variant | Sentinel | Slot 7 | Yellow Lupos (30%) |
| Background | Matchmaker's Clearing | Slot 8 | White Low Bottoms (100%) |
| Personality | Precise | Slot 9 | White Tail Tip (100%) |
| Stat Changes | AGI +7, SMR +3, SPD -3 | Slot 10 | White Inner Ear (70%) |
| Oberon | 6/9/2023 | ||
|---|---|---|---|
 | |||
| Raffle Traits | Pups Bred | ||
| Novus Eyes, Black Cougar, White Lupos, White Wings Heavy | 61 | ||
| Wardrobe Details | |||
| Base | Sky | Slot 1 | Black Cougar (50%) |
| Base Genetics | Cool Light II | Slot 2 | Black Sallander (60%) |
| Eyes | Novus | Slot 3 | White Dilution (40%) |
| Skin | Gray | Slot 4 | White Lupos (80%) |
| Nose | Blue | Slot 5 | Silver Inuit Unders (80%) |
| Claws | White | Slot 6 | White Wings Heavy (50%) |
| Variant | Default | Slot 7 | White Neck Band (100%) |
| Background | Columbia Icefield | Slot 8 | White Eyebrows (100%) |
| Personality | Unfriendly | Slot 9 | Silver Back Patch (100%) |
| Stat Changes | SMR +7, STR +3, WIS -3 | Slot 10 | White Undercoat (100%) |
| Alkonost | 6/16/2023 | ||
|---|---|---|---|
 | |||
| Raffle Traits | Pups Bred | ||
| Dust Eyes, Cream Inverted Panda, Henna Cougar, Henna Panda | 70 | ||
| Wardrobe Details | |||
| Base | Russet | Slot 1 | Auburn Points (100%) |
| Base Genetics | Warm Dark II | Slot 2 | Black Smoke (70%) |
| Eyes | Dust | Slot 3 | Ducat Marbled Unders (100%) |
| Skin | Black | Slot 4 | Henna Panda (40%) |
| Nose | Dark | Slot 5 | Cream Inverted Panda (30%) |
| Claws | Root | Slot 6 | Black Blanket Ticking (100%) |
| Variant | Sentinel | Slot 7 | Henna Cougar (40%) |
| Background | Auyuittuq National Park | Slot 8 | Black Shaded (80%) |
| Personality | Observant | Slot 9 | Ducat Undercoat (70%) |
| Stat Changes | WIS +7, SMR +3, AGI -3 | Slot 10 | Beige Urajiro (100%) |
| Altgeld II | 6/23/2023 | ||
|---|---|---|---|
 | |||
| Raffle Traits | Pups Bred | ||
| Husky Eyes, Black Panda, Black Wings, White Wings Heavy | 71 | ||
| Wardrobe Details | |||
| Base | Bedrock | Slot 1 | Silver Undercoat (40%) |
| Base Genetics | Monochrome Dark II | Slot 2 | White Wings Heavy (70%) |
| Eyes | Husky | Slot 3 | Black Shaded (50%) |
| Skin | Black | Slot 4 | Black Half Mask (100%) |
| Nose | Black | Slot 5 | Black Panda (100%) |
| Claws | Black | Slot 6 | Gray Inverted Manicou (30%) |
| Variant | Relaxed | Slot 7 | White Tail Tip (100%) |
| Background | Sunrise: Lake Superior | Slot 8 | Black Wings (100%) |
| Personality | Sarcastic | Slot 9 | White Light Husky (80%) |
| Stat Changes | SMR +7, WIS +3, STR -3 | Slot 10 | White Urajiro (100%) |
| Monoceros II | 6/30/2023 | ||
|---|---|---|---|
 | |||
| Raffle Traits | Pups Bred | ||
| Bloodhound Eyes, Beige Inverted Panda, Henna Panda, Red Lupos | 58 | ||
| Wardrobe Details | |||
| Base | Grossular | Slot 1 | Beige Inverted Panda (30%) |
| Base Genetics | Warm Light II | Slot 2 | White Inverted Manicou (30%) |
| Eyes | Bloodhound | Slot 3 | Red Lupos (40%) |
| Skin | Pink | Slot 4 | White Blaze (100%) |
| Nose | Pink | Slot 5 | White Highlights (60%) |
| Claws | White | Slot 6 | White Tail Tip (100%) |
| Variant | Default | Slot 7 | Henna Panda (30%) |
| Background | Sunset: Barataria Marsh | Slot 8 | Zircon Undercoat (50%) |
| Personality | Charming | Slot 9 | White Underbelly (40%) |
| Stat Changes | STR +7, SMR +3, WIS -3 | Slot 10 | Zircon Dilution (30%) |
| Xenon II | 7/7/2023 | ||
|---|---|---|---|
 | |||
| Raffle Traits | Pups Bred | ||
| Steel Blue Eyes, Black Cougar, Black Wings Scarce, Dark Brown Lupos | 63 | ||
| Wardrobe Details | |||
| Base | Malachite | Slot 1 | White Tamaskan Unders (100%) |
| Base Genetics | Cool Medium II | Slot 2 | White Underbelly (100%) |
| Eyes | Steel Blue | Slot 3 | Black Cougar (70%) |
| Skin | Dark Brown | Slot 4 | Brown Shaded (30%) |
| Nose | Black | Slot 5 | Black Wings Scarce (50%) |
| Claws | Bone | Slot 6 | Black Half Mask (80%) |
| Variant | Sentinel | Slot 7 | Dark Brown Lupos (40%) |
| Background | Swimming Mallard Ducks | Slot 8 | White Urajiro (70%) |
| Personality | Imaginative | Slot 9 | Black Dilution (40%) |
| Stat Changes | WIS +7, SPD +3, STR -3 | Slot 10 | White Tail Tip (100%) |
| Wiglaf II | 7/14/2023 | ||
|---|---|---|---|
 | |||
| Raffle Traits | Pups Bred | ||
| Dust Eyes, Brown Lupos, Honey Wings, Yellow Merle | 61 | ||
| Wardrobe Details | |||
| Base | Corrosion | Slot 1 | Yellow Merle (40%) |
| Base Genetics | Muted Medium II | Slot 2 | Brown Rump Edge (100%) |
| Eyes | Dust | Slot 3 | Ducat Inverted Panda (70%) |
| Skin | Dark Brown | Slot 4 | Honey Wings (100%) |
| Nose | Brown | Slot 5 | Brown Dilution (60%) |
| Claws | Sandy | Slot 6 | Dark Brown Smudge Heavy (70%) |
| Variant | Default | Slot 7 | Brown Lupos (50%) |
| Background | Sunset: Cumberland Island | Slot 8 | Beige Undercoat (80%) |
| Personality | Sociable | Slot 9 | White Tamaskan Unders (40%) |
| Stat Changes | SMR +7, SPD +3, STR -3 | Slot 10 | White Eyebrows (100%) |
| Ulbrecht III | 7/21/2023 | ||
|---|---|---|---|
 | |||
| Raffle Traits | Pups Bred | ||
| Novus Eyes, Beige Inverted Panda, Brown Panda, Dark Brown Wings Scarce | 60 | ||
| Wardrobe Details | |||
| Base | Salt | Slot 1 | Brown Panda (40%) |
| Base Genetics | Monochrome Light II | Slot 2 | Dark Brown Manicou (60%) |
| Eyes | Novus | Slot 3 | Black Snout (100%) |
| Skin | Brown | Slot 4 | Dark Brown Half Mask (100%) |
| Nose | Dark Brown | Slot 5 | Brown Dilution (60%) |
| Claws | Bone | Slot 6 | Dark Brown Smudge (60%) |
| Variant | Sentinel | Slot 7 | Beige Inverted Panda (20%) |
| Background | [USA] Iowa - Broken Kettle Grasslands | Slot 8 | Dark Brown Wings Scarce (100%) |
| Personality | Dishonest | Slot 9 | Beige Unders (40%) |
| Stat Changes | SPD +7, SMR +3, WIS -3 | Slot 10 | White Urajiro (100%) |
| Sleipnir II | 7/28/2023 | ||
|---|---|---|---|
 | |||
| Raffle Traits | Pups Bred | ||
| Bloodhound Eyes, Black Wings Scarce, Red Inverted Panda, Red Wings Heavy | 66 | ||
| Wardrobe Details | |||
| Base | Lupin | Slot 1 | Cream Low Bottoms (60%) |
| Base Genetics | Muted Dark II | Slot 2 | Cream Light Husky (40%) |
| Eyes | Bloodhound | Slot 3 | Black Blanket (70%) |
| Skin | Black | Slot 4 | Red Wings Heavy (40%) |
| Nose | Black | Slot 5 | Red Inverted Panda (20%) |
| Claws | Black | Slot 6 | Auburn Dorsal (100%) |
| Variant | Relaxed | Slot 7 | Black Dilution (50%) |
| Background | Redwood Shade | Slot 8 | Black Half Mask (80%) |
| Personality | Sneaky | Slot 9 | Black Half Cape (100%) |
| Stat Changes | SMR +7, AGI +3, SPD -3 | Slot 10 | Black Wings Scarce (100%) |
| Pyxis II | 8/4/2023 | ||
|---|---|---|---|
 | |||
| Raffle Traits | Pups Bred | ||
| Cream Inverted Panda, Dark Brown Wings Heavy, Yellow Lupos | 70 | ||
| Wardrobe Details | |||
| Base | Greisen | Slot 1 | Yellow Lupos (60%) |
| Base Genetics | Muted Light II | Slot 2 | Doubloon Unders (60%) |
| Eyes | Warm Gray | Slot 3 | Dark Brown Wings Heavy (100%) |
| Skin | Dark | Slot 4 | Dark Brown Points (40%) |
| Nose | Dark | Slot 5 | Cream Inverted Panda (50%) |
| Claws | Bone | Slot 6 | Honey Agouti (40%) |
| Variant | Default | Slot 7 | Dinar Dilution (100%) |
| Background | Sunrise: Sierra Nevada Mountains | Slot 8 | Cream Highlights (40%) |
| Personality | Charming | Slot 9 | White Underbelly (100%) |
| Stat Changes | STR +7, SMR +3, WIS -3 | Slot 10 | White Inner Ear (100%) |
| Wren II | 8/11/2023 | ||
|---|---|---|---|
 | |||
| Raffle Traits | Pups Bred | ||
| Steel Blue Eyes, Black Cougar, White Merle, White Wings | 70 | ||
| Wardrobe Details | |||
| Base | Coot | Slot 1 | Black Inverted Cross (100%) |
| Base Genetics | Cool Dark II | Slot 2 | White Merle (30%) |
| Eyes | Steel Blue | Slot 3 | Black Smudge Heavy (60%) |
| Skin | Black | Slot 4 | Black Cougar (70%) |
| Nose | Black | Slot 5 | Gray Back Half Patch (40%) |
| Claws | Gray | Slot 6 | White Wings (50%) |
| Variant | Relaxed | Slot 7 | White Predator (100%) |
| Background | Waterfolk Den | Slot 8 | Silver Chest (60%) |
| Personality | Anxious | Slot 9 | Black Cape Ticking (100%) |
| Stat Changes | SPD +7, AGI +3, STR -3 | Slot 10 | White Cheek Fluff (100%) |
| Hades | 8/18/2023 | ||
|---|---|---|---|
 | |||
| Raffle Traits | Pups Bred | ||
| Brown Panda, Dark Brown Wings, Honey Wings Scarce | 80 | ||
| Wardrobe Details | |||
| Base | Sandy | Slot 1 | Cream Carnage (100%) |
| Base Genetics | Muted Medium II | Slot 2 | Beige Undercoat (70%) |
| Eyes | Mercury | Slot 3 | Black Smudge (90%) |
| Skin | Dark | Slot 4 | Brown Panda (50%) |
| Nose | Brown | Slot 5 | Dark Brown Wings (100%) |
| Claws | Bistre | Slot 6 | Honey Wings Scarce (40%) |
| Variant | Default | Slot 7 | Black Half Mask (100%) |
| Background | Microburst | Slot 8 | Doubloon Inverted Cross (50%) |
| Personality | Vulgar | Slot 9 | Auburn Smoke (80%) |
| Stat Changes | AGI +7, SPD +3, STR -3 | Slot 10 | Beige Toes (100%) |
| Ursa II | 8/25/2023 | ||
|---|---|---|---|
 | |||
| Raffle Traits | Pups Bred | ||
| Husky Eyes, Black Lupos, Henna Cougar, Red Inverted Panda | 73 | ||
| Wardrobe Details | |||
| Base | Rufous | Slot 1 | Red Sallander (40%) |
| Base Genetics | Warm Dark II | Slot 2 | Black Smoke (100%) |
| Eyes | Husky | Slot 3 | Black Lupos (100%) |
| Skin | Dark | Slot 4 | Red Inverted Panda (40%) |
| Nose | Dark | Slot 5 | Black Unders (100%) |
| Claws | Bistre | Slot 6 | Auburn Carnage (100%) |
| Variant | Relaxed | Slot 7 | Henna Cougar (100%) |
| Background | Bloody Cryptid Den | Slot 8 | Black Dilution (80%) |
| Personality | Aloof | Slot 9 | Black Half Mask (100%) |
| Stat Changes | SMR +7, AGI +3, WIS -3 | Slot 10 | Auburn Predator (100%) |
| Pyxis III | 9/1/2023 | ||
|---|---|---|---|
 | |||
| Raffle Traits | Pups Bred | ||
| Brown Lupos, Honey Inverted Panda, Yellow Merle | 48 | ||
| Wardrobe Details | |||
| Base | Xanthic | Slot 1 | Honey Inverted Panda (40%) |
| Base Genetics | Warm Medium II | Slot 2 | Beige Marbled Unders (100%) |
| Eyes | Honey | Slot 3 | Brown Lupos (100%) |
| Skin | Brown | Slot 4 | Yellow Merle (50%) |
| Nose | Brown | Slot 5 | Doubloon Dilution (60%) |
| Claws | Bone | Slot 6 | Sepia Shaded (80%) |
| Variant | Default | Slot 7 | Beige Limbs (50%) |
| Background | The Cairngorms | Slot 8 | Beige Low Bottoms (100%) |
| Personality | Dedicated | Slot 9 | White Half Socks (100%) |
| Stat Changes | WIS +7, STR +3, SMR -3 | Slot 10 | White Urajiro (70%) |
| Clay II | 9/8/2023 | ||
|---|---|---|---|
 | |||
| Raffle Traits | Pups Bred | ||
| Bloodhound Eyes, Cream Lupos, Yellow Inverted Panda, White Wings Scarce | 43 | ||
| Wardrobe Details | |||
| Base | Chrysoberyl | Slot 1 | Zircon Points (40%) |
| Base Genetics | Cool Light II | Slot 2 | White Light Husky (100%) |
| Eyes | Bloodhound | Slot 3 | Yellow Inverted Panda (20%) |
| Skin | Blue | Slot 4 | White Inverted Manicou (40%) |
| Nose | Light | Slot 5 | White Spectacles (100%) |
| Claws | White | Slot 6 | Cream Lupos (40%) |
| Variant | Default | Slot 7 | Zircon Highlights (100%) |
| Background | Tropical Cave | Slot 8 | White Wings Scarce (70%) |
| Personality | Charming | Slot 9 | White Trim (100%) |
| Stat Changes | STR +7, SMR +3, WIS -3 | Slot 10 | White Socks (100%) |
| Fenrir | 9/15/2023 | ||
|---|---|---|---|
 | |||
| Raffle Traits | Pups Bred | ||
| Brown Wings Heavy, Honey Inverted Panda, Honey Wings Scarce | 56 | ||
| Wardrobe Details | |||
| Base | Acanthite | Slot 1 | Brown Wings Heavy (60%) |
| Base Genetics | Monochrome Medium II | Slot 2 | Dark Brown Back Edge Patch (100%) |
| Eyes | Chestnut Brown | Slot 3 | Yellow Heavy Husky (50%) |
| Skin | Dark | Slot 4 | Honey Wings Scarce (50%) |
| Nose | Dark Brown | Slot 5 | Black Mantle (100%) |
| Claws | Light | Slot 6 | Honey Inverted Panda (30%) |
| Variant | Relaxed | Slot 7 | Black Carnage (50%) |
| Background | Sunrise: Mer Bleue Wetland | Slot 8 | Cream Half Cape Ticking (80%) |
| Personality | Independent | Slot 9 | Doubloon Underfur (100%) |
| Stat Changes | WIS +7, AGI +3, SPD -3 | Slot 10 | Ducat Urajiro (100%) |
| Yarran | 9/22/2023 | ||
|---|---|---|---|
 | |||
| Raffle Traits | Pups Bred | ||
| Husky Eyes, Red Wings, White Merle, White Wings Scarce | 64 | ||
| Wardrobe Details | |||
| Base | Diorite | Slot 1 | Red Wings (40%) |
| Base Genetics | Cool Medium II | Slot 2 | White Merle (40%) |
| Eyes | Husky | Slot 3 | Red Mask (30%) |
| Skin | Blue | Slot 4 | Auburn Inverted Cross (40%) |
| Nose | Blue | Slot 5 | White Wings Scarce (100%) |
| Claws | White | Slot 6 | White Tamaskan Unders (100%) |
| Variant | Default | Slot 7 | Silver Neck Band (100%) |
| Background | Sunrise: Wandering Polar Bear | Slot 8 | Red Half Dorsal (30%) |
| Personality | Sneaky | Slot 9 | White Cape Ticking (40%) |
| Stat Changes | SMR +7, AGI +3, SPD -3 | Slot 10 | White Half Mask (60%) |
| Tucana | 9/29/2023 | ||
|---|---|---|---|
 | |||
| Raffle Traits | Pups Bred | ||
| Novus Eyes, Brown Panda, Cream Inverted Panda, Dark Brown Wings | 61 | ||
| Wardrobe Details | |||
| Base | Ducat | Slot 1 | Dark Brown Wings (70%) |
| Base Genetics | Warm Light II | Slot 2 | Brown Panda (60%) |
| Eyes | Novus | Slot 3 | Ducat Grizzle (100%) |
| Skin | Bistre | Slot 4 | Cream Elbow Patch (100%) |
| Nose | Dark | Slot 5 | White Marbled Unders (100%) |
| Claws | Oxblood | Slot 6 | White Eyebrows (100%) |
| Variant | Sentinel | Slot 7 | Cream Inverted Panda (30%) |
| Background | [USA] Mississippi - Greenville Cypress Preserve | Slot 8 | Dark Brown Half Cape (100%) |
| Personality | Confident | Slot 9 | Beige Medium Husky (60%) |
| Stat Changes | STR +7, SPD +3, AGI -3 | Slot 10 | Brown Forehead (80%) |
| Velimir | 10/6/2023 | ||
|---|---|---|---|
 | |||
| Raffle Traits | Pups Bred | ||
| Brown Lupos, Honey Cougar, Honey Wings Heavy | 64 | ||
| Wardrobe Details | |||
| Base | Sphalerite | Slot 1 | Black Limbs (60%) |
| Base Genetics | Monochrome Dark II | Slot 2 | Black Agouti (40%) |
| Eyes | Copper | Slot 3 | Honey Wings Heavy (60%) |
| Skin | Brown | Slot 4 | Dark Brown Cover (40%) |
| Nose | Brown | Slot 5 | Ducat Unders (100%) |
| Claws | Bone | Slot 6 | Brown Lupos (50%) |
| Variant | Default | Slot 7 | Ducat Marbled Unders (90%) |
| Background | Winterfat Tail | Slot 8 | Beige Underfur (60%) |
| Personality | Dishonest | Slot 9 | Honey Cougar (20%) |
| Stat Changes | SPD +7, SMR +3, WIS -3 | Slot 10 | White Bottoms (80%) |
| Otsoa III | 10/13/2023 | ||
|---|---|---|---|
 | |||
| Raffle Traits | Pups Bred | ||
| Bloodhound Eyes, Black Cougar, Red Inverted Panda, Red Panda | 58 | ||
| Wardrobe Details | |||
| Base | Cocoa | Slot 1 | Auburn Shaded (100%) |
| Base Genetics | Muted Dark II | Slot 2 | Black Dilution (100%) |
| Eyes | Bloodhound | Slot 3 | Red Highlights (100%) |
| Skin | Black | Slot 4 | Red Panda (40%) |
| Nose | Black | Slot 5 | Zircon Elbow Patch (100%) |
| Claws | Root | Slot 6 | Red Inverted Panda (40%) |
| Variant | Relaxed | Slot 7 | Black Cougar (100%) |
| Background | Massive Bonfire | Slot 8 | Black Stained Limbs (100%) |
| Personality | Combative | Slot 9 | Zircon Tamaskan Unders (60%) |
| Stat Changes | STR +7, SPD +3, WIS -3 | Slot 10 | Black Half Mask (100%) |
| Absalom II | 10/20/2023 | ||
|---|---|---|---|
 | |||
| Raffle Traits | Pups Bred | ||
| Steel Blue Eyes, Brown Lupos, Brown Wings Scarce, Cream Inverted Panda | 70 | ||
| Wardrobe Details | |||
| Base | Isabel | Slot 1 | Brown Lupos (100%) |
| Base Genetics | Muted Light II | Slot 2 | Cream Inverted Panda (60%) |
| Eyes | Steel Blue | Slot 3 | Dark Brown Saddle (80%) |
| Skin | Light Brown | Slot 4 | Sepia Inverted Cross (60%) |
| Nose | Light Brown | Slot 5 | Beige Inverted Manicou (30%) |
| Claws | Oxblood | Slot 6 | Cream Dilution (50%) |
| Variant | Default | Slot 7 | White Carnage (100%) |
| Background | Malpaís | Slot 8 | Brown Wings Scarce (100%) |
| Personality | Anxious | Slot 9 | Sepia Half Dorsal (100%) |
| Stat Changes | SPD +7, AGI +3, STR -3 | Slot 10 | White Back Heavy Patch (60%) |
| Yugen | 10/27/2023 | ||
|---|---|---|---|
 | |||
| Raffle Traits | Pups Bred | ||
| Holly Eyes, Gold Cougar, Honey Merle, Honey Wings | 60 | ||
| Wardrobe Details | |||
| Base | Sulphur | Slot 1 | Honey Merle (70%) |
| Base Genetics | Warm Medium II | Slot 2 | Yellow Grizzle (100%) |
| Eyes | Holly | Slot 3 | Honey Wings (80%) |
| Skin | Brown | Slot 4 | White Dilution (50%) |
| Nose | Light Brown | Slot 5 | Honey Cape (100%) |
| Claws | Sandy | Slot 6 | White Undercoat (100%) |
| Variant | Relaxed | Slot 7 | Gold Neck Band (100%) |
| Background | Secluded Spring Den | Slot 8 | White Undersides (100%) |
| Personality | Optimistic | Slot 9 | Gold Cougar (70%) |
| Stat Changes | AGI +7, SPD +3, WIS -3 | Slot 10 | Doubloon Highlights (100%) |
| Hercules | 11/3/2023 | ||
|---|---|---|---|
 | |||
| Raffle Traits | Pups Bred | ||
| Husky Eyes, Aspen Lupos, Dark Brown Panda, White Wings | 85 | ||
| Wardrobe Details | |||
| Base | Melchior | Slot 1 | Brown Belly Stripe (70%) |
| Base Genetics | Monochrome Light II | Slot 2 | Dark Brown Panda (50%) |
| Eyes | Husky | Slot 3 | Gray Saddle Ticking (60%) |
| Skin | Light | Slot 4 | Beige Urajiro (100%) |
| Nose | Light | Slot 5 | Aspen Lupos (100%) |
| Claws | Light | Slot 6 | White Blaze (100%) |
| Variant | Default | Slot 7 | White Half Cape Ticking (100%) |
| Background | Migrating Caribou | Slot 8 | White Wings (100%) |
| Personality | Sullen | Slot 9 | Aspen Unders (100%) |
| Stat Changes | AGI +7, STR +3, SMR -3 | Slot 10 | White Undercoat (100%) |
| Beethoven II | 11/10/2023 | ||
|---|---|---|---|
 | |||
| Raffle Traits | Pups Bred | ||
| Bloodhound Eyes, Black Cougar, Gold Wings, Red Panda | 75 | ||
| Wardrobe Details | |||
| Base | Auburn | Slot 1 | Black Undercoat (100%) |
| Base Genetics | Warm Dark II | Slot 2 | Gold Dilution (50%) |
| Eyes | Bloodhound | Slot 3 | Red Panda (40%) |
| Skin | Black | Slot 4 | Auburn Points (80%) |
| Nose | Black | Slot 5 | Doubloon Grizzle (30%) |
| Claws | Oxblood | Slot 6 | Black Cougar (80%) |
| Variant | Relaxed | Slot 7 | Gold Wings (70%) |
| Background | Rotting Pumpkin Field | Slot 8 | Black Sallander (100%) |
| Personality | Malicious | Slot 9 | Black Limbs (100%) |
| Stat Changes | STR +7, SMR +3, AGI -3 | Slot 10 | Doubloon Gentle Unders (100%) |
| Hushpuppy II | 11/17/2023 | ||
|---|---|---|---|
 | |||
| Raffle Traits | Pups Bred | ||
| Dark Hazel Eyes, Cedar Lupos, Dark Brown Panda, Honey Wings Heavy | 52 | ||
| Wardrobe Details | |||
| Base | Corrosion | Slot 1 | Deira Unders (100%) |
| Base Genetics | Muted Medium II | Slot 2 | Dark Brown Blanket Ticking (80%) |
| Eyes | Dark Hazel | Slot 3 | Dark Brown Half Mask (80%) |
| Skin | Dark | Slot 4 | Cream Cape Ticking (100%) |
| Nose | Brown | Slot 5 | Honey Wings Heavy (100%) |
| Claws | Root | Slot 6 | Gray Agouti (40%) |
| Variant | Sentinel | Slot 7 | Dark Brown Panda (60%) |
| Background | Beinn Eighe | Slot 8 | Cedar Lupos (80%) |
| Personality | Keen | Slot 9 | Beige Gentle Unders (100%) |
| Stat Changes | SPD +7, SMR +3, STR -3 | Slot 10 | White Trim (100%) |
| Yarrow | 11/24/2023 | ||
|---|---|---|---|
 | |||
| Raffle Traits | Pups Bred | ||
| Storm Eyes, Aspen Inverted Panda, Black Lupos, Black Wings | 63 | ||
| Wardrobe Details | |||
| Base | Lilac | Slot 1 | Gray Inverted Cross (30%) |
| Base Genetics | Cool Dark II | Slot 2 | Black Back (80%) |
| Eyes | Storm | Slot 3 | Black Wings (100%) |
| Skin | Black | Slot 4 | Black Lupos (30%) |
| Nose | Black | Slot 5 | Black Dilution (100%) |
| Claws | Gray | Slot 6 | Aspen Inverted Panda (40%) |
| Variant | Default | Slot 7 | Aspen Medium Husky (40%) |
| Background | Skellig Michael | Slot 8 | Zircon Highlights (60%) |
| Personality | Anxious | Slot 9 | Zircon Spectacles (100%) |
| Stat Changes | SPD +7, AGI +3, STR -3 | Slot 10 | White Underbelly (90%) |
| Gungnir III | 12/1/2023 | ||
|---|---|---|---|
 | |||
| Raffle Traits | Pups Bred | ||
| Dust Eyes, Gold Lupos, Honey Merle, Honey Wings Heavy | 49 | ||
| Wardrobe Details | |||
| Base | Calcite | Slot 1 | Cream Inverted Opossum (100%) |
| Base Genetics | Warm Light II | Slot 2 | Honey Merle (40%) |
| Eyes | Dust | Slot 3 | Honey Half Dorsal (100%) |
| Skin | Dark Brown | Slot 4 | Beige Patchy Unders (100%) |
| Nose | Brown | Slot 5 | Brown Shoulder Patch (100%) |
| Claws | Bone | Slot 6 | Honey Wings Heavy (80%) |
| Variant | Relaxed | Slot 7 | Gold Lupos (70%) |
| Background | Picws Du | Slot 8 | Dark Brown Back Half Patch (100%) |
| Personality | Charming | Slot 9 | Deira Back Heavy Patch (100%) |
| Stat Changes | STR +7, SMR +3, WIS -3 | Slot 10 | White Underfur (100%) |
| Timber | 12/8/2023 | ||
|---|---|---|---|
 | |||
| Raffle Traits | Pups Bred | ||
| Holly Eyes, Brown Merle Patches, Gold Wings Heavy, Honey Cougar | 56 | ||
| Wardrobe Details | |||
| Base | Malachite | Slot 1 | Brown Merle Patches (40%) |
| Base Genetics | Cool Medium II | Slot 2 | Honey Cougar (40%) |
| Eyes | Holly | Slot 3 | Brown Stained Limbs (60%) |
| Skin | Dark Brown | Slot 4 | Beige Cheek Fluff (50%) |
| Nose | Oxblood | Slot 5 | Beige Inner Ear (60%) |
| Claws | Oxblood | Slot 6 | Gold Wings Heavy (40%) |
| Variant | Default | Slot 7 | Beige Muzzle Patch (100%) |
| Background | Blanket Bog | Slot 8 | Beige Bottoms (50%) |
| Personality | Keen | Slot 9 | Dark Brown Half Cover (80%) |
| Stat Changes | SPD +7, SMR +3, STR -3 | Slot 10 | Gold Dilution (30%) |
| Hyde | 12/15/2023 | ||
|---|---|---|---|
 | |||
| Raffle Traits | Pups Bred | ||
| Steel Blue Eyes, Brown Cougar, Dark Brown Lupos, Gold Wings Scarce | 72 | ||
| Wardrobe Details | |||
| Base | Sphalerite | Slot 1 | Black Manicou (100%) |
| Base Genetics | Monochrome Dark II | Slot 2 | Dark Brown Lupos (40%) |
| Eyes | Steel Blue | Slot 3 | Gold Dilution (30%) |
| Skin | Dark Brown | Slot 4 | Brown Cougar (40%) |
| Nose | Brown | Slot 5 | Cedar Socks (80%) |
| Claws | Black | Slot 6 | White Tail Tip (30%) |
| Variant | Relaxed | Slot 7 | Cedar Predator (40%) |
| Background | Beinn Eighe | Slot 8 | Gold Wings Scarce (40%) |
| Personality | Quiet | Slot 9 | Shedua Mantle (40%) |
| Stat Changes | WIS +7, SMR +3, SPD -3 | Slot 10 | White Urajiro (100%) |
| Petrichor | 12/22/2023 | ||
|---|---|---|---|
 | |||
| Raffle Traits | Pups Bred | ||
| Bloodhound Eyes, Red Cougar, Red Panda, White Merle | 75 | ||
| Wardrobe Details | |||
| Base | Lavender | Slot 1 | Auburn Shaded (20%) |
| Base Genetics | Cool Light II | Slot 2 | Red Cougar (30%) |
| Eyes | Bloodhound | Slot 3 | Aspen Cape Ticking (50%) |
| Skin | Pink | Slot 4 | Red Panda (30%) |
| Nose | Pale | Slot 5 | Aspen Sallander (40%) |
| Claws | White | Slot 6 | White Underbelly (100%) |
| Variant | Relaxed | Slot 7 | White Dilution (30%) |
| Background | Sunrise: Havasupai Falls | Slot 8 | White Merle (60%) |
| Personality | Charming | Slot 9 | White Socks (50%) |
| Stat Changes | STR +7, SMR +3, WIS -3 | Slot 10 | White Toes (100%) |
| Draven II | 12/29/2023 | ||
|---|---|---|---|
 | |||
| Raffle Traits | Pups Bred | ||
| Novus Eyes, Aspen Inverted Panda, Black Wings, Brown Cougar | 62 | ||
| Wardrobe Details | |||
| Base | Marble | Slot 1 | Black Wings (80%) |
| Base Genetics | Monochrome Medium II | Slot 2 | Cocoa Carnage (70%) |
| Eyes | Novus | Slot 3 | Silver Sallander (100%) |
| Skin | Brown | Slot 4 | Aspen Inverted Panda (50%) |
| Nose | Blue | Slot 5 | Silver Back Heavy Patch (90%) |
| Claws | Dark | Slot 6 | Brown Cougar (30%) |
| Variant | Default | Slot 7 | Silver Shaded (40%) |
| Background | Winter Cave | Slot 8 | White Eyebrows (80%) |
| Personality | Sneaky | Slot 9 | White Trim (100%) |
| Stat Changes | SMR +7, AGI +3, SPD -3 | Slot 10 | White Socks (40%) |
2024 Studs
2024 Studs
| Ahusa II | 1/5/2024 | ||
|---|---|---|---|
 | |||
| Raffle Traits | Pups Bred | ||
| Husky Eyes, Aspen Lupos, White Inverted Panda, White Wings Heavy | 62 | ||
| Wardrobe Details | |||
| Base | Peach | Slot 1 | Red Mantle (30%) |
| Base Genetics | Muted Light II | Slot 2 | Dinar Shaded (60%) |
| Eyes | Husky | Slot 3 | Zircon Butcher (100%) |
| Skin | Tan | Slot 4 | Rufous Butcher (80%) |
| Nose | Pink | Slot 5 | White Inverted Panda (30%) |
| Claws | Sandy | Slot 6 | Aspen Neck Band (100%) |
| Variant | Default | Slot 7 | White Unders (60%) |
| Background | Sunrise: Cibola Forest | Slot 8 | Aspen Lupos (100%) |
| Personality | Anxious | Slot 9 | White Wings Heavy (50%) |
| Stat Changes | SPD +7, AGI +3, STR -3 | Slot 10 | White Tail Tip (100%) |
| Sirius | 1/12/2024 | ||
|---|---|---|---|
 | |||
| Raffle Traits | Pups Bred | ||
| Smoke Eyes, Black Merle Patches, Brown Wings Heavy, Dark Brown Lupos | 65 | ||
| Wardrobe Details | |||
| Base | Siqoq | Slot 1 | Black Half Dorsal (100%) |
| Base Genetics | Monochrome Light II | Slot 2 | Dark Brown Cape Ticking (100%) |
| Eyes | Smoke | Slot 3 | Dark Brown Lupos (60%) |
| Skin | Black | Slot 4 | Black Merle Patches (90%) |
| Nose | Gray | Slot 5 | Honey Mantle (20%) |
| Claws | Gray | Slot 6 | Brown Wings Heavy (40%) |
| Variant | Relaxed | Slot 7 | Black Blanket Ticking (50%) |
| Background | Mendenhall Glacier | Slot 8 | Aspen Trim (100%) |
| Personality | Aloof | Slot 9 | White Bottoms (100%) |
| Stat Changes | SMR +7, AGI +3, WIS -3 | Slot 10 | Aspen Dilution (30%) |
| Rhubarb III | 1/19/2024 | ||
|---|---|---|---|
 | |||
| Raffle Traits | Pups Bred | ||
| Beige Inverted Panda, Gold Wings Heavy, Honey Cougar | 58 | ||
| Wardrobe Details | |||
| Base | Doubloon | Slot 1 | Dinar Eyebrows (100%) |
| Base Genetics | Warm Medium II | Slot 2 | Gold Wings Heavy (100%) |
| Eyes | Glass | Slot 3 | Ducat Ear Tips (100%) |
| Skin | Brown | Slot 4 | Honey Cougar (100%) |
| Nose | Brown | Slot 5 | Beige Inverted Panda (40%) |
| Claws | Sandy | Slot 6 | Dinar Shaded (100%) |
| Variant | Sentinel | Slot 7 | Cream Inuit Unders (100%) |
| Background | Creswell Crag | Slot 8 | Cedar Mantle (30%) |
| Personality | Keen | Slot 9 | Beige Undersides (50%) |
| Stat Changes | SPD +7, SMR +3, STR -3 | Slot 10 | White Bottoms (100%) |
| Perseus II | 1/26/2024 | ||
|---|---|---|---|
 | |||
| Raffle Traits | Pups Bred | ||
| Husky Eyes, Black Cougar, White Orca, White Wings Heavy | 66 | ||
| Wardrobe Details | |||
| Base | Coot | Slot 1 | Silver Cape (50%) |
| Base Genetics | Cool Dark II | Slot 2 | Sterling Shoulder Patch (100%) |
| Eyes | Husky | Slot 3 | Black Mask (40%) |
| Skin | Black | Slot 4 | Black Smudge (60%) |
| Nose | Black | Slot 5 | White Wings Heavy (40%) |
| Claws | Black | Slot 6 | Sterling Cross (100%) |
| Variant | Default | Slot 7 | Silver Dilution (60%) |
| Background | Waterfolk Den | Slot 8 | Black Cougar (80%) |
| Personality | Bossy | Slot 9 | White Orca (80%) |
| Stat Changes | WIS +7, STR +3, AGI -3 | Slot 10 | White Half Cape Ticking (40%) |
| Jupiter II | 2/2/2024 | ||
|---|---|---|---|
 | |||
| Raffle Traits | Pups Bred | ||
| Dark Hazel Eyes, Aspen Inverted Panda, Cream Orca, Dark Brown Lupos | 64 | ||
| Wardrobe Details | |||
| Base | Pecan | Slot 1 | Gold Rump Patch (40%) |
| Base Genetics | Muted Dark II | Slot 2 | Cream Unders (50%) |
| Eyes | Dark Hazel | Slot 3 | Aspen Inverted Panda (30%) |
| Skin | Dark | Slot 4 | Honey Back (60%) |
| Nose | Dark Brown | Slot 5 | Dark Brown Lupos (80%) |
| Claws | Brown | Slot 6 | Cream Orca (80%) |
| Variant | Sentinel | Slot 7 | Beige Undercoat (30%) |
| Background | Deep Forest | Slot 8 | Dark Brown Half Saddle (40%) |
| Personality | Humble | Slot 9 | Cream Eyebrows (70%) |
| Stat Changes | AGI +7, WIS +3, STR -3 | Slot 10 | Cream Inner Ear (50%) |
| Dhampir II | 2/9/2024 | ||
|---|---|---|---|
 | |||
| Raffle Traits | Pups Bred | ||
| Bloodhound Eyes, Henna Cougar, Red Orca, Red Wings Scarce | 91 | ||
| Wardrobe Details | |||
| Base | Russet | Slot 1 | Black Manicou (80%) |
| Base Genetics | Warm Dark II | Slot 2 | Auburn Smudge (30%) |
| Eyes | Bloodhound | Slot 3 | Henna Cougar (50%) |
| Skin | Black | Slot 4 | Red Wings Scarce (40%) |
| Nose | Black | Slot 5 | Cedar Unders (50%) |
| Claws | Root | Slot 6 | Auburn Half Mask (50%) |
| Variant | Relaxed | Slot 7 | Black Dilution (50%) |
| Background | Siskiyou Iris & Sunstone Hills | Slot 8 | Red Orca (50%) |
| Personality | Sociable | Slot 9 | Cedar Undercoat (60%) |
| Stat Changes | SMR +7, SPD +3, STR -3 | Slot 10 | Beige Urajiro (50%) |
| Wicker | 2/16/2024 | ||
|---|---|---|---|
 | |||
| Raffle Traits | Pups Bred | ||
| Brown Lupos, Brown Wings Heavy, Yellow Orca | 80 | ||
| Wardrobe Details | |||
| Base | Antler | Slot 1 | Dark Brown Sallander (50%) |
| Base Genetics | Muted Medium II | Slot 2 | Brown Lupos (40%) |
| Eyes | Hetero Blue & Brown | Slot 3 | Yellow Dilution (50%) |
| Skin | Dark | Slot 4 | Brown Wings Heavy (60%) |
| Nose | Tan | Slot 5 | Yellow Orca (60%) |
| Claws | Sandy | Slot 6 | Dark Brown Smoke (40%) |
| Variant | Default | Slot 7 | White Underfur (80%) |
| Background | Glen Nevis | Slot 8 | Sepia Dilution (80%) |
| Personality | Keen | Slot 9 | Dark Brown Half Mask (70%) |
| Stat Changes | SPD +7, SMR +3, STR -3 | Slot 10 | White Bottoms (100%) |
| Bacon | 2/23/2024 | ||
|---|---|---|---|
 | |||
| Raffle Traits | Pups Bred | ||
| Steel Blue Eyes, Beige Orca, Cedar Lupos, Honey Wings Scarce | 64 | ||
| Wardrobe Details | |||
| Base | Jacinthe | Slot 1 | Dark Brown Opossum (80%) |
| Base Genetics | Warm Light II | Slot 2 | Honey Mantle (60%) |
| Eyes | Steel Blue | Slot 3 | Cedar Lupos (80%) |
| Skin | Dark | Slot 4 | Beige Predator (30%) |
| Nose | Dark Brown | Slot 5 | Honey Wings Scarce (50%) |
| Claws | Oxblood | Slot 6 | Brown Blanket Ticking (80%) |
| Variant | Default | Slot 7 | Dark Brown Half Cape Ticking (80%) |
| Background | Meadow in the Thicket | Slot 8 | Beige Orca (60%) |
| Personality | Combative | Slot 9 | Beige Marbled Unders (50%) |
| Stat Changes | STR +7, SPD +3, WIS -3 | Slot 10 | White Low Bottoms (100%) |
| Kismet II | 3/1/2024 | ||
|---|---|---|---|
 | |||
| Raffle Traits | Pups Bred | ||
| Storm Eyes, Aspen Orca, Aspen Lupos, Black Wings Heavy | 81 | ||
| Wardrobe Details | |||
| Base | Onyx | Slot 1 | Sterling Undercoat (100%) |
| Base Genetics | Monochrome Dark II | Slot 2 | Aspen Lupos (30%) |
| Eyes | Storm | Slot 3 | Black Blanket Ticking (100%) |
| Skin | Black | Slot 4 | Auburn Dilution (30%) |
| Nose | Bistre | Slot 5 | Aspen Underfur (70%) |
| Claws | Root | Slot 6 | Auburn Inverted Cross (20%) |
| Variant | Default | Slot 7 | Black Wings Heavy (60%) |
| Background | Beinn Eighe | Slot 8 | Aspen Orca (50%) |
| Personality | Conceited | Slot 9 | Cream Predator (30%) |
| Stat Changes | STR +7, AGI +3, SMR -3 | Slot 10 | White Gentle Unders (100%) |
| Cepheus | 3/8/2024 | ||
|---|---|---|---|
 | |||
| Raffle Traits | Pups Bred | ||
| Novus Eyes, Brown Cougar, Gold Lupos, Honey Orca | 43 | ||
| Wardrobe Details | |||
| Base | Malachite | Slot 1 | Brown Cougar (30%) |
| Base Genetics | Cool Medium II | Slot 2 | Gold Lupos (30%) |
| Eyes | Novus | Slot 3 | Dark Brown Half Mask (60%) |
| Skin | Dark Brown | Slot 4 | Shedua Dorsal (50%) |
| Nose | Brown | Slot 5 | Beige Blaze (50%) |
| Claws | Black | Slot 6 | Honey Orca (60%) |
| Variant | Relaxed | Slot 7 | Shedua Back Heavy Patch (60%) |
| Background | Old Cottage | Slot 8 | Beige Marbled Unders (100%) |
| Personality | Observant | Slot 9 | Beige Tuxedo (50%) |
| Stat Changes | WIS +7, SMR +3, AGI -3 | Slot 10 | White Undersides (70%) |
| Timber II | 3/15/2024 | ||
|---|---|---|---|
 | |||
| Raffle Traits | Pups Bred | ||
| Husky Eyes, Black Lupos, Gray Orca, White Wings Heavy | 78 | ||
| Wardrobe Details | |||
| Base | Titanium | Slot 1 | Black Shaded (50%) |
| Base Genetics | Monchrome Light II | Slot 2 | Black Blanket Ticking (60%) |
| Eyes | Husky | Slot 3 | Black Undercoat (40%) |
| Skin | Black | Slot 4 | White Wings Heavy (80%) |
| Nose | Gray | Slot 5 | White Urajiro (100%) |
| Claws | White | Slot 6 | Silver Undercoat (60%) |
| Variant | Sentinel | Slot 7 | White Spectacles (100%) |
| Background | Eye of the Hurricane | Slot 8 | Black Lupos (60%) |
| Personality | Anxious | Slot 9 | Gray Orca (100%) |
| Stat Changes | SPD +7, AGI +3, STR -3 | Slot 10 | White Cape Ticking (100%) |
| Popcorn II | 3/22/2024 | ||
|---|---|---|---|
 | |||
| Raffle Traits | Pups Bred | ||
| Dust Eyes, Brown Cougar, Cedar Orca, Honey Inverted Panda | 58 | ||
| Wardrobe Details | |||
| Base | Tawny | Slot 1 | Cream Heavy Husky (100%) |
| Base Genetics | Warm Medium II | Slot 2 | Honey Inverted Panda (40%) |
| Eyes | Dust | Slot 3 | Cream Undersides (100%) |
| Skin | Dark Brown | Slot 4 | Shedua Forehead (80%) |
| Nose | Dark Brown | Slot 5 | Brown Cougar (60%) |
| Claws | Brown | Slot 6 | Black Opossum (90%) |
| Variant | Default | Slot 7 | Cedar Orca (50%) |
| Background | Loch Lomond | Slot 8 | Doubloon Inverted Cross (40%) |
| Personality | Sneaky | Slot 9 | Gold Stained Limbs (60%) |
| Stat Changes | SMR +7, AGI +3, SPD -3 | Slot 10 | Black Dilution (50%) |
| Tucana II | 3/29/2024 | ||
|---|---|---|---|
 | |||
| Raffle Traits | Pups Bred | ||
| Holly Eyes, Brown Wings Heavy, Gold Orca, Gold Wings Scarce | 61 | ||
| Wardrobe Details | |||
| Base | Greisen | Slot 1 | Honey Agouti (60%) |
| Base Genetics | Muted Light II | Slot 2 | Brown Wings Heavy (60%) |
| Eyes | Holly | Slot 3 | Gold Wings Scarce (50%) |
| Skin | Brown | Slot 4 | Honey Back Edge Patch (100%) |
| Nose | Tan | Slot 5 | Shedua Back (50%) |
| Claws | Bone | Slot 6 | Gold Orca (30%) |
| Variant | Relaxed | Slot 7 | Dark Brown Half Mask (100%) |
| Background | Sandstone Cavern | Slot 8 | Beige Underbelly (100%) |
| Personality | Capable | Slot 9 | Black Dorsal (50%) |
| Stat Changes | STR +7, WIS +3, AGI -3 | Slot 10 | White Low Bottoms (100%) |
| Jeff III | 4/5/2024 | ||
|---|---|---|---|
 | |||
| Raffle Traits | Pups Bred | ||
| Storm Eyes, Aspen Inverted Panda, White Lupos, White Wings Scarce | 64 | ||
| Wardrobe Details | |||
| Base | Pale | Slot 1 | Aspen Inverted Panda (40%) |
| Base Genetics | Cool Light II | Slot 2 | White Lupos (80%) |
| Eyes | Storm | Slot 3 | Sterling Unders (60%) |
| Skin | Gray | Slot 4 | Cocoa Butcher (90%) |
| Nose | Blue | Slot 5 | Shedua Shaded (50%) |
| Claws | White | Slot 6 | White Wings Scarce (100%) |
| Variant | Default | Slot 7 | Black Half Mask (50%) |
| Background | Chaparral Shrubland | Slot 8 | Silver Spectacles (100%) |
| Personality | Arrogant | Slot 9 | Aspen Dilution (40%) |
| Stat Changes | STR +7, AGI +3, WIS -3 | Slot 10 | White Tamaskan Unders (100%) |
| Timber III | 4/12/2024 | ||
|---|---|---|---|
 | |||
| Raffle Traits | Pups Bred | ||
| Bloodhound Eyes, Dark Brown Merle Patches, Dark Brown Wings Heavy, Gold Cougar | 53 | ||
| Wardrobe Details | |||
| Base | Chert | Slot 1 | Cocoa Points (100%) |
| Base Genetics | Monochrome Medium II | Slot 2 | Gold Cougar (30%) |
| Eyes | Bloodhound | Slot 3 | Cocoa Neck Band (100%) |
| Skin | Brown | Slot 4 | Dark Brown Merle Patches (60%) |
| Nose | Dark Brown | Slot 5 | Cream Trim (100%) |
| Claws | Sandy | Slot 6 | Dark Brown Wings Heavy (70%) |
| Variant | Sentinel | Slot 7 | Cream Marbled Unders (100%) |
| Background | Volcano Eruption | Slot 8 | Cocoa Dilution (40%) |
| Personality | Combative | Slot 9 | Dinar Dorsal (30%) |
| Stat Changes | STR +7, SPD +3, WIS -3 | Slot 10 | White Tamaskan Unders (60%) |
| Del Tule III | 4/19/2024 | ||
|---|---|---|---|
 | |||
| Raffle Traits | Pups Bred | ||
| Smoke Eyes, Aspen Lupos, Aspen Orca, Red Wings Heavy | 65 | ||
| Wardrobe Details | |||
| Base | Rufous | Slot 1 | Aspen Lupos (100%) |
| Base Genetics | Warm Dark II | Slot 2 | Zircon Undersides (100%) |
| Eyes | Smoke | Slot 3 | Red Wings Heavy (60%) |
| Skin | Dark Brown | Slot 4 | Zircon Tamaskan Unders (100%) |
| Nose | Dark Brown | Slot 5 | Auburn Agouti (100%) |
| Claws | Root | Slot 6 | Aspen Orca (80%) |
| Variant | Relaxed | Slot 7 | Auburn Undercoat (80%) |
| Background | Wild Toucans | Slot 8 | Aspen Urajiro (100%) |
| Personality | Bossy | Slot 9 | White Eyebrows (100%) |
| Stat Changes | WIS +7, STR +3, AGI -3 | Slot 10 | White Low Bottoms (100%) |
| Penumbra | 4/26/2024 | ||
|---|---|---|---|
 | |||
| Raffle Traits | Pups Bred | ||
| Steel Blue Eyes, Beige Orca, Cream Merle, Honey Wings | 59 | ||
| Wardrobe Details | |||
| Base | Oroide | Slot 1 | Beige Underfur (100%) |
| Base Genetics | Muted Dark II | Slot 2 | Beige Trim (70%) |
| Eyes | Steel Blue | Slot 3 | Cream Merle (70%) |
| Skin | Dark Brown | Slot 4 | Honey Agouti (50%) |
| Nose | Brown | Slot 5 | Beige Orca (60%) |
| Claws | Oxblood | Slot 6 | Shedua Cape (100%) |
| Variant | Sentinel | Slot 7 | Honey Wings (40%) |
| Background | Desert Traveler | Slot 8 | Brown Back (80%) |
| Personality | Scatterbrained | Slot 9 | Deira Back Patch (100%) |
| Stat Changes | SPD +7, STR +3, SMR -3 | Slot 10 | White Marbled Unders (100%) |
| Kronos | 5/3/2024 | ||
|---|---|---|---|
 | |||
| Raffle Traits | Pups Bred | ||
| Novus Eyes, Black Merle Patches, Black Wings Scarce, Henna Panda | 59 | ||
| Wardrobe Details | |||
| Base | Maltese | Slot 1 | Black Shaded (60%) |
| Base Genetics | Cool Medium II | Slot 2 | Black Shepherd Heavy (50%) |
| Eyes | Novus | Slot 3 | Gray Cape Ticking (100%) |
| Skin | Black | Slot 4 | Black Wings Scarce (100%) |
| Nose | Gray | Slot 5 | Rufous Sallander (30%) |
| Claws | Gray | Slot 6 | Henna Panda (30%) |
| Variant | Sentinel | Slot 7 | Red Dilution (20%) |
| Background | Nocturnal Flowering Cacti | Slot 8 | Black Undercoat (40%) |
| Personality | Anxious | Slot 9 | Black Merle Patches (70%) |
| Stat Changes | SPD +7, AGI +3, STR -3 | Slot 10 | White Predator (90%) |
| Perseus III | 5/10/2024 | ||
|---|---|---|---|
 | |||
| Raffle Traits | Pups Bred | ||
| Dark Hazel Eyes, Brown Cougar, Gold Lupos, Gold Wings | 53 | ||
| Wardrobe Details | |||
| Base | Yellow | Slot 1 | Dinar Inuit Unders (100%) |
| Base Genetics | Warm Light II | Slot 2 | Brown Cougar (100%) |
| Eyes | Dark Hazel | Slot 3 | Deira Bottoms (100%) |
| Skin | Dark Brown | Slot 4 | Cream Tuxedo (80%) |
| Nose | Light Brown | Slot 5 | White Eyebrows (80%) |
| Claws | Root | Slot 6 | Gold Lupos (40%) |
| Variant | Default | Slot 7 | Beige Marbled Unders (100%) |
| Background | Path of Boulders | Slot 8 | Gold Wings (40%) |
| Personality | Sneaky | Slot 9 | Shedua Limbs (50%) |
| Stat Changes | SMR +7, AGI +3, SPD -3 | Slot 10 | White Trim (100%) |
| Hercules II | 5/17/2024 | ||
|---|---|---|---|
 | |||
| Raffle Traits | Pups Bred | ||
| Husky Eyes, Cedar Lupos, Cream Orca, Dark Brown Wings Scarce | 72 | ||
| Wardrobe Details | |||
| Base | Rime | Slot 1 | Cream Highlights (100%) |
| Base Genetics | Monochrome Light II | Slot 2 | Cedar Lupos (30%) |
| Eyes | Husky | Slot 3 | Dark Brown Opossum (70%) |
| Skin | Brown | Slot 4 | Cream Orca (40%) |
| Nose | Brown | Slot 5 | White Nose Line (40%) |
| Claws | Gray | Slot 6 | Dark Brown Wings Scarce (80%) |
| Variant | Relaxed | Slot 7 | White Tail Tip (100%) |
| Background | [Middle America] Nicaragua - Lake Nicaragua | Slot 8 | Dark Brown Blanket Ticking (60%) |
| Personality | Keen | Slot 9 | Cocoa Dilution (80%) |
| Stat Changes | SPD +7, SMR +3, STR -3 | Slot 10 | White Urajiro (100%) |
| Yellowstone II | 5/24/2024 | ||
|---|---|---|---|
 | |||
| Raffle Traits | Pups Bred | ||
| Dust Eyes, Brown Wings, Cream Inverted Panda, Dark Brown Panda | 59 | ||
| Wardrobe Details | |||
| Base | Blonde | Slot 1 | Cream Undersides (100%) |
| Base Genetics | Muted Medium II | Slot 2 | Dark Brown Chest (60%) |
| Eyes | Dust | Slot 3 | Dark Brown Panda (30%) |
| Skin | Dark | Slot 4 | Beige Inuit Unders (50%) |
| Nose | Brown | Slot 5 | Shedua Dilution (80%) |
| Claws | Dark | Slot 6 | Cream Inverted Panda (30%) |
| Variant | Default | Slot 7 | Brown Wings (50%) |
| Background | [Canada] Saskatchewan - Summer Aspen Forest | Slot 8 | White Marbled Unders (60%) |
| Personality | Observant | Slot 9 | Brown Stained Limbs (50%) |
| Stat Changes | WIS +7, SMR +3, AGI -3 | Slot 10 | Beige Inner Ear (50%) |
| Hades II | 5/31/2024 | ||
|---|---|---|---|
 | |||
| Raffle Traits | Pups Bred | ||
| Steel Blue Eyes, Aspen Lupos, Black Wings Heavy, Gray Orca | 48 | ||
| Wardrobe Details | |||
| Base | Nocturne | Slot 1 | Dark Brown Blanket Ticking (50%) |
| Base Genetics | Cool Dark II | Slot 2 | Gray Undersides (60%) |
| Eyes | Steel Blue | Slot 3 | Gray Orca (100%) |
| Skin | Black | Slot 4 | Brown Shoulders (60%) |
| Nose | Brown | Slot 5 | Aspen Points (60%) |
| Claws | Gray | Slot 6 | Aspen Lupos (60%) |
| Variant | Relaxed | Slot 7 | Black Manicou (40%) |
| Background | Ash Meadows | Slot 8 | Black Wings Heavy (70%) |
| Personality | Amiable | Slot 9 | Dark Brown Inverted Cross (40%) |
| Stat Changes | WIS +7, AGI +3, STR -3 | Slot 10 | White Marbled Unders (90%) |
| Lycan | 6/7/2024 | ||
|---|---|---|---|
 | |||
| Raffle Traits | Pups Bred | ||
| Bloodhound Eyes, Gold Lupos, Gold Wings Heavy, Honey Inverted Panda | 55 | ||
| Wardrobe Details | |||
| Base | Saffron | Slot 1 | Dinar Mask (80%) |
| Base Genetics | Warm Medium II | Slot 2 | Honey Undersides (50%) |
| Eyes | Bloodhound | Slot 3 | Honey Inverted Panda (70%) |
| Skin | Dark Brown | Slot 4 | Dark Brown Rump Patch (100%) |
| Nose | Brown | Slot 5 | Gold Lupos (80%) |
| Claws | Dark | Slot 6 | Beige Underbelly (100%) |
| Variant | Default | Slot 7 | Doubloon Back (80%) |
| Background | [USA] Missouri - The Ozarks | Slot 8 | Gold Wings Heavy (100%) |
| Personality | Impulsive | Slot 9 | Brown Shepherd Heavy (60%) |
| Stat Changes | SPD +7, SMR +3, WIS -3 | Slot 10 | Beige Urajiro (100%) |
| Zephyr II | 6/14/2024 | ||
|---|---|---|---|
 | |||
| Raffle Traits | Pups Bred | ||
| Holly Eyes, Black Wings Scarce, Henna Cougar, Red Orca | 71 | ||
| Wardrobe Details | |||
| Base | Biotite | Slot 1 | Black Half Mask (100%) |
| Base Genetics | Monochrome Dark II | Slot 2 | Red Orca (50%) |
| Eyes | Holly | Slot 3 | Aspen Underbelly (100%) |
| Skin | Black | Slot 4 | Henna Cougar (80%) |
| Nose | Black | Slot 5 | Aspen Eyebrows (50%) |
| Claws | Root | Slot 6 | Black Back Heavy Patch (60%) |
| Variant | Relaxed | Slot 7 | Black Dilution (50%) |
| Background | [USA] South Dakota - Badlands | Slot 8 | Black Wings Scarce (100%) |
| Personality | Quiet | Slot 9 | Black Cape Ticking (100%) |
| Stat Changes | WIS +7, SMR +3, SPD -3 | Slot 10 | Aspen Half Cape Ticking (70%) |
| Walker II | 6/21/2024 | ||
|---|---|---|---|
 | |||
| Raffle Traits | Pups Bred | ||
| Novus Eyes, Brown Merle Patches, Brown Panda, Dark Brown Wings Heavy | 66 | ||
| Wardrobe Details | |||
| Base | Almond | Slot 1 | Beige Undercoat (100%) |
| Base Genetics | Muted Light II | Slot 2 | Brown Back (60%) |
| Eyes | Novus | Slot 3 | Brown Panda (80%) |
| Skin | Brown | Slot 4 | White Limbs (40%) |
| Nose | Light | Slot 5 | White Sallander (40%) |
| Claws | White | Slot 6 | Brown Merle Patches (80%) |
| Variant | Default | Slot 7 | Dark Brown Wings Heavy (80%) |
| Background | Fairy Fort | Slot 8 | Shedua Dilution (80%) |
| Personality | Sneaky | Slot 9 | White Marbled Unders (100%) |
| Stat Changes | SMR +7, AGI +3, SPD -3 | Slot 10 | White Urajiro (100%) |
| Brogan III | 6/28/2024 | ||
|---|---|---|---|
 | |||
| Raffle Traits | Pups Bred | ||
| Husky Eyes, Cedar Lupos, White Inverted Panda, White Orca | 59 | ||
| Wardrobe Details | |||
| Base | Chrysoberyl | Slot 1 | Tuff Dilution (50%) |
| Base Genetics | Cool Light II | Slot 2 | White Cape (40%) |
| Eyes | Husky | Slot 3 | White Marbled Unders (100%) |
| Skin | Light | Slot 4 | Cedar Lupos (30%) |
| Nose | Pallid | Slot 5 | Zircon Predator (80%) |
| Claws | White | Slot 6 | White Orca (100%) |
| Variant | Relaxed | Slot 7 | Black Smoke (50%) |
| Background | [Middle America] Panama - Chagres River | Slot 8 | Tuff Unders (30%) |
| Personality | Anxious | Slot 9 | White Inverted Panda (30%) |
| Stat Changes | SPD +7, AGI +3, STR -3 | Slot 10 | White Trim (100%) |
| Alligator III | 7/5/2024 | ||
|---|---|---|---|
 | |||
| Raffle Traits | Pups Bred | ||
| Dark Hazel Eyes, Aspen Lupos, Black Merle Patches, Red Wings Heavy | 56 | ||
| Wardrobe Details | |||
| Base | Dravite | Slot 1 | Black Shaded (100%) |
| Base Genetics | Warm Dark II | Slot 2 | Red Wings Heavy (100%) |
| Eyes | Dark Hazel | Slot 3 | Aspen Lupos (60%) |
| Skin | Dark Brown | Slot 4 | Black Merle Patches (100%) |
| Nose | Dark Brown | Slot 5 | Aspen Unders (50%) |
| Claws | Dark | Slot 6 | Cedar Inuit Unders (30%) |
| Variant | Default | Slot 7 | White Sallander (100%) |
| Background | [USA] Kansas - Twisters | Slot 8 | Auburn Smoke (40%) |
| Personality | Bossy | Slot 9 | White Eyebrows (100%) |
| Stat Changes | WIS +7, STR +3, AGI -3 | Slot 10 | White Cheek Fluff (100%) |
| Circinus II | 7/12/2024 | ||
|---|---|---|---|
 | |||
| Raffle Traits | Pups Bred | ||
| Storm Eyes, Black Lupos, Gray Orca, White Wings Scarce | 43 | ||
| Wardrobe Details | |||
| Base | Steele | Slot 1 | Black Lupos (60%) |
| Base Genetics | Monochrome Medium II | Slot 2 | Silver Shaded (100%) |
| Eyes | Storm | Slot 3 | White Wings Scarce (100%) |
| Skin | Gray | Slot 4 | Black Rump Patch (100%) |
| Nose | Black | Slot 5 | White Socks (50%) |
| Claws | Gray | Slot 6 | Gray Orca (80%) |
| Variant | Sentinel | Slot 7 | Black Half Mask (100%) |
| Background | Seaside Gull Flock | Slot 8 | Silver Neck Band (80%) |
| Personality | Impulsive | Slot 9 | Black Smoke (100%) |
| Stat Changes | SPD +7, SMR +3, WIS -3 | Slot 10 | Gray Saddle Ticking (40%) |
| Saturn | 7/19/2024 | ||
|---|---|---|---|
 | |||
| Raffle Traits | Pups Bred | ||
| Bloodhound Eyes, Beige Orca, Dark Brown Wings, Yellow Lupos | 62 | ||
| Wardrobe Details | |||
| Base | Pecan | Slot 1 | Beige Sallander (60%) |
| Base Genetics | Muted Dark II | Slot 2 | Beige Underbelly (100%) |
| Eyes | Bloodhound | Slot 3 | Yellow Lupos (30%) |
| Skin | Dark | Slot 4 | Beige Orca (60%) |
| Nose | Brown | Slot 5 | Aspen Inverted Opossum (30%) |
| Claws | Dark | Slot 6 | White Socks (100%) |
| Variant | Sentinel | Slot 7 | Dark Brown Half Dorsal (100%) |
| Background | [USA] Idaho - City of Rocks | Slot 8 | Dark Brown Wings (80%) |
| Personality | Dutiful | Slot 9 | White Urajiro (100%) |
| Stat Changes | STR +7, WIS +3, SMR -3 | Slot 10 | Cream Cape Ticking (30%) |
| Zagreus II | 7/26/2024 | ||
|---|---|---|---|
 | |||
| Raffle Traits | Pups Bred | ||
| Steel Blue Eyes, White Lupos, White Merle, White Orca | 65 | ||
| Wardrobe Details | |||
| Base | Galena | Slot 1 | Black Cover (60%) |
| Base Genetics | Cool Medium II | Slot 2 | White Underfur (100%) |
| Eyes | Steel Blue | Slot 3 | Silver Half Mask (100%) |
| Skin | Gray | Slot 4 | White Marbled Unders (60%) |
| Nose | Blue | Slot 5 | Sterling Shoulder Patch (100%) |
| Claws | White | Slot 6 | Sterling Dilution (50%) |
| Variant | Relaxed | Slot 7 | White Orca (100%) |
| Background | [USA] Maine - Acadia National Forest | Slot 8 | Gray Half Cape Ticking (100%) |
| Personality | Charming | Slot 9 | White Merle (60%) |
| Stat Changes | STR +7, SMR +3, WIS -3 | Slot 10 | White Lupos (70%) |
| Stygian | 8/2/2024 | ||
|---|---|---|---|
 | |||
| Raffle Traits | Pups Bred | ||
| Husky Eyes, Aspen Inverted Panda, Aspen Orca, Red Cougar | 66 | ||
| Wardrobe Details | |||
| Base | Arkose | Slot 1 | White Underfur (100%) |
| Base Genetics | Warm Light II | Slot 2 | Aspen Inverted Panda (100%) |
| Eyes | Husky | Slot 3 | Auburn Cover (40%) |
| Skin | Marbled | Slot 4 | Red Cougar (50%) |
| Nose | Marbled | Slot 5 | Auburn Dorsal (80%) |
| Claws | Oxblood | Slot 6 | Auburn Half Mask (40%) |
| Variant | Default | Slot 7 | Aspen Cape Ticking (60%) |
| Background | [USA] Georgia - Providence Canyon | Slot 8 | White Dilution (30%) |
| Personality | Conceited | Slot 9 | Aspen Orca (100%) |
| Stat Changes | STR +7, AGI +3, SMR -3 | Slot 10 | White Eyebrows (100%) |
| Yellowstone III | 8/9/2024 | ||
|---|---|---|---|
 | |||
| Raffle Traits | Pups Bred | ||
| Holly Eyes, Brown Wings Scarce, Honey Cougar, Honey Inverted Panda | 65 | ||
| Wardrobe Details | |||
| Base | Vanilla | Slot 1 | Beige Inverted Opossum (100%) |
| Base Genetics | Muted Medium II | Slot 2 | Dinar Mantle (50%) |
| Eyes | Holly | Slot 3 | Honey Cougar (80%) |
| Skin | Oxblood | Slot 4 | Cedar Half Cape (70%) |
| Nose | Brown | Slot 5 | Dark Brown Smudge Heavy (80%) |
| Claws | Oxblood | Slot 6 | Sepia Inuit Unders (100%) |
| Variant | Relaxed | Slot 7 | Honey Inverted Panda (30%) |
| Background | [USA] Washington - North Cascades | Slot 8 | Dinar Dilution (100%) |
| Personality | Neutral | Slot 9 | Brown Wings Scarce (80%) |
| Stat Changes | STR +2, SPD +2, AGI +2, WIS +2, SMR +2 | Slot 10 | Ducat Underfur (80%) |
| Absalom III | 8/16/2024 | ||
|---|---|---|---|
 | |||
| Raffle Traits | Pups Bred | ||
| Smoke Eyes, Aspen Lupos, Red Cougar, Red Orca | 69 | ||
| Wardrobe Details | |||
| Base | Salt | Slot 1 | Auburn Butcher (30%) |
| Base Genetics | Monochrome Light II | Slot 2 | Auburn Dilution (80%) |
| Eyes | Smoke | Slot 3 | Black Shepherd Heavy (80%) |
| Skin | Black | Slot 4 | Aspen Lupos (50%) |
| Nose | Black | Slot 5 | Red Orca (30%) |
| Claws | Gray | Slot 6 | Black Smudge Heavy (80%) |
| Variant | Sentinel | Slot 7 | Auburn Points (30%) |
| Background | Abandoned Ranch | Slot 8 | Black Snout (90%) |
| Personality | Dishonest | Slot 9 | Red Cougar (20%) |
| Stat Changes | SPD +7, SMR +3, WIS -3 | Slot 10 | White Sallander (100%) |
| Halcyon II | 8/23/2024 | ||
|---|---|---|---|
 | |||
| Raffle Traits | Pups Bred | ||
| Black Wings Scarce, Gray Orca, White Merle | 65 | ||
| Wardrobe Details | |||
| Base | Denim | Slot 1 | Silver Patchy Unders (100%) |
| Base Genetics | Cool Dark II | Slot 2 | Sterling Snout (80%) |
| Eyes | Hetero White & Black | Slot 3 | Black Dorsal (100%) |
| Skin | Black | Slot 4 | Gray Orca (100%) |
| Nose | Black | Slot 5 | Sterling Cross (30%) |
| Claws | Black | Slot 6 | White Low Bottoms (100%) |
| Variant | Relaxed | Slot 7 | White Merle (100%) |
| Background | Abandoned Town Hall | Slot 8 | Black Blanket Ticking (100%) |
| Personality | Sneaky | Slot 9 | Black Wings Scarce (60%) |
| Stat Changes | SMR +7, AGI +3, SPD -3 | Slot 10 | Black Rump Edge (100%) |
| Alkonost II | 8/30/2024 | ||
|---|---|---|---|
 | |||
| Raffle Traits | Pups Bred | ||
| Bloodhound Eyes, Cedar Orca, Cream Merle, Henna Cougar | 67 | ||
| Wardrobe Details | |||
| Base | Rust | Slot 1 | Doubloon Medium Husky (60%) |
| Base Genetics | Warm Medium II | Slot 2 | Auburn Points (80%) |
| Eyes | Bloodhound | Slot 3 | Cream Undercoat (70%) |
| Skin | Dark | Slot 4 | Cream Merle (80%) |
| Nose | Dark | Slot 5 | Cedar Orca (100%) |
| Claws | Root | Slot 6 | Cream Inverted Cross (50%) |
| Variant | Sentinel | Slot 7 | Beige Tamaskan Unders (100%) |
| Background | [USA] Wisconsin - Dells of the Wisconsin River | Slot 8 | Auburn Dilution (40%) |
| Personality | Sneaky | Slot 9 | White Marbled Unders (50%) |
| Stat Changes | SMR +7, AGI +3, SPD -3 | Slot 10 | Henna Cougar (60%) |
| Vestige II | 9/6/2024 | ||
|---|---|---|---|
 | |||
| Raffle Traits | Pups Bred | ||
| Dust Eyes, Brown Wings Scarce, Cedar Lupos, Honey Orca | 74 | ||
| Wardrobe Details | |||
| Base | Buff | Slot 1 | Brown Smoke (50%) |
| Base Genetics | Muted Light II | Slot 2 | Brown Inverted Cross (50%) |
| Eyes | Dust | Slot 3 | Honey Orca (60%) |
| Skin | Brown | Slot 4 | White Inverted Opossum (50%) |
| Nose | Tan | Slot 5 | Cedar Lupos (50%) |
| Claws | Bone | Slot 6 | Beige Dilution (50%) |
| Variant | Relaxed | Slot 7 | Brown Wings Scarce (60%) |
| Background | Sunlit Cave | Slot 8 | Whtie Bottoms (60%) |
| Personality | Sullen | Slot 9 | Dinar Butcher (60%) |
| Stat Changes | AGI +7, STR +3, SMR -3 | Slot 10 | White Eyebrows (60%) |
| Monoceros III | 9/13/2024 | ||
|---|---|---|---|
 | |||
| Raffle Traits | Pups Bred | ||
| Novus Eyes, Black Merle Patches, Honey Wings, Yellow Orca | 63 | ||
| Wardrobe Details | |||
| Base | Pewter | Slot 1 | Doubloon Dilution (80%) |
| Base Genetics | Monochrome Dark II | Slot 2 | Doubloon Shaded (60%) |
| Eyes | Novus | Slot 3 | White Nose Line (60%) |
| Skin | Brown | Slot 4 | Shedua Back (40%) |
| Nose | Brown | Slot 5 | Honey Wings (80%) |
| Claws | Sandy | Slot 6 | Black Merle Patches (80%) |
| Variant | Sentinel | Slot 7 | Yellow Orca (50%) |
| Background | [USA] Arkansas - Ozark National Forest | Slot 8 | Deira Carnage (50%) |
| Personality | Imaginative | Slot 9 | Beige Marbled Unders (100%) |
| Stat Changes | WIS +7, SPD +3, STR -3 | Slot 10 | White Urajiro (60%) |
| Gungnir IV | 9/20/2024 | ||
|---|---|---|---|
 | |||
| Raffle Traits | Pups Bred | ||
| Husky Eyes, Aspen Inverted Panda, White Merle, White Wings Heavy | 62 | ||
| Wardrobe Details | |||
| Base | Diorite | Slot 1 | White Nose Bridge (100%) |
| Base Genetics | Cool Medium II | Slot 2 | Aspen Marbled Unders (50%) |
| Eyes | Husky | Slot 3 | White Wings Heavy (50%) |
| Skin | Blue | Slot 4 | Sterling Dilution (20%) |
| Nose | Blue | Slot 5 | White Paws (100%) |
| Claws | White | Slot 6 | White Elbows (100%) |
| Variant | Relaxed | Slot 7 | Aspen Inverted Panda (30%) |
| Background | Lunar Glacier | Slot 8 | White Half Cape Ticking (40%) |
| Personality | Aloof | Slot 9 | White Low Bottoms (100%) |
| Stat Changes | SMR +7, AGI +3, WIS -3 | Slot 10 | White Merle (100%) |
| Aki | 9/27/2024 | ||
|---|---|---|---|
 | |||
| Raffle Traits | Pups Bred | ||
| Storm Eyes, Black Cougar, Black Wings Scarce, Yellow Orca | 64 | ||
| Wardrobe Details | |||
| Base | Dinar | Slot 1 | Black Wings Scarce (100%) |
| Base Genetics | Warm Dark II | Slot 2 | Honey Cross (100%) |
| Eyes | Storm | Slot 3 | Yellow Orca (40%) |
| Skin | Black | Slot 4 | Sepia Inuit Unders (60%) |
| Nose | Black | Slot 5 | Ducat Back Half Patch (80%) |
| Claws | Root | Slot 6 | Black Cougar (80%) |
| Variant | Default | Slot 7 | Black Stained Limbs (100%) |
| Background | [USA] Massachusetts - Quabbin Reservoir | Slot 8 | White Low Bottoms (100%) |
| Personality | Sullen | Slot 9 | White Socks (80%) |
| Stat Changes | AGI +7, STR +3, SMR -3 | Slot 10 | Black Dilution (100%) |
| Geoff | 10/4/2024 | ||
|---|---|---|---|
 | |||
| Raffle Traits | Pups Bred | ||
| Steel Blue Eyes, Aspen Inverted Panda, Aspen Lupos, White Orca | 68 | ||
| Wardrobe Details | |||
| Base | Sky | Slot 1 | Cocoa Dilution (80%) |
| Base Genetics | Cool Light II | Slot 2 | Brown Stained Limbs (50%) |
| Eyes | Steel Blue | Slot 3 | Aspen Shoulder Patch (80%) |
| Skin | Light | Slot 4 | Gray Mantle (60%) |
| Nose | Light | Slot 5 | Aspen Inverted Panda (50%) |
| Claws | Bone | Slot 6 | White Undercoat (60%) |
| Variant | Relaxed | Slot 7 | Aspen Lupos (40%) |
| Background | Ardnamurchan | Slot 8 | White Orca (100%) |
| Personality | Amiable | Slot 9 | Zircon Points (50%) |
| Stat Changes | WIS +7, AGI +3, STR -3 | Slot 10 | White Predator (80%) |
| Astridine | 10/11/2024 | ||
|---|---|---|---|
 | |||
| Raffle Traits | Pups Bred | ||
| Dark Hazel Eyes, Dark Brown Wings Scarce, Honey Inverted Panda, Yellow Lupos | 64 | ||
| Wardrobe Details | |||
| Base | Sandy | Slot 1 | Dark Brown Points (100%) |
| Base Genetics | Muted Medium II | Slot 2 | Yellow Lupos (60%) |
| Eyes | Dark Hazel | Slot 3 | Dark Brown Arapawa Coat (80%) |
| Skin | Black | Slot 4 | Honey Inverted Panda (30%) |
| Nose | Dark Brown | Slot 5 | Dark Brown Saddle Ticking (100%) |
| Claws | Black | Slot 6 | Black Dilution (100%) |
| Variant | Sentinel | Slot 7 | Dark Brown Wings Scarce (100%) |
| Background | Corrupted Den | Slot 8 | Beige Bottoms (60%) |
| Personality | Anxious | Slot 9 | Beige Eyebrows (80%) |
| Stat Changes | SPD +7, AGI +3, STR -3 | Slot 10 | Dark Brown Snout (80%) |
| Monoceros IV | 10/18/2024 | ||
|---|---|---|---|
 | |||
| Raffle Traits | Pups Bred | ||
| Holly Eyes, Black Wings Heavy, Henna Cougar, Red Wings Scarce | 57 | ||
| Wardrobe Details | |||
| Base | Sarder | Slot 1 | Black Limbs (80%) |
| Base Genetics | Warm Dark II | Slot 2 | Black Shaded (50%) |
| Eyes | Holly | Slot 3 | Ducat Underbelly (100%) |
| Skin | Black | Slot 4 | Henna Cougar (80%) |
| Nose | Black | Slot 5 | Black Neck (100%) |
| Claws | Root | Slot 6 | Black Half Mask (100%) |
| Variant | Default | Slot 7 | Black Dilution (100%) |
| Background | Pumpkin King | Slot 8 | Black Wings Heavy (100%) |
| Personality | Malicious | Slot 9 | Red Wings Scarce (30%) |
| Stat Changes | STR +7, SMR +3, AGI -3 | Slot 10 | Red Dorsal (20%) |
| Vela II | 10/25/2024 | ||
|---|---|---|---|
 | |||
| Raffle Traits | Pups Bred | ||
| Husky Eyes, Black Cougar, Black Lupos, Gray Orca | 74 | ||
| Wardrobe Details | |||
| Base | Steele | Slot 1 | White Predator (100%) |
| Base Genetics | Monochrome Medium II | Slot 2 | Black Arapawa Coat (80%) |
| Eyes | Husky | Slot 3 | Black Smudge Heavy (100%) |
| Skin | Blue | Slot 4 | Silver Sallander (100%) |
| Nose | Blue | Slot 5 | Black Cougar (100%) |
| Claws | White | Slot 6 | Black Lupos (100%) |
| Variant | Sentinel | Slot 7 | Gray Orca (100%) |
| Background | Total Eclipse over Niagara Falls | Slot 8 | Silver Cape Ticking (90%) |
| Personality | Optimistic | Slot 9 | Silver Half Mask (50%) |
| Stat Changes | AGI +7, SPD +3, WIS -3 | Slot 10 | Black Butcher (100%) |
| Alkonost III | 11/1/2024 | ||
|---|---|---|---|
 | |||
| Raffle Traits | Pups Bred | ||
| Smoke Eyes, Aspen Inverted Panda, Pumice Cougar, Shell Merle | 57 | ||
| Wardrobe Details | |||
| Base | Lilac | Slot 1 | Aspen Inverted Panda (50%) |
| Base Genetics | Cool Dark II | Slot 2 | Shell Undercoat (80%) |
| Eyes | Smoke | Slot 3 | Shell Merle (100%) |
| Skin | Black | Slot 4 | Black Vixen Points (80%) |
| Nose | Black | Slot 5 | Black Snout (90%) |
| Claws | Black | Slot 6 | Pumice Cougar (100%) |
| Variant | Default | Slot 7 | Black Stained Limbs (80%) |
| Background | Twisted Path | Slot 8 | Black Smudge (80%) |
| Personality | Conceited | Slot 9 | Shell Toes (100%) |
| Stat Changes | STR +7, AGI +3, SMR -3 | Slot 10 | Pumice Cape Ticking (100%) |
| Corvus III | 11/8/2024 | ||
|---|---|---|---|
 | |||
| Raffle Traits | Pups Bred | ||
| Bloodhound Eyes, Red Cougar, Shell Inverted Panda, Shell Orca | 68 | ||
| Wardrobe Details | |||
| Base | Grossular | Slot 1 | Red Back (100%) |
| Base Genetics | Warm Light II | Slot 2 | Rufous Half Dorsal (100%) |
| Eyes | Bloodhound | Slot 3 | Red Cougar (60%) |
| Skin | Marbled | Slot 4 | Auburn Agouti (60%) |
| Nose | Marbled | Slot 5 | Shell Inverted Panda (20%) |
| Claws | Sandy | Slot 6 | Shell Orca (40%) |
| Variant | Relaxed | Slot 7 | Red Dilution (30%) |
| Background | Courting Eagles | Slot 8 | Rufous Half Dorsal (80%) |
| Personality | Malicious | Slot 9 | White Undercoat (100%) |
| Stat Changes | STR +7, SMR +3, AGI -3 | Slot 10 | White Eyebrows (100%) |
| Halibut II | 11/15/2024 | ||
|---|---|---|---|
 | |||
| Raffle Traits | Pups Bred | ||
| Novus Eyes, Black Cougar, Nocturne Lupos, Nocturne Wings Scarce | 69 | ||
| Wardrobe Details | |||
| Base | Ebony | Slot 1 | Black Smudge (70%) |
| Base Genetics | Muted Dark II | Slot 2 | Sterling Undercoat (80%) |
| Eyes | Novus | Slot 3 | Black Cougar (80%) |
| Skin | Black | Slot 4 | Nocturne Wings Scarce (80%) |
| Nose | Black | Slot 5 | Lily Highlights (80%) |
| Claws | Black | Slot 6 | Nocturne Lupos (60%) |
| Variant | Sentinel | Slot 7 | Pumice Shaded (40%) |
| Background | Sunset: Jocassee Gorge | Slot 8 | Nocturne Tail Tip (80%) |
| Personality | Anxious | Slot 9 | Black Head Stripe (50%) |
| Stat Changes | SPD +7, AGI +3, STR -3 | Slot 10 | Lily Spectacles (70%) |
| Circinus III | 11/22/2024 | ||
|---|---|---|---|
 | |||
| Raffle Traits | Pups Bred | ||
| Nocturne Panda, White Inverted Panda, White Lupos | 73 | ||
| Wardrobe Details | |||
| Base | Nepheline | Slot 1 | Pumice Points (50%) |
| Base Genetics | Monochrome Light II | Slot 2 | Black Back Patch (100%) |
| Eyes | Hetero Black & White | Slot 3 | Pumice Saddle Ticking (100%) |
| Skin | Blue | Slot 4 | Nocturne Panda (60%) |
| Nose | Gray | Slot 5 | Silver Limbs (50%) |
| Claws | White | Slot 6 | White Inverted Panda (20%) |
| Variant | Relaxed | Slot 7 | Gray Wolverine (80%) |
| Background | [USA] Vermont - Quechee Gorge | Slot 8 | White Lupos (80%) |
| Personality | Keen | Slot 9 | Pumice Blanket Ticking (80%) |
| Stat Changes | SPD +7, SMR +3, STR -3 | Slot 10 | White Bottoms (100%) |
| Rogir II | 11/29/2024 | ||
|---|---|---|---|
 | |||
| Raffle Traits | Pups Bred | ||
| Nocturne Wings, Red Panda, White Wings Scarce | 62 | ||
| Wardrobe Details | |||
| Base | Lavender | Slot 1 | Gray Full Mask (40%) |
| Base Genetics | Cool Light II | Slot 2 | White Wings Scarce (30%) |
| Eyes | White | Slot 3 | Aspen Blaze (50%) |
| Skin | Light | Slot 4 | Red Panda (20%) |
| Nose | Marbled | Slot 5 | Aspen Heavy Husky (40%) |
| Claws | Light | Slot 6 | Nocturne Dilution (60%) |
| Variant | Default | Slot 7 | Nocturne Wings (50%) |
| Background | Sunrise: Waterton Lake | Slot 8 | White Gentle Unders (100%) |
| Personality | Sarcastic | Slot 9 | White Cape Ticking (80%) |
| Stat Changes | SMR +7, WIS +3, STR -3 | Slot 10 | White Sallander (100%) |
| Butterscotch III | 12/6/2024 | ||
|---|---|---|---|
 | |||
| Raffle Traits | Pups Bred | ||
| Storm Eyes, Gold Wings Scarce, Nocturne Wings Heavy, Pumice Cougar | 56 | ||
| Wardrobe Details | |||
| Base | Corrosion | Slot 1 | Doubloon Light Husky (100%) |
| Base Genetics | Muted Medium II | Slot 2 | Black Shaded (60%) |
| Eyes | Storm | Slot 3 | Iridium Sallander (50%) |
| Skin | Bistre | Slot 4 | Black Half Mask (100%) |
| Nose | Bistre | Slot 5 | Nocturne Wings Heavy (80%) |
| Claws | Root | Slot 6 | Gold Wings Scarce (50%) |
| Variant | Relaxed | Slot 7 | Cedar Cape Ticking (100%) |
| Background | Yosemite Valley | Slot 8 | Pumice Cougar (80%) |
| Personality | Combative | Slot 9 | Ducat Marbled Unders (60%) |
| Stat Changes | STR +7, SPD +3, WIS -3 | Slot 10 | White Low Bottoms (80%) |
| Lycan II | 12/13/2024 | ||
|---|---|---|---|
 | |||
| Raffle Traits | Pups Bred | ||
| Dust Eyes, Beige Inverted Panda, Honey Wings, Yellow Merle | 66 | ||
| Wardrobe Details | |||
| Base | Sulphur | Slot 1 | Rufous Mantle (80%) |
| Base Genetics | Warm Medium II | Slot 2 | Gold Socks (90%) |
| Eyes | Dust | Slot 3 | Honey Dorsal (100%) |
| Skin | Dark | Slot 4 | Dark Brown Blanket Ticking (60%) |
| Nose | Tan | Slot 5 | Beige Inverted Panda (30%) |
| Claws | Sandy | Slot 6 | Yellow Merle (60%) |
| Variant | Default | Slot 7 | Cream Marbled Unders (100%) |
| Background | Fertile Garden Mounds | Slot 8 | Sepia Half Cape (60%) |
| Personality | Dedicated | Slot 9 | Honey Wings (60%) |
| Stat Changes | WIS +7, STR +3, SMR -3 | Slot 10 | White Soay Unders (80%) |
| Javier | 12/20/2024 | ||
|---|---|---|---|
 | |||
| Raffle Traits | Pups Bred | ||
| Husky Eyes, Black Wings Scarce, Henna Cougar | 65 | ||
| Wardrobe Details | |||
| Base | Greisen | Slot 1 | Pumice Cross (100%) |
| Base Genetics | Muted Light II | Slot 2 | Sterling Shaded (100%) |
| Eyes | Husky | Slot 3 | Cream Light Husky (100%) |
| Skin | Umbral | Slot 4 | Henna Cougar (100%) |
| Nose | Mud | Slot 5 | Red Butcher (100%) |
| Claws | Root | Slot 6 | Black Butcher (100%) |
| Variant | Default | Slot 7 | Auburn Wings Heavy (100%) |
| Background | [USA] Tennessee - Great Smoky Mountains | Slot 8 | Black Wings Scarce (33%) |
| Personality | Pessimistic | Slot 9 | Pumice Cape Ticking (100%) |
| Stat Changes | AGI +7, STR +3, SPD -3 | Slot 10 | Zircon Undersides (80%) |
| Lupin | 12/27/2024 | ||
|---|---|---|---|
 | |||
| Raffle Traits | Pups Bred | ||
| Holly Eyes, Nocturne Lupos, Pumice Cougar, White Inverted Panda | 63 | ||
| Wardrobe Details | |||
| Base | Bedrock | Slot 1 | Aspen Inverted Opossum (80%) |
| Base Genetics | Monochrome Dark II | Slot 2 | White Inverted Panda (40%) |
| Eyes | Holly | Slot 3 | Nocturne Lupos (80%) |
| Skin | Black | Slot 4 | Gray Unders (30%) |
| Nose | Black | Slot 5 | Pumice Cougar (80%) |
| Claws | Black | Slot 6 | White Cape (100%) |
| Variant | Default | Slot 7 | Iridium Half Cape Ticking (100%) |
| Background | Deep Forest | Slot 8 | White Nose Line (100%) |
| Personality | Pessimistic | Slot 9 | Black Back Stripe (60%) |
| Stat Changes | AGI +7, STR +3, SPD -3 | Slot 10 | White Toes (100%) |
2025 Studs
2025 Studs
| Hephaestus III | 1/3/2025 | ||
|---|---|---|---|
 | |||
| Raffle Traits | Pups Bred | ||
| Nocturne Wings Heavy, White Orca, White Wings Scarce | 53 | ||
| Wardrobe Details | |||
| Base | Coot | Slot 1 | Silver Shaded (30%) |
| Base Genetics | Cool Dark II | Slot 2 | Nocturne Cheek Fluff (100%) |
| Eyes | Ice | Slot 3 | White Half Socks (100%) |
| Skin | Black | Slot 4 | White Dilution (30%) |
| Nose | Black | Slot 5 | Pumice Blanket (60%) |
| Claws | Black | Slot 6 | White Muzzle Patch (100%) |
| Variant | Default | Slot 7 | Nocturne Wings Heavy (100%) |
| Background | Merry Winter Town | Slot 8 | White Wings Scarce (30%) |
| Personality | Dedicated | Slot 9 | White Ear Tips (100%) |
| Stat Changes | WIS +7, STR +3, SMR -3 | Slot 10 | White Orca (100%) |
| Aki II | 1/10/2025 | ||
|---|---|---|---|
 | |||
| Raffle Traits | Pups Bred | ||
| Honey Cougar, Honey Wings Heavy, Shell Inverted Panda | 64 | ||
| Wardrobe Details | |||
| Base | Ducat | Slot 1 | Yellow Marbled Unders (100%) |
| Base Genetics | Warm Light II | Slot 2 | Honey Wings Heavy (100%) |
| Eyes | Glass | Slot 3 | Shell Inverted Panda (60%) |
| Skin | Marbled | Slot 4 | Dark Brown Saddle (100%) |
| Nose | Oxblood | Slot 5 | Cream Undercoat (100%) |
| Claws | Wild | Slot 6 | Ducat Bottoms (100%) |
| Variant | Sentinel | Slot 7 | Shell Predator (60%) |
| Background | Serpentine Tors | Slot 8 | Honey Cougar (100%) |
| Personality | Selfish | Slot 9 | Beige Undersides (30%) |
| Stat Changes | SMR +7, STR +3, WIS -3 | Slot 10 | Shedua Cape (50%) |
| Draven III | 1/17/2025 | ||
|---|---|---|---|
 | |||
| Raffle Traits | Pups Bred | ||
| Cedar Orca, Gold Cougar, Nocturne Panda | 54 | ||
| Wardrobe Details | |||
| Base | Lupin | Slot 1 | Yellow Back Half Patch (50%) |
| Base Genetics | Muted Dark II | Slot 2 | Cedar Orca (60%) |
| Eyes | Mercury | Slot 3 | Doubloon Patchy Unders (100%) |
| Skin | Bistre | Slot 4 | Shedua Cross (40%) |
| Nose | Dark | Slot 5 | Gold Cougar (25%) |
| Claws | Dark | Slot 6 | Beige Paws (80%) |
| Variant | Sentinel | Slot 7 | Dark Brown Smudge Heavy (80%) |
| Background | Swan Love Lake | Slot 8 | Yellow Back Patch (70%) |
| Personality | Fair | Slot 9 | Nocturne Panda (45%) |
| Stat Changes | SMR +7, WIS +3, SPD -3 | Slot 10 | Iridium Cape (80%) |
| Agate II | 1/24/2025 | ||
|---|---|---|---|
 | |||
| Raffle Traits | Pups Bred | ||
| Dark Hazel Eyes, Nocturne Lupos, Nocturne Wings, Shell Merle | 56 | ||
| Wardrobe Details | |||
| Base | Maltese | Slot 1 | Gold Socks (50%) |
| Base Genetics | Cool Medium II | Slot 2 | Yellow Urajiro (100%) |
| Eyes | Dark Hazel | Slot 3 | Brown Shoulder Patch (100%) |
| Skin | Gray | Slot 4 | Sepia Unders (70%) |
| Nose | Blue | Slot 5 | Cedar Urajiro (70%) |
| Claws | Gray | Slot 6 | Shell Merle (30%) |
| Variant | Default | Slot 7 | Nocturne Wings (60%) |
| Background | Shortgrass Prairie | Slot 8 | Gray Chest (70%) |
| Personality | Reliable | Slot 9 | Nocturne Lupos (65%) |
| Stat Changes | STR +7, AGI +3, SPD -3 | Slot 10 | Shell Grizzle (30%) |
| Lacerta II | 1/31/2025 | ||
|---|---|---|---|
 | |||
| Raffle Traits | Pups Bred | ||
| Steel Blue Eyes, Cream Orca, Dark Brown Panda, Gold Lupos | 58 | ||
| Wardrobe Details | |||
| Base | Sterling | Slot 1 | Gold Lupos (40%) |
| Base Genetics | Monochrome Medium II | Slot 2 | Gold Arapawa Coat (30%) |
| Eyes | Steel Blue | Slot 3 | Pumice Saddle (80%) |
| Skin | Mud | Slot 4 | Shedua Shaded (70%) |
| Nose | Bistre | Slot 5 | Dark Brown Panda (40%) |
| Claws | Oxblood | Slot 6 | Cream Unders (60%) |
| Variant | Relaxed | Slot 7 | Cream Orca (50%) |
| Background | [USA] Maryland - Calvert Cliffs | Slot 8 | Shedua Limbs (60%) |
| Personality | Keen | Slot 9 | White Low Bottoms (80%) |
| Stat Changes | SPD +7, SMR +3, STR -3 | Slot 10 | White Eyebrows (50%) |
| Xander | 2/7/2025 | ||
|---|---|---|---|
 | |||
| Raffle Traits | Pups Bred | ||
| Dark Brown Merle Patches, Honey Merle, Pumice Cougar | 57 | ||
| Wardrobe Details | |||
| Base | Xanthic | Slot 1 | Cream Bottoms (90%) |
| Base Genetics | Warm Medium II | Slot 2 | Rufous Panda (60%) |
| Eyes | Warm Gray | Slot 3 | Black Cape Ticking (100%) |
| Skin | Grime | Slot 4 | Black Elbow Patch (30%) |
| Nose | Grime | Slot 5 | Doubloon Unders (100%) |
| Claws | Grime | Slot 6 | Deira Limbs (30%) |
| Variant | Default | Slot 7 | Honey Merle (80%) |
| Background | Big Thicket | Slot 8 | Dark Brown Merle Patches (75%) |
| Personality | Quiet | Slot 9 | Auburn Arapawa Coat (80%) |
| Stat Changes | WIS +7, SMR +3, SPD -3 | Slot 10 | Pumice Cougar (90%) |
| Aeolus | 2/14/2025 | ||
|---|---|---|---|
 | |||
| Raffle Traits | Pups Bred | ||
| Bloodhound Eyes, Aspen Lupos, Red Wings, Shell Merle | 60 | ||
| Wardrobe Details | |||
| Base | Feldspar | Slot 1 | Shell Urajiro (100%) |
| Base Genetics | Muted Light II | Slot 2 | White Inner Ear (100%) |
| Eyes | Bloodhound | Slot 3 | Auburn Shaded (40%) |
| Skin | Pink | Slot 4 | Shell Inverted Agouti (100%) |
| Nose | Pink | Slot 5 | Shell Merle (100%) |
| Claws | Dius | Slot 6 | Red Arapawa Coat (40%) |
| Variant | Relaxed | Slot 7 | Red Wings (50%) |
| Background | Swan Nest | Slot 8 | White Cape Ticking (100%) |
| Personality | Charming | Slot 9 | Aspen Lupos (50%) |
| Stat Changes | STR +7, WIS +3, SMR -3 | Slot 10 | White Predator (100%) |
| Epoch | 2/21/2025 | ||
|---|---|---|---|
 | |||
| Raffle Traits | Pups Bred | ||
| Smoke Eyes, Nocturne Panda, Nocturne Wings Heavy, Shell Orca | 35 | ||
| Wardrobe Details | |||
| Base | Chrysoberyl | Slot 1 | Iridium Arapawa Coat (100%) |
| Base Genetics | Cool Light II | Slot 2 | Nocturne Panda (60%) |
| Eyes | Smoke | Slot 3 | Iridium Inuit Unders (50%) |
| Skin | Mud | Slot 4 | Shell Orca (100%) |
| Nose | Gray | Slot 5 | Shell Neck Band (40%) |
| Claws | Peat | Slot 6 | Pumice Cape Ticking (100%) |
| Variant | Sentinel | Slot 7 | Pumice Half Dorsal (100%) |
| Background | Romantic Coastal Dinner | Slot 8 | Nocturne Wings Heavy (80%) |
| Personality | Sullen | Slot 9 | Shell Unders (70%) |
| Stat Changes | AGI +7, STR +3, SMR -3 | Slot 10 | White Bottoms (80%) |
| Corvus IV | 2/28/2025 | ||
|---|---|---|---|
 | |||
| Raffle Traits | Pups Bred | ||
| Lavender Eyes, Gray Catshark Light, Pumice Catshark Heavy, Pumice Cougar | 66 | ||
| Wardrobe Details | |||
| Base | Melchior | Slot 1 | Shell Undersides (100%) |
| Base Genetics | Monochrome Light II | Slot 2 | Black Cover (50%) |
| Eyes | Lavender | Slot 3 | Pumice Cougar (60%) |
| Skin | Dark Brown | Slot 4 | Cocoa Back Heavy Patch (90%) |
| Nose | Bistre | Slot 5 | Pumice Catshark Heavy (80%) |
| Claws | Gray | Slot 6 | Cocoa Limbs (80%) |
| Variant | Relaxed | Slot 7 | Shell Carnage (80%) |
| Background | Winter Snake Valley | Slot 8 | Gray Catshark Light (60%) |
| Personality | Imaginative | Slot 9 | White Low Bottoms (100%) |
| Stat Changes | WIS +7, SPD +3, STR -3 | Slot 10 | White Neck Band (70%) |
| Draven IV | 3/7/2025 | ||
|---|---|---|---|
 | |||
| Raffle Traits | Pups Bred | ||
| Mint Eyes, Black Catshark Heavy, Cream Lupos, Pumice Catshark Light | 69 | ||
| Wardrobe Details | |||
| Base | Obsidian | Slot 1 | Silver Neck Band (50%) |
| Base Genetics | Monochrome Dark II | Slot 2 | Sterling Arapawa Coat (80%) |
| Eyes | Mint | Slot 3 | Black Catshark Heavy (100%) |
| Skin | Dark | Slot 4 | Pumice Catshark Light (80%) |
| Nose | Dark | Slot 5 | Shell Underbelly (80%) |
| Claws | Dark | Slot 6 | Silver Tail Tip (100%) |
| Variant | Sentinel | Slot 7 | Cream Lupos (40%) |
| Background | Raging Tornado | Slot 8 | Pumice Shaded (80%) |
| Personality | Quiet | Slot 9 | Silver Eyebrows (60%) |
| Stat Changes | WIS +7, SMR +3, SPD -3 | Slot 10 | Pumice Cape Ticking (80%) |
| Buckeye III | 3/14/2025 | ||
|---|---|---|---|
 | |||
| Raffle Traits | Pups Bred | ||
| Bismuth Eyes, Brown Catshark Light, Brown Panda, Honey Catshark Heavy | 62 | ||
| Wardrobe Details | |||
| Base | Dravite | Slot 1 | Shell Nose Line (100%) |
| Base Genetics | Warm Dark II | Slot 2 | Honey Catshark Heavy (100%) |
| Eyes | Bismuth | Slot 3 | Cream Inverted Agouti (50%) |
| Skin | Marbled | Slot 4 | Ducat Shaded (50%) |
| Nose | Marbled | Slot 5 | Cream Cape Ticking (100%) |
| Claws | Brown | Slot 6 | Brown Catshark Light (50%) |
| Variant | Default | Slot 7 | Brown Panda (60%) |
| Background | Marble Arch Cave | Slot 8 | Cream Tamaskan Unders (100%) |
| Personality | Scatterbrained | Slot 9 | White Gentle Unders (50%) |
| Stat Changes | SPD +7, STR +3, SMR -3 | Slot 10 | White Eyebrows (50%) |
| Luka | 3/21/2025 | ||
|---|---|---|---|
 | |||
| Raffle Traits | Pups Bred | ||
| Novus Eyes, Dark Brown Catshark Heavy, Dark Brown Catshark Light, Shell Merle | 69 | ||
| Wardrobe Details | |||
| Base | Tuff | Slot 1 | Cocoa Cape Ticking (100%) |
| Base Genetics | Muted Medium II | Slot 2 | Dark Brown Agouti (50%) |
| Eyes | Novus | Slot 3 | Beige Half Cape Ticking (40%) |
| Skin | Anomaly | Slot 4 | Dark Brown Catshark Heavy (100%) |
| Nose | Bistre | Slot 5 | Dark Brown Catshark Light (50%) |
| Claws | Mud | Slot 6 | Shell Bottoms (100%) |
| Variant | Relaxed | Slot 7 | Beige Gentle Unders (100%) |
| Background | [USA] South Carolina - The Oak Tree Forest | Slot 8 | Tuff Neck Band (100%) |
| Personality | Malicious | Slot 9 | Shell Merle (60%) |
| Stat Changes | STR +7, SMR +3, AGI -3 | Slot 10 | White Carnage (50%) |
| Geoff II | 3/28/2025 | ||
|---|---|---|---|
 | |||
| Raffle Traits | Pups Bred | ||
| Husky Eyes, Black Catshark Light, Gray Catshark Heavy, Nocturne Wings Heavy | 68 | ||
| Wardrobe Details | |||
| Base | Nocturne | Slot 1 | Sterling Undercoat (100%) |
| Base Genetics | Cool Dark II | Slot 2 | Black Saddle (40%) |
| Eyes | Husky | Slot 3 | Gray Catshark Heavy (100%) |
| Skin | Gray | Slot 4 | Black Manicou (80%) |
| Nose | Gray | Slot 5 | Iridium Inuit Unders (100%) |
| Claws | White | Slot 6 | White Gentle Unders (100%) |
| Variant | Sentinel | Slot 7 | White Eyebrows (100%) |
| Background | Lunar Prairie | Slot 8 | Black Catshark Light (100%) |
| Personality | Sullen | Slot 9 | Nocturne Wings Heavy (100%) |
| Stat Changes | AGI +7, STR +3, SMR -3 | Slot 10 | Silver Half Cape Ticking (100%) |
| Absalom IV | 4/4/2025 | ||
|---|---|---|---|
 | |||
| Raffle Traits | Pups Bred | ||
| Storm Eyes, Brown Catshark Heavy, Henna Catshark Light, Yellow Merle | 68 | ||
| Wardrobe Details | |||
| Base | Calcite | Slot 1 | White Tamaskan Unders (100%) |
| Base Genetics | Warm Light II | Slot 2 | Sepia Back Patch (100%) |
| Eyes | Storm | Slot 3 | Brown Shaded (80%) |
| Skin | Wild | Slot 4 | Gold Rump Patch (75%) |
| Nose | Tan | Slot 5 | Yellow Merle (60%) |
| Claws | Brown | Slot 6 | Saffron Half Socks (50%) |
| Variant | Relaxed | Slot 7 | White Urajiro (80%) |
| Background | Jurassic Coast | Slot 8 | Henna Catshark Light (40%) |
| Personality | Bossy | Slot 9 | Brown Catshark Heavy (40%) |
| Stat Changes | WIS +7, STR +3, AGI -3 | Slot 10 | Cream Highlights (75%) |
| Popcorn III | 4/11/2025 | ||
|---|---|---|---|
 | |||
| Raffle Traits | Pups Bred | ||
| Dust Eyes, Brown Wings, Honey Catshark Light, Red Catshark Heavy | 50 | ||
| Wardrobe Details | |||
| Base | Saffron | Slot 1 | Brown Wings (100%) |
| Base Genetics | Warm Medium II | Slot 2 | Cream Arapawa Coat (60%) |
| Eyes | Dust | Slot 3 | Honey Catshark Heavy (100%) |
| Skin | Dark | Slot 4 | Dark Brown Forehead (60%) |
| Nose | Brown | Slot 5 | White Tamaskan Unders (50%) |
| Claws | Light | Slot 6 | Red Catshark Heavy (30%) |
| Variant | Sentinel | Slot 7 | Brown Back (80%) |
| Background | [USA] Oklahoma - Black Mesa | Slot 8 | Sepia Dilution (100%) |
| Personality | Sarcastic | Slot 9 | Cream Half Cape (50%) |
| Stat Changes | SMR +7, WIS +3, STR -3 | Slot 10 | Cream Eyebrows (100%) |
| Otsoa IV | 4/18/2025 | ||
|---|---|---|---|
 | |||
| Raffle Traits | Pups Bred | ||
| Bismuth Eyes, Henna Catshark Heavy, Red Catshark Light, Red Lupos | 77 | ||
| Wardrobe Details | |||
| Base | Acanthite | Slot 1 | Black Limbs (100%) |
| Base Genetics | Monochrome Medium II | Slot 2 | Black Cape (100%) |
| Eyes | Bismuth | Slot 3 | Auburn Smudge Heavy (100%) |
| Skin | Mud | Slot 4 | Black Rump (80%) |
| Nose | Black | Slot 5 | Auburn Shaded (60%) |
| Claws | Root | Slot 6 | Pumice Cape Ticking (100%) |
| Variant | Default | Slot 7 | Red Catshark Light (60%) |
| Background | Super Flower Blood Moon Total Lunar Eclipse | Slot 8 | Henna Catshark Heavy (80%) |
| Personality | Independent | Slot 9 | Red Lupos (40%) |
| Stat Changes | WIS +7, AGI +3, SPD -3 | Slot 10 | Black Inverted Cross (60%) |
| Seraph II | 4/25/2025 | ||
|---|---|---|---|
 | |||
| Raffle Traits | Pups Bred | ||
| Nocturne Wings, Pumice Cougar, Shell Inverted Panda | 63 | ||
| Wardrobe Details | |||
| Base | Sepia | Slot 1 | Black Undercoat (50%) |
| Base Genetics | Muted Dark II | Slot 2 | Dinar Inverted Cross (100%) |
| Eyes | Copper | Slot 3 | Rufous Points (80%) |
| Skin | Corrupt | Slot 4 | Nocturne Wings (50%) |
| Nose | Bistre | Slot 5 | Shedua Dilution (100%) |
| Claws | Corrupt | Slot 6 | Black Forehead (100%) |
| Variant | Relaxed | Slot 7 | Shell Inverted Panda (30%) |
| Background | Sunset: Shadow of Mount Rainier | Slot 8 | Pumice Cougar (80%) |
| Personality | Amiable | Slot 9 | Dinar Back Edge Patch (80%) |
| Stat Changes | WIS +7, AGI +3, STR -3 | Slot 10 | Black Blanket (50%) |
| Porkchop | 5/2/2025 | ||
|---|---|---|---|
 | |||
| Raffle Traits | Pups Bred | ||
| Smoke Eyes, Black Leopard Shark, White Inverted Panda, White Wings | 66 | ||
| Wardrobe Details | |||
| Base | Diorite | Slot 1 | Black Smoke (40%) |
| Base Genetics | Cool Medium II | Slot 2 | White Tail Tip (100%) |
| Eyes | Smoke | Slot 3 | Black Dilution (80%) |
| Skin | Lusxnei | Slot 4 | White Highlights (100%) |
| Nose | Blue | Slot 5 | White Wings (100%) |
| Claws | Lusxnei | Slot 6 | Black Half Mask (100%) |
| Variant | Default | Slot 7 | White Inverted Panda (30%) |
| Background | Cold Cave | Slot 8 | Black Leopard Shark (80%) |
| Personality | Aloof | Slot 9 | Black Limbs (50%) |
| Stat Changes | SMR +7, AGI +3, WIS -3 | Slot 10 | White Underbelly (100%) |
| Hades III | 5/9/2025 | ||
|---|---|---|---|
 | |||
| Raffle Traits | Pups Bred | ||
| Cedar Lupos, Cream Orca, Honey Leopard Shark | 64 | ||
| Wardrobe Details | |||
| Base | Buff | Slot 1 | Cream Whitetail Spots (100%) |
| Base Genetics | Muted Light II | Slot 2 | Dark Brown Back (80%) |
| Eyes | Hetero Brown & Blue | Slot 3 | Cream Orca (80%) |
| Skin | Dark Brown | Slot 4 | Gold Cover (30%) |
| Nose | Brown | Slot 5 | Beige Cape Ticking (50%) |
| Claws | Bistre | Slot 6 | Cedar Lupos (60%) |
| Variant | Sentinel | Slot 7 | Beige Undercoat (60%) |
| Background | Dead Stream Swamp | Slot 8 | White Tamaskan Unders (60%) |
| Personality | Trusting | Slot 9 | Honey Leopard Shark (80%) |
| Stat Changes | AGI +7, WIS +3, SMR -3 | Slot 10 | Ducat Dilution (40%) |
| Romeo II | 5/16/2025 | ||
|---|---|---|---|
 | |||
| Raffle Traits | Pups Bred | ||
| Mint Eyes, Brown Panda, Gray Leopard Shark, Nocturne Lupos | 73 | ||
| Wardrobe Details | |||
| Base | Sphalerite | Slot 1 | Yellow Socks (60%) |
| Base Genetics | Monochrome Dark II | Slot 2 | Nocturne Lupos (75%) |
| Eyes | Mint | Slot 3 | White Nose Line (85%) |
| Skin | Grime | Slot 4 | Beige Undersides (70%) |
| Nose | Gray | Slot 5 | Yellow Urajiro (80%) |
| Claws | Fern | Slot 6 | Black Tail Tip (100%) |
| Variant | Default | Slot 7 | Cedar Patchy Unders (70%) |
| Background | Tornado | Slot 8 | Gray Leopard Shark (90%) |
| Personality | Combative | Slot 9 | White Carnage (80%) |
| Stat Changes | STR +7, SPD +3, WIS -3 | Slot 10 | Brown Panda (40%) |
| Wiglaf III | 5/23/2025 | ||
|---|---|---|---|
 | |||
| Raffle Traits | Pups Bred | ||
| Beige Orca, Dark Brown Leopard Shark, Honey Wings Heavy | 62 | ||
| Wardrobe Details | |||
| Base | Jacinthe | Slot 1 | Honey Wings Heavy (100%) |
| Base Genetics | Warm Light II | Slot 2 | Dark Brown Head Stripe (100%) |
| Eyes | Light Glass | Slot 3 | Beige Orca (100%) |
| Skin | Tan | Slot 4 | Honey Mask (60%) |
| Nose | Tan | Slot 5 | Dark Brown Blanket (50%) |
| Claws | Bone | Slot 6 | Dark Brown Leopard Shark (100%) |
| Variant | Relaxed | Slot 7 | Gold Shaded (30%) |
| Background | [USA] South Carolina - The Oak Tree Forest | Slot 8 | Beige Eyebrows (100%) |
| Personality | Helpful | Slot 9 | Honey Limbs (50%) |
| Stat Changes | SMR +7, SPD +3, AGI -3 | Slot 10 | Beige Toes (50%) |
| Vale | 5/30/2025 | ||
|---|---|---|---|
 | |||
| Raffle Traits | Pups Bred | ||
| Storm Eyes, Nocturne Lupos, Nocturne Wings Heavy, Pumice Leopard Shark | 66 | ||
| Wardrobe Details | |||
| Base | Chrysoberyl | Slot 1 | Black Shaded (40%) |
| Base Genetics | Cool Light II | Slot 2 | Nocturne Undercoat (80%) |
| Eyes | Storm | Slot 3 | Black Back Heavy Patch (100%) |
| Skin | Apollo | Slot 4 | Nocturne Lupos (80%) |
| Nose | Squall | Slot 5 | White Cheek Fluff (100%) |
| Claws | Aarluk | Slot 6 | Nocturne Wings Heavy (50%) |
| Variant | Default | Slot 7 | Pumice Leopard Shark (80%) |
| Background | [USA] Florida - Gulf Coast | Slot 8 | White Medium Husky (60%) |
| Personality | Lazy | Slot 9 | Sterling Dilution (40%) |
| Stat Changes | AGI +7, WIS +3, SPD -3 | Slot 10 | White Inner Ear (100%) |
| Yugen II | 6/6/2025 | ||
|---|---|---|---|
 | |||
| Raffle Traits | Pups Bred | ||
| Holly Eyes, Brown Catshark Light, Brown Leopard Shark, Cream Lupos | 60 | ||
| Wardrobe Details | |||
| Base | Sandy | Slot 1 | Dinar Sakiz Mask (60%) |
| Base Genetics | Muted Medium II | Slot 2 | Dark Brown Smoke (30%) |
| Eyes | Holly | Slot 3 | Brown Catshark Light (100%) |
| Skin | Marbled | Slot 4 | Shell Light Husky (100%) |
| Nose | Marbled | Slot 5 | Brown Leopard Shark (100%) |
| Claws | Oxblood | Slot 6 | Shell Blaze (100%) |
| Variant | Sentinel | Slot 7 | Shell Inner Ear (100%) |
| Background | [Middle America] Honduras - Jeannette Kawas Park | Slot 8 | Doubloon Inverted Cross (30%) |
| Personality | Bossy | Slot 9 | Cream Lupos (60%) |
| Stat Changes | WIS +7, STR +3, AGI -3 | Slot 10 | Shell Nose Line (100%) |
| Hyde II | 6/13/2025 | ||
|---|---|---|---|
 | |||
| Raffle Traits | Pups Bred | ||
| Gray Orca, Henna Leopard Shark, Red Wings Scarce | 62 | ||
| Wardrobe Details | |||
| Base | Salt | Slot 1 | Shedua Trim (70%) |
| Base Genetics | Monochrome Light II | Slot 2 | Gray Orca (100%) |
| Eyes | Dark Glass | Slot 3 | Shell Inverted Agouti (50%) |
| Skin | Blend | Slot 4 | Shedua Shaded (60%) |
| Nose | Conflux | Slot 5 | Red Wings Scarce (40%) |
| Claws | Blend | Slot 6 | Auburn Patchy Unders (40%) |
| Variant | Default | Slot 7 | Shell Underfur (60%) |
| Background | [USA] New Hampshire - Waterfall | Slot 8 | Henna Leopard Shark (60%) |
| Personality | Malicious | Slot 9 | Shedua Eyebrows (100%) |
| Stat Changes | STR +7, SMR +3, AGI -3 | Slot 10 | Rufous Smudge (60%) |
| Draven V | 6/20/2025 | ||
|---|---|---|---|
 | |||
| Raffle Traits | Pups Bred | ||
| Bloodhound Eyes, Black Wings Heavy, Henna Catshark Heavy, Red Leopard Shark | 64 | ||
| Wardrobe Details | |||
| Base | Auburn | Slot 1 | Black Shaded (100%) |
| Base Genetics | Warm Dark II | Slot 2 | Black Wings Heavy (100%) |
| Eyes | Bloodhound | Slot 3 | Henna Catshark Heavy (100%) |
| Skin | Black | Slot 4 | Red Leopard Shark (70%) |
| Nose | Black | Slot 5 | Red Back (40%) |
| Claws | Black | Slot 6 | Cream Inverted Opossum (20%) |
| Variant | Sentinel | Slot 7 | Auburn Points (70%) |
| Background | Burn the Bridges | Slot 8 | Red Dilution (40%) |
| Personality | Combative | Slot 9 | Cream Underbelly (60%) |
| Stat Changes | STR +7, SPD +3, WIS -3 | Slot 10 | Black Saddle Ticking (70%) |
| Xenon III | 6/27/2025 | ||
|---|---|---|---|
 | |||
| Raffle Traits | Pups Bred | ||
| Honey Merle, Nocturne Panda, Nocturne Wings Scarce | 61 | ||
| Wardrobe Details | |||
| Base | Cocoa | Slot 1 | Gold Undersides (50%) |
| Base Genetics | Muted Dark II | Slot 2 | Brown Cheek Fluff (70%) |
| Eyes | Honey | Slot 3 | Gray Smudge (90%) |
| Skin | Oxblood | Slot 4 | Black Inverted Cross (90%) |
| Nose | Oxblood | Slot 5 | Nocturne Wings Scarce (90%) |
| Claws | Bone | Slot 6 | Cedar Cover (80%) |
| Variant | Default | Slot 7 | Nocturne Panda (85%) |
| Background | [USA] Illinois - Farmlands | Slot 8 | Pumice Saddle Ticking (60%) |
| Personality | Charming | Slot 9 | Cream Irish (80%) |
| Stat Changes | STR +7, SMR +3, WIS -3 | Slot 10 | Honey Merle (50%) |
| Halibut III | 7/4/2025 | ||
|---|---|---|---|
 | |||
| Raffle Traits | Pups Bred | ||
| Brown Merle Patches, Cedar Lupos, Dark Brown Leopard Shark | 40 | ||
| Wardrobe Details | |||
| Base | Greisen | Slot 1 | Magnolia Underbelly (100%) |
| Base Genetics | Muted Light II | Slot 2 | Dark Brown Leopard Shark (70%) |
| Eyes | Light Glass | Slot 3 | Brown Agouti (60%) |
| Skin | Oxblood | Slot 4 | Brown Butcher (60%) |
| Nose | Dark | Slot 5 | Shedua Points (60%) |
| Claws | Light | Slot 6 | Shedua Dilution (60%) |
| Variant | Relaxed | Slot 7 | Brown Merle Patches (40%) |
| Background | Forest Clearing | Slot 8 | Dinar Mark (80%) |
| Personality | Pessimistic | Slot 9 | Dark Brown Half Mask (100%) |
| Stat Changes | AGI +7, STR +3, SPD -3 | Slot 10 | Cedar Lupos (50%) |
| Saturn II | 7/11/2025 | ||
|---|---|---|---|
 | |||
| Raffle Traits | Pups Bred | ||
| Steel Blue Eyes, Black Catshark Light, Pumice Catshark Heavy, White Orca | 64 | ||
| Wardrobe Details | |||
| Base | Denim | Slot 1 | Gray Patchy Unders (80%) |
| Base Genetics | Cool Dark II | Slot 2 | White Urajiro (80%) |
| Eyes | Steel Blue | Slot 3 | Iridium Blanket (60%) |
| Skin | Aarluk | Slot 4 | Black Catshark Light (80%) |
| Nose | Aarluk | Slot 5 | White Orca (100%) |
| Claws | Aarluk | Slot 6 | Black Dilution (80%) |
| Variant | Sentinel | Slot 7 | Pumice Catshark Heavy (50%) |
| Background | Winter Valles Caldera | Slot 8 | White Eyebrows (100%) |
| Personality | Sullen | Slot 9 | White Tail Tip (100%) |
| Stat Changes | AGI +7, STR +3, SMR -3 | Slot 10 | White Half Socks (100%) |
| Lycan III | 7/25/2025 | ||
|---|---|---|---|
 | |||
| Raffle Traits | Pups Bred | ||
| Lavender Eyes, Aspen Lupos, Aspen Orca, Henna Catshark Light | 65 | ||
| Wardrobe Details | |||
| Base | Arkose | Slot 1 | Rufous Vixen Points (30%) |
| Base Genetics | Warm Light II | Slot 2 | Rufous Smudge (30%) |
| Eyes | Lavender | Slot 3 | Aspen Orca (60%) |
| Skin | Pink | Slot 4 | Henna Catshark Light (50%) |
| Nose | Pink | Slot 5 | Auburn Half Mask (50%) |
| Claws | Dius | Slot 6 | Auburn Cover (60%) |
| Variant | Relaxed | Slot 7 | Lily Spectacles (100%) |
| Background | Romantic Coastal Dinner | Slot 8 | Aspen Eyebrows (80%) |
| Personality | Humble | Slot 9 | Beige Low Bottoms (100%) |
| Stat Changes | AGI +7, WIS +3, STR -3 | Slot 10 | Aspen Lupos (60%) |
| Vela III | 8/1/2025 | ||
|---|---|---|---|
 | |||
| Raffle Traits | Pups Bred | ||
| Dark Hazel Eyes, Brown Catshark Heavy, Cream Orca, Dark Brown Wings Heavy | 69 | ||
| Wardrobe Details | |||
| Base | Blonde | Slot 1 | Dark Brown Vixen Points (100%) |
| Base Genetics | Muted Medium II | Slot 2 | Cream Highlights (100%) |
| Eyes | Dark Hazel | Slot 3 | Shedua Mantle (100%) |
| Skin | Dark Brown | Slot 4 | Cream Underfur (60%) |
| Nose | Brown | Slot 5 | Cream Gentle Unders (50%) |
| Claws | Brown | Slot 6 | Brown Catshark Heavy (30%) |
| Variant | Relaxed | Slot 7 | Cream Eyebrows (60%) |
| Background | Creswell Crag | Slot 8 | Cream Orca (60%) |
| Personality | Dutiful | Slot 9 | Dark Brown Wings Heavy (80%) |
| Stat Changes | STR +7, WIS +3, SMR -3 | Slot 10 | Cream Chipmunk Back Stripes (80%) |
| Moonglade | 8/8/2025 | ||
|---|---|---|---|
 | |||
| Raffle Traits | Pups Bred | ||
| Husky Eyes, Pumice Cougar, White Inverted Panda, White Wings | 38 | ||
| Wardrobe Details | |||
| Base | Pale | Slot 1 | Iridium Smudge Heavy (80%) |
| Base Genetics | Cool Light II | Slot 2 | Pumice Saddle Ticking (100%) |
| Eyes | Husky | Slot 3 | White Grizzle (70%) |
| Skin | Pallid | Slot 4 | Pumice Cougar (80%) |
| Nose | Spectre | Slot 5 | White Wings (70%) |
| Claws | Spectre | Slot 6 | Iridium Half Mask (100%) |
| Variant | Sentinel | Slot 7 | White Inverted Panda (20%) |
| Background | [Rain] Appalachian Temperate Rainforest | Slot 8 | Sterling Dilution (80%) |
| Personality | Sullen | Slot 9 | Silver Nose Bridge (100%) |
| Stat Changes | AGI +7, STR +3, SMR -3 | Slot 10 | Silver Cape Ticking (100%) |
| Valentino II | 8/15/2025 | ||
|---|---|---|---|
 | |||
| Raffle Traits | Pups Bred | ||
| Black Catshark Heavy, Black Leopard Shark, Red Catshark Light | 85 | ||
| Wardrobe Details | |||
| Base | Rufous | Slot 1 | Black Half Mask (60%) |
| Base Genetics | Warm Dark II | Slot 2 | Black Leopard Shark (100%) |
| Eyes | Light Glass | Slot 3 | Auburn Arapawa Coat (50%) |
| Skin | Corrupt | Slot 4 | Red Catshark Light (40%) |
| Nose | Conflux | Slot 5 | Black Catshark Heavy (70%) |
| Claws | Corrupt | Slot 6 | Red Shaded (30%) |
| Variant | Default | Slot 7 | Auburn Dilution (70%) |
| Background | Headless Horseman Bridge | Slot 8 | Ducat Tamaskan Unders (100%) |
| Personality | Dishonest | Slot 9 | Beige Gentle Unders (70%) |
| Stat Changes | SPD +7, SMR +3, WIS -3 | Slot 10 | Cream Highlights (40%) |
| Oberon II | 8/22/2025 | ||
|---|---|---|---|
 | |||
| Raffle Traits | Pups Bred | ||
| Dust Eyes, Brown Leopard Shark, Dark Brown Wings Heavy, Shell Inverted Panda | 57 | ||
| Wardrobe Details | |||
| Base | Siqoq | Slot 1 | Cream Inverted Manicou (50%) |
| Base Genetics | Monochrome Light II | Slot 2 | Dark Brown Wings Heavy (50%) |
| Eyes | Dust | Slot 3 | Brown Leopard Shark (60%) |
| Skin | Wild | Slot 4 | Black Blanket (90%) |
| Nose | Mud | Slot 5 | Pumice Underbelly (100%) |
| Claws | Mud | Slot 6 | Deira Inverted Opossum (50%) |
| Variant | Relaxed | Slot 7 | Shell Inuit Unders (80%) |
| Background | Shortgrass Prairie | Slot 8 | Shell Inverted Panda (30%) |
| Personality | Anxious | Slot 9 | Pumice Blanket Ticking (60%) |
| Stat Changes | SPD +7, AGI +3, STR -3 | Slot 10 | Brown Cape Ticking (50%) |
| Zeus II | 8/29/2025 | ||
|---|---|---|---|
 | |||
| Raffle Traits | Pups Bred | ||
| Bismuth Eyes, Nocturne Wings, Pumice Cougar, Shell Merle | 60 | ||
| Wardrobe Details | |||
| Base | Malachite | Slot 1 | Nocturne Dilution (100%) |
| Base Genetics | Cool Medium II | Slot 2 | Black Predator (60%) |
| Eyes | Bismuth | Slot 3 | Shell Merle (40%) |
| Skin | Mud | Slot 4 | Black Half Mask (100%) |
| Nose | Grime | Slot 5 | Black Carnage (80%) |
| Claws | Peat | Slot 6 | Black Limbs (50%) |
| Variant | Default | Slot 7 | Pumice Cougar (80%) |
| Background | Forest Earthquake | Slot 8 | Nocturne Wings (50%) |
| Personality | Dishonest | Slot 9 | White Low Bottoms (100%) |
| Stat Changes | SPD +7, SMR +3, WIS -3 | Slot 10 | Black Back Edge Patch (80%) |
| Meatloaf II | 9/5/2025 | ||
|---|---|---|---|
 | |||
| Raffle Traits | Pups Bred | ||
| Mint Eyes, Aspen Orca, Honey Catshark Heavy, White Wings Heavy | 75 | ||
| Wardrobe Details | |||
| Base | Isabel | Slot 1 | Auburn Arapawa Coat (40%) |
| Base Genetics | Muted Light II | Slot 2 | Auburn Shaded (60%) |
| Eyes | Mint | Slot 3 | Lily Points (40%) |
| Skin | Dius | Slot 4 | White Wings Heavy (60%) |
| Nose | Pallid | Slot 5 | Honey Catshark Heavy (40%) |
| Claws | Dius | Slot 6 | Lily Dilution (60%) |
| Variant | Relaxed | Slot 7 | Aspen Orca (100%) |
| Background | Sunrise: Mer Bleue Wetland | Slot 8 | Aspen Underbelly (100%) |
| Personality | Anxious | Slot 9 | White Cape Ticking (100%) |
| Stat Changes | SPD +7, AGI +3, STR -3 | Slot 10 | White Irish (80%) |
| Yarran II | 9/12/2025 | ||
|---|---|---|---|
 | |||
| Raffle Traits | Pups Bred | ||
| Dark Brown Catshark Light, Dark Brown Panda, Dark Brown Leopard Shark | 70 | ||
| Wardrobe Details | |||
| Base | Salt | Slot 1 | Black Butcher (100%) |
| Base Genetics | Monochrome Light II | Slot 2 | Honey Arapawa Coat (40%) |
| Eyes | Light Glass | Slot 3 | Dark Brown Leopard Shark (40%) |
| Skin | Dark Brown | Slot 4 | Dark Brown Panda (40%) |
| Nose | Gray | Slot 5 | Gold Soay Unders (40%) |
| Claws | Gray | Slot 6 | Honey Trim (100%) |
| Variant | Default | Slot 7 | Dark Brown Catshark Light (40%) |
| Background | Winterfat Trail | Slot 8 | Black Vixen Points (50%) |
| Personality | Reliable | Slot 9 | White Urajiro (100%) |
| Stat Changes | STR +7, AGI +3, SPD -3 | Slot 10 | White Neck Band (100%) |
| Eigengrau II | 9/19/2025 | ||
|---|---|---|---|
 | |||
| Raffle Traits | Pups Bred | ||
| Bloodhound Eyes, Henna Leopard Shark, Red Catshark Heavy, Red Wings Heavy | 60 | ||
| Wardrobe Details | |||
| Base | Grossular | Slot 1 | Rufous Smoke (80%) |
| Base Genetics | Warm Light II | Slot 2 | Black Back Stripe (100%) |
| Eyes | Bloodhound | Slot 3 | Black Smudge (100%) |
| Skin | Corrupt | Slot 4 | Red Catshark Heavy (40%) |
| Nose | Corrupt | Slot 5 | Black Belly Stripe (100%) |
| Claws | Corrupt | Slot 6 | Henna Leopard Shark (80%) |
| Variant | Sentinel | Slot 7 | Red Highlights (100%) |
| Background | California Wildfire | Slot 8 | Red Wings Heavy (80%) |
| Personality | Impulsive | Slot 9 | Auburn Dilution (100%) |
| Stat Changes | SPD +7, SMR +3, WIS -3 | Slot 10 | White Urajiro (100%) |
| Moonglade II | 9/26/2025 | ||
|---|---|---|---|
 | |||
| Raffle Traits | Pups Bred | ||
| Lavender Eyes, Nocturne Lupose, Pumice Leopard Shark, Shell Orca | 75 | ||
| Wardrobe Details | |||
| Base | Lilac | Slot 1 | Lily Dilution (100%) |
| Base Genetics | Cool Dark II | Slot 2 | Iridium Smudge Heavy (100%) |
| Eyes | Lavender | Slot 3 | Lily Patchy Unders (50%) |
| Skin | Noctiluca | Slot 4 | Shell Gentle Unders (100%) |
| Nose | Umbral | Slot 5 | Shell Orca (60%) |
| Claws | Noctiluca | Slot 6 | Pumice Blanket Ticking (100%) |
| Variant | Relaxed | Slot 7 | Nocturne Lupos (40%) |
| Background | Giant Effigy | Slot 8 | Pumice Full Rump (50%) |
| Personality | Sullen | Slot 9 | Pumice Leopard Shark (100%) |
| Stat Changes | AGI +7, STR +3, SMR -3 | Slot 10 | Shell Nose Line (80%) |
| Crow | 10/3/2025 | ||
|---|---|---|---|
 | |||
| Raffle Traits | Pups Bred | ||
| Novus Eyes, Brown Leopard Shark, Dark Brown Catshark Heavy, Shell Merle | 75 | ||
| Wardrobe Details | |||
| Base | Antler | Slot 1 | Dark Brown Inverted Cross (40%) |
| Base Genetics | Muted Medium II | Slot 2 | Brown Half Saddle (50%) |
| Eyes | Novus | Slot 3 | Dark Brown Arapawa Coat (60%) |
| Skin | Dark Brown | Slot 4 | Brown Dilution (100%) |
| Nose | Dark | Slot 5 | Shell Medium Husky (40%) |
| Claws | Light | Slot 6 | Dark Brown Catshark Heavy (70%) |
| Variant | Sentinel | Slot 7 | Brown Leopard Shark (70%) |
| Background | [Canada] New Brunswick - Hopewell Rocks | Slot 8 | Shell Merle (70%) |
| Personality | Anxious | Slot 9 | White Highlights (60%) |
| Stat Changes | SPD +7, AGI +3, STR -3 | Slot 10 | White Underbelly (80%) |
| Penumbra II | 10/10/2025 | ||
|---|---|---|---|
 | |||
| Raffle Traits | Pups Bred | ||
| Dust Eyes, Brown Catshark Light, Honey Leopard Shark, Honey Orca | 78 | ||
| Wardrobe Details | |||
| Base | Biotite | Slot 1 | Honey Orca (100%) |
| Base Genetics | Monochrome Dark II | Slot 2 | Honey Underbelly (100%) |
| Eyes | Dust | Slot 3 | Dark Brown Manicou (50%) |
| Skin | Conflux | Slot 4 | Saffron Inuit Unders (80%) |
| Nose | Bistre | Slot 5 | Brown Catshark Light (50%) |
| Claws | Light | Slot 6 | Honey Leopard Shark (70%) |
| Variant | Default | Slot 7 | Brown Back Half Patch (100%) |
| Background | Sunset: Shadow of Mount Rainier | Slot 8 | Dinar Half Cape (80%) |
| Personality | Combative | Slot 9 | Sepia Inverted Cross (40%) |
| Stat Changes | STR +7, SPD +3, WIS -3 | Slot 10 | Ducat Trim (100%) |
| Monsoon | 10/17/2025 | ||
|---|---|---|---|
 | |||
| Raffle Traits | Pups Bred | ||
| Smoke Eyes, Nocturne Lupos, Nocturne Wings, White Merle | 93 | ||
| Wardrobe Details | |||
| Base | Sky | Slot 1 | Nocturne Lupos (100%) |
| Base Genetics | Cool Light II | Slot 2 | Nocturne Dilution (100%) |
| Eyes | Smoke | Slot 3 | White Highlights (100%) |
| Skin | Gray | Slot 4 | White Underbelly (100%) |
| Nose | Gray | Slot 5 | White Merle (100%) |
| Claws | Gray | Slot 6 | Nocturne Wings (60%) |
| Variant | Default | Slot 7 | Iridium Points (100%) |
| Background | Winter Fluffy Trees | Slot 8 | White Half Mask (50%) |
| Personality | Quiet | Slot 9 | White Eyebrows (100%) |
| Stat Changes | WIS +7, SMR +3, SPD -3 | Slot 10 | White Whitetail Spots (100%) |
| Hrothgar | 10/24/2025 | ||
|---|---|---|---|
 | |||
| Raffle Traits | Pups Bred | ||
| Black Leopard Shark, Black Lupos, Red Orca | TBD | ||
| Wardrobe Details | |||
| Base | Sarder | Slot 1 | Black Sallander (100%) |
| Base Genetics | Warm Dark II | Slot 2 | Auburn Carnage (60%) |
| Eyes | Dark Glass | Slot 3 | Black Lupos (80%) |
| Skin | Vile | Slot 4 | Red Orca (40%) |
| Nose | Vile | Slot 5 | Black Points (40%) |
| Claws | Corrupt | Slot 6 | Black Blanket (60%) |
| Variant | Relaxed | Slot 7 | Black Leopard Shark (80%) |
| Background | Burning Scarecrow | Slot 8 | Cream Gentle Unders (40%) |
| Personality | Reliable | Slot 9 | Black Dilution (80%) |
| Stat Changes | STR +7, AGI +3, SPD -3 | Slot 10 | Cream Low Bottoms (50%) |
| Agate III | 10/31/2025 | ||
|---|---|---|---|
 | |||
| Raffle Traits | Pups Bred | ||
| Honey Catshark Light, Xanthic Lupos, Xanthic Orca | TBD | ||
| Wardrobe Details | |||
| Base | Ebony | Slot 1 | Yellow Underbelly (100%) |
| Base Genetics | Muted Dark II | Slot 2 | Dark Brown Blanket Ticking (70%) |
| Eyes | Light Glass | Slot 3 | Shedua Vixen Points (40%) |
| Skin | Bistre | Slot 4 | Xanthic Lupos (70%) |
| Nose | Bistre | Slot 5 | Sepia Dilution (60%) |
| Claws | Bistre | Slot 6 | Sepia Undercoat (100%) |
| Variant | Default | Slot 7 | Honey Catshark Light (60%) |
| Background | Hudson Bay | Slot 8 | Xanthic Orca (70%) |
| Personality | Reliable | Slot 9 | Saffron Gentle Unders (100%) |
| Stat Changes | STR +7, AGI +3, SPD -3 | Slot 10 | Saffron Trim (100%) |